Introduction
Thank you for choosing REIkit to help you create your investor website!
In this guide, we will go over the basics for website construction and give you some pointers to make it both attractive and effective for generating motivated seller leads. Let’s get started!
Website Settings
Setup steps before creating your first real estate investor website
Before you start building the pages of your personalized site, it’s helpful to set up your company profile and the images associated with your business such as your logo, as well as your own profile picture which will be used to personalize your site.
1. Upload your profile picture and logo, update account settings
To do this, head to the Account Settings page, located on the bottom of the left-hand navigation of the dashboard.
From this page you can upload a personal picture – this is a great way to allow potential clients to feel like they are getting to know you personally – a logo, and your contact information.
2. Fill in your company information
Try to make your profile as complete as possible, including the State.
How can I create a real estate investor website?
The following steps will allow you to create your first investor website.
1. Go to Websites
Once you have filled in your account profile information, click on Websites in the left-hand navigation of your screen.
2. Enter Website Name
You will want to name your website. The name of the website isn’t shown publicly, however it is used to generate the reikit.net subdomain on which your website will live until you add your own domain.
This site will initially be created on a reikit.net subdomain, essentially a smaller subdivision of the primary reikit.net website.
It will look like this: “yourwebsitename.reikit.net”.
This way, if you don’t add your own domain, you will still be able to access your site through that subdomain.
TIP: You can change your subdomain name later if you don’t like it.
3. Choose a Content Library
After coming up with your site name, go beneath the entry line and choose your content library. As of the writing of this guide, there is only one option, Investor Website, so select it.
3. Generate Website
When you click Generate Website, your site will generate from the content library. Once it is successfully created, you will notice that the left-hand navigation has changed, revealing new different icons that contain operations that you can use to customize your site: Pages, Menus, Forms, Templates, Settings, Domain. I will go over each of these icons shortly.
The first step after creating the site is to add a domain that you own. Don’t worry if you don’t have your own domain yet – that’s what the reikit.net subdomain is for.
If you don’t have a domain yet, click the Cancel button, which will then direct you to the Settings page. If you do have one, then go to the next section for instructions on adding it.
How can I add a domain to my website?
Here is the process to attach a domain to your new investor website.
1. Go to DOMAIN in the left navigation
You may already be on the Domains screen if you just created a website.
If not, you can get to the Domains screen by using the left hand navigation. In the left-hand navigation for your website, you will see the DOMAIN icon near the bottom. After clicking on that navigation item you will be taken to a screen where you can input your own domain address.
2. Enter your already purchased domain name
To add a domain simply enter the name of a domain that you have purchased from GoDaddy, for example: www.myawesomedomain.com and then click the SET DOMAIN NAME button on the top right of the page.
3. Set up the domain DNS on your domain registrar
Now that your domain has been added, the page will refresh and you will be provided with instructions to set it up with a “www cname” or a Canonical Name.
You will need to do this through your domain’s registrar DNS servers. By setting a Canonical Name for your site, you will make it so that traffic to www on your domain be redirected properly to your new website.
4. Set up a domain redirect
While you’re accomplishing this in your domain registrar settings, you should also add a redirect for your site so that anyone typing in your site address without the “www” is redirected to your site with the “www”.
Securing your investor website with a Secure Certificate
In today’s digital age, having a secure certificate is a great way to impress upon visitors that your site is safe to use.
Nowadays, people are savvy to the potential risks of placing their personal information online. Marking your site with a secure certificate will provide any visitors with peace of mind; this is important for building client trust and establishing your website brand as that of a reputable investor.
In addition, Google is boosting sites in their rankings that have secure certificates for their search pages. Ranking in Google is a high priority, so establishing your site with a certificate is very important. Additionally, Google’s Chrome browser will alert users if your site doesn’t have a certificate by explicitly warning visitors that your site is “Not Secure”, possibly turning them away on the landing page.
Steps to secure your website with a secure certificate
Let’s go over the steps to secure your investor website with an SSL certificate.
1. Go to your website’s Domain editing screen
Click the Domain button on the left-hand navigation.
2. Select the Secure Website checkbox
There will be a checkbox you can check to make your site secure. Make sure that it is checked.
Once you have selected to secure your website, you will need to click the Save button to save the change.
3. Configure your DNS on your Domain registrar to validate your certificate
After you click Save, the page will refresh and show you the status of your secure certificates. If it does not refresh automatically after 20 seconds, you will need to refresh it manually.
You will see statuses for both the “www” version of your domain and the version without the “www”. Both will need to be validated to complete the website certificate installation process.
The Certificate installation process goes through the following steps, and where you are in the process is shown in the validation status next to each certificate:
Validation Statuses for Secure Certificate Installation
Requesting certificate – we are generating the certificate on the back end and installing it.
When you see this status, refresh the Domains page after around 2 minutes and you should see the next status.
Pending validation – you will be given instructions to add 2 more cnames, in the same way that you added one for your domain. These CNAMES will validate that you own the domain and that you are authorized to create a certificate for it.
When you create these CNAMES, initially set the TTL to the lowest possible setting so that you can see whether your changes are working. In GoDaddy for example the lowest possible TTL is a half hour.
After you have created your CNAMES, you will need to wait the length of the TTL plus about 2 hours before you should expect the certificate status to change. After that time has elapsed, go back to the domain settings for your website and refresh the page. At that point you should be able to see the next status.
Success – That domain was validated.
Validation Expired – The domain validation steps were not completed. If you would like to restart the process you have to remove the certificate and add it back.
What investor website settings can be customized?
Now that your site is all set up and you’re ready to customize and fine-tune it, let’s go through what you can control.
Basic Settings
Name
You can set the name of the website. The website name is only for your own identification to be able to distinguish different websites from each other if you have created multiple websites.
Subdomain
The subdomain is only important if you do not have a domain. In the case that you do not have a domain for your website, you can set the subdomain on the reikit.net domain that matches your brand.
Header Brand
Logo
Your logo shows up in the header of your investor website. It’s a good way to differentiate yourself from other sites.
Brand Name
The Brand Name shows in the header of your webpage next to your logo, so make sure they work well together. If your logo already has your brand name in it, you may want to leave this empty.
Template Variables
When you first view the pages of your new website online, you will notice instances of “Los Angeles” sprinkled throughout the text on the page, and used throughout the website.
However, when you view these pages in edit mode within REI/kit, you’ll notice that {{ service_area }} appears instead of Los Angeles.
Do not change or overwrite these instances of {{ service_area }}.
To change Los Angeles to your area, the only thing you need to do is replace the words Los Angeles in the ‘Template Variables’ section of the Website Settings screen with your area.
Once you make this change, the system will auto-populate the {{ service area }} variables throughout your website with the new text.
Here’s how to do it:
The ‘Template Variables’ section currently displays this:
{% assign service_area = “Los Angeles, CA” %}
You leave it exactly as is, except for just replacing everything between the quotes with your City, State or City and surrounding areas, nationwide, and so on.
Example:
{% assign service_area = “Birmingham, AL and surrounding areas” %}
Contact Info
Contact Phone
Your business phone, area code included. If entered, it will show up in your header and your website visitors will be able to click it as a CTA (Call to Action).
This can also be used in your template and website content as a variable:
{{ website.contact_phone }}
Contact Email
Your business phone, area code included. If entered, it will show up in your header and your website visitors will be able to click it as a CTA (Call to Action).
This can also be used in your template and website content as a variable:
{{ website.contact_email }}
Other Company Information
You can add even more contact information for the benefit of your visitors, although this is not used on the site by default. These fields can be used in the site using the following variables:
{{ website.company_name }}

{{ website.company_street_address }}

{{ website.company_city }}

{{ website.company_state }}
Owner Avatar
The owner avatar comes from the account owner’s profile settings. It is be included in your website content using the tag:
{{ website.owner_avatar }}
This can make your site a little more personal and put a face to the name! Add a good, professional photo to really make it your own.
Social Links
These are the little icons you see at the bottom of other blogs or webpages that link to your social media presences. Fill in as many as you like and they will appear in the header and footer of each page of your website.
Tracking
These settings allow you to add tracking to your site, which is important for good SEO tactics and intelligent website content updates.
Google Analytics ID
Create a Google Analytics account at google.com/analytics; this is free for you to do. Once this is done, set up a property in that website’s toolkit. This property will be your website’s URL address:
www.yourdomain.com
Choose a view to report certain metrics and data from your REIkit site.
Then add your personal Google Analytics ID.
Go to your PROPERTY page in the Google Analytics toolkit and click Tracking Info > Tracking Code. The ID will be at the top. Copy and paste that onto the indicated input field on your REIkit Settings page.
Facebook Pixel ID
Make a Facebook Ads account; just like with Analytics this is completely free. Then go to your Ads Manager and select Pixels from navigation. This should be under the Assets heading. Then you can find “Actions” and select “View Pixel Code”. Copy and paste this into the input field.
You will need this for Facebook retargeting ads for anyone that has visited your site but has not submitted their lead information.
Google Search Console
Set up a free account with Google Search Console, then set up a Property just as you did with Analytics. You will need to verify your website ownership using the REIkit website’s Meta Tag input field, which is embedded in the HTML code. Once you have verified this, you go back to Console and click “Verify” to finalize.
Bing Webmaster Tools
Create a Bing account and log in. Then choose Option 2 and copy and paste the <meta> tag into the input field. Just like with Search Console, once this is finalized you should be able to return to Bing and Verify your site.
Theme Settings
You can select between 4 different font styles: Body, Heading, Header Brand, and Menu. These can be customized with the fonts installed for the website library that you are using. These will allow you to additionally personalize your site if you wish.
Stylesheets
If you ever want to go even more personal, you can write your own stylesheets for implementation into your site. You are provided an example of these for you to edit your styles.
Javascript
Should you have some experience with Javascript and want to add something to the header, such as a chat widget or Google tag manager, you’re able to do that in the specified Javascript field included at the bottom of this page.
Final Note on the Settings page
At the bottom of your Website’s Settings page you’ll see a large “Destroy Website” button in red.
Destroying your website is a permanent action that also removes your data domains and certificate subscriptions. Be sure before you finalize this action, as you will lose all the work you put into building the site, and validating the domain and certificates.
Creating and Editing Investor Website Pages
Before you can understand how to create and editing a pages on your REIkit investor website, you should understand all of the components that make up your site.
What are the building blocks of a page in REIkit?
Each and every webpage is made up of multiple building blocks that make up the whole:
Website settings (variables, styles, scripts)
--> Webpage Template (header, footer, menus, forms)
----> Webpage
-------> Featured Image
-------> Title
-------> Hero Content
-------> Webpage Content
-------> Selected Menus
-------> Selected Forms
Within REI/kit you can edit each component of a webpage separately by accessing the specific editing area for each of settings, templates, and pages.
Settings
You can specify and change the contact information, social links, scripts and styles and the like of each individual page. This can help differentiate various pages between one another.
Templates
Different templates can help you generate content for different purposes. For instance, all house listing pages should be similar and use similar headers, contents, and footers.
Pages
Featured Image
Set a featured image to be the main focus of each individual page. This will be displayed in the hero section of the page, near the top. Each page can have it’s own featured image.
Title
The title will show up in the hero section of the page.
Hero Content
The hero content of a page is the content shown at the top of the page, explaining what a visitor will find down below. This should be punchy and attention-grabbing as well as informative.
Webpage Content
This is the main content of the page, where you can make the page come to life. It should also have any forms or content that the page is focused around.
Optional
Menus
On the right-hand side of the webpage editing screen, you will find options to select which menu to show in the header, sidebar, and or footer of the page.
Forms
You can also modify the forms that display the page: those on the page itself in the hero section, the sidebar, or the footer.
How can I edit a page?
You can edit pages using the following steps:
1. Go to Pages
Click the Pages navigation item in the left-hand navigation.
2. Edit Webpage
From the list of webpages, you can either click on the title, or the EDIT action on the page to begin editing it.
Before you do anything, note the “Save Changes” button. This finalizes any decisions you’ve made and no changes go through unless you click here.
Next, take a look at the “Published” toggle at the top of the screen.
Pages can only be viewed in Published mode, so be sure to activate this if you want to see what the page looks at during any stage of the process.
You can modify the following aspects of your page:
Title
This is what will show at the tops of the screen, along with the Hero Content in the Hero section of the webpage.
Slug
The slug is the portion of the URL in your browser address bar that defines this page as separate from the rest of your site. Use only lowercase words and dashes to separate your words and avoid special characters.
This will be automatically generated for you when the page is created, but you can customize it as part of smart SEO practices, for example to append a location to the url like “sell-my-house-in-los-angeles”.
Set as Home Page
On the right-hand side of the screen, you can set any one page as your home page. When you make a page your home page, any previous home page will be unset from being the home page.
Hero Content
This text shows in the Hero section of the webpage just below the title.
Main Page Content
This is the main content of the page as presented inside the template you’ve selected for the page. You can edit this inside the editor provided for you or use code view if you want to have more control over the styling of the page.
Menus
When you select menus on a page, you are setting them to appear on the current page that you’re editing. To put a page itself on a menu, on the other hand, you will need to head to the “Menus” section of the site editor on the left-hand navigation.
The location of your menus is defined by the template you’ve selected, so make sure that any menu you want to be included on the page is included as part of your base template. Menus not included in the template won’t show up, even if they are included on your edited page interface.
Forms
Just like with menus, you can opt to have these show up on any page provided they also exist as part of the page’s template.
Template
This is where you can edit the overall template of the page and its content, as we’ve discussed above. Most of the time this template will be appropriate for the content you’re creating, but you are given the option to change it if you desire.
Featured Image
This is the image behind the hero content at the top of the page. You can use the default image provided from the image library with the toolkit, or upload one from your own computer.
This is a great free resource for images for your website:
SEO Settings for a page
You can and should fine tune your SEO settings for each page.
SEO Title
This is the Search-Engine-Optimized title that shows up in Google search results. This should include your most important keyword for page ranking.
SEO Keywords
These are for Bing search results. Bing should typically account for around 10% of your traffic. If you’d rather avoid Bing entirely, you can leave this blank as Google can view this field negatively if it sees what amounts to keyword spamming.
SEO Description
This is the snippet that will appear in Google search results. It’s often the first explanation potential visitors have for what your site page entails, so it needs to be descriptive but attractive, drawing people in without being “spammy”. Although Google claims to not use this as a ranking signal, it will highlight the keywords inside of the snippet that matched a person’s search.
Reset from Library
This will regenerate your page according to the content library from which it was originally created. It’s a good way to reset your progress and start fresh if you don’t like how a page is turning out, but it removes any changes you’ve made so far, so decide carefully.
How can I create a page?
Now let’s go through the process of creating your own webpage.
1. Go to Pages in the menu
Go to “Pages” on the left-hand navigation. At the bottom of the page list, you will see a “New Webpage” button. This page can be created in one of two ways.
2. Select a Page Type
You can select to create your page as either a “blank” page using one of the provided templates; or you can create it by using a pre-generated page in your page library. The second option will build the page with content already written so that you are not starting with a blank slate.
2.a Select a Blank Page
Blank pages require you to select your desired template to continue, of which there are five:
Landing Page- This is good for home pages or any page where you want to capture traffic or leads.
Page Template- This is a standard webpage template, suitable for a variety of uses.
Post Template- This is a blog post template and any page created with this template will be listed as a blog post in the blog index.
Blog Index- This type is a home page of the blog portion of your website. It’ll list each blog post you’ve written: those pages that use the “Post Template” described above. The posts will be organized in reverse last updated order.
Deal Inventory Template- This imports and lists all of the deals that have been marked as “added to inventory” on your REIkit marketing report in the Projects section.
2.b Select a Page from Library
If you decide to use a pregenerated page as a baseline for your new page, you can pick one of those existing pages and the website will create the new page with a similar slug to the one in the library.
Remember to alter these slugs as necessary, particularly if you have several pages that are similar to one another. You can edit the page as you want once it’s been generated.
Each new page is created as “unpublished”. This means that it’s not viewable online until you edit that page specifically and click it to “published”. If you want to link any new pages in existing menus, you will need to go to the Menu button at the left-hand navigation and add it to the appropriate menu.
Now let’s go through some quick examples to make specific pages.
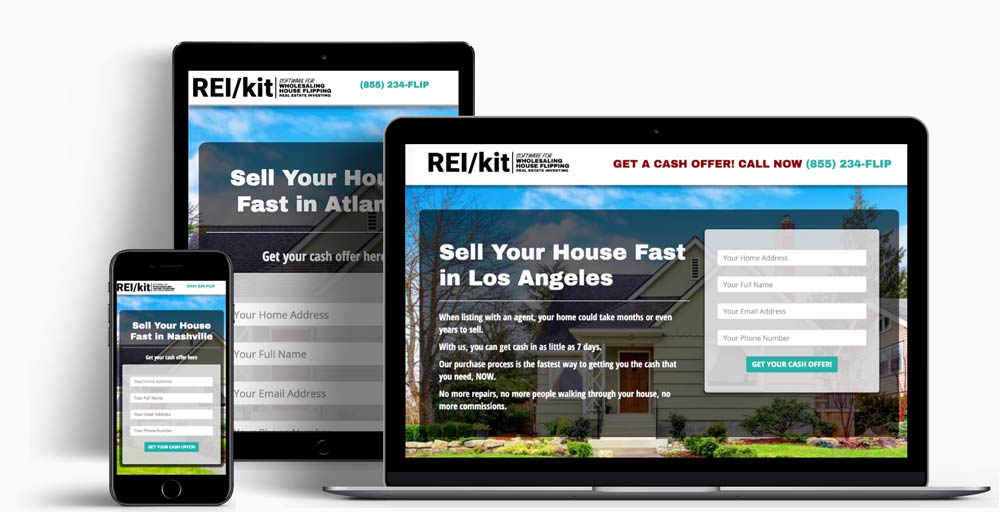
How can I create a motivated seller lead page?
1. Go to Pages in the menu
Go to Pages on the left-hand navigation, then click “New Webpage”.
2. Select page from Library
Select your page from the library. Pick the one called “Motivated Seller Landing Page”. This selects the pre-generated content that will be ideal for this purpose.
3. Create Webpage
Click “Create Webpage” at the bottom.
4. Choose whether to show menus
One piece of advice for any lead page that is also a landing page for Pay-Per-Click (PPC) campaigns is that can be a good idea to avoid showing any menus on such a page. This allows the visitor to only perform one action on the page, and that is to fill in the lead form and nothing else, keeping their presence focused and limiting their options.
To do this, you should select “No Menu” from the header and footer menu sections while editing this new lead page.
How can I create a blog post?
1. Go to Pages
Go to Pages on the left-hand navigation and click “New Webpage”.
2. Select blank page
Choose the Blank page option instead of one from the library.
3. Add title
Enter whatever title you desire for the blog post. This will also be the basis for the url, however you will be able to fine-tune it later.
4. Select Blog Post Template
Now choose your template. You will want to use the “Blog Post Template”. Any webpage with the “Blog Post Template” will automatically be included on the blog index page.
5. Create Webpage
Click “Create Webpage” to create it and start editing it.
Menus
Now that you have a handle on how to create and edit your webpages, let’s dive deeper into menus.
How can I add a link to a menu?
Adding links or pages to a menu be accomplished in just a few steps.
1. Go to Menus
Click to the Menus icon on the left-hand navigation. Once there, select the menu that you want to edit. Each menu, once clicked, will show you the various items within that menu, including how they are “nested” or stacked atop one another.
2. Add Menu Item
Click the Add Menu Item button at the bottom of the screen to add a new button or link to a particular menu.
Menu Item Text
This sets the text of the menu item as it displays on your menu. If you select an existing page from the page selection, but do not enter the menu item text, then the text will become the title of the selected page.
Nest Under Menu Item
You can nest a menu item beneath another menu item one level deep.
Select an existing Page to link to
You can select an existing page to link to for this menu item. This will automatically set the url, and it will hide the external url option.
Or, Enter an external URL
If you did not select an existing page, then you can enter the url of any external page to link to. This can be a page elsewhere on the site or an external URL, which you can provide in the space indicated on this page. If you enter a url into this input box, the option to select a page will disappear.
Additional style classes
You can also add any CSS style names (separate them by spaces) to make the menu adhere to the styles that you created earlier when you edited your website’s settings.
Open in New Window
Picking the “Open in New Window” option will open the page linked to the menu item in a new browser window.
Link order
You can also set the link order of a menu page or item. This will determine what order links will be in when they are displayed to a visitor.
Forms
Let’s go through some of the forms that you can start using immediately, as they are provided as part of the REIkit toolset.
What forms are available?
You can make use of three default forms. These can be accessed via the “Forms” button on the left-hand navigation: the Contact Form Buyer, the Contact Form Seller, and the Seller Lead Form.
When a visitor to your website submits any of these forms, you will get an email that’s sent to the contact email address that you specify in your website settings. If this is not filled in, the website account owner email address will receive the email instead.
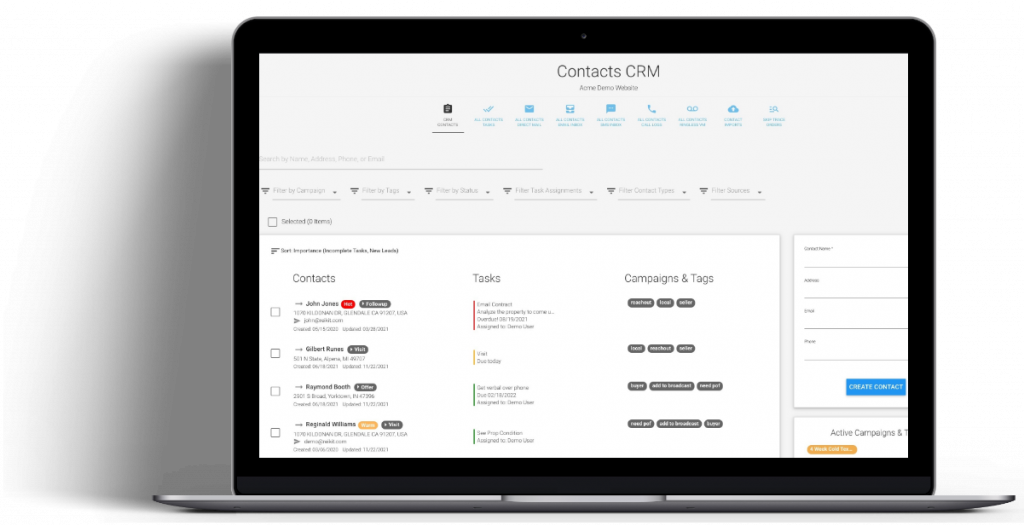
The Seller Lead form will enter a lead into your CRM as well as send an email to either of the above destinations.
What settings can I edit on a form?
By selecting any of these forms on the list, you can edit a few attributes of each, including the fields shown on the form like Name, Phone Number, etc. Each of those fields can be further customized by clicking the Edit button beside their switch. You can also decide whether any of these fields are visible on the form by switching the button beside their description.
The required switch determines whether a field must be filled in before the form can be submitted. This can let you receive more leads that have fewer fields filled in, or fewer leads that may be more qualified since they’ve filled in more of the form.
As one final word of advice, the “Thank You” text at the bottom of the form should be limited in scope. This will ensure that it fits into the area designated for it at the form. This keeps everything looking professional.
Can I create a new form?
At this time, you are not able to create a new form.
Templates
Let’s walk through how to edit the templates that you can use with your site.
How can I edit a template?
Liquid Templates
Webpages are rendered using the Liquid template language developed and used by Shopify. This allows you to add dynamic elements into your html templates in a secure and high-performance way.
You can use all of the syntax from the liquid template language documented here:
Additionally, the following resources are available for you to use inside of your templates:
Content Variables
The following special variables can be used in the template to render content and forms.
Content
These variables will render the contents of the webpage that uses this template.
{{ webpage_hero_content }}

{{ webpage_content }}
Forms
The following variables will be rendered into a form:
{{ page_form }}

{{ footer_form }}

{{ sidebar_form }}
You can select which forms populate into these tags in the page editor.
There are also 3 boolean variables that will let you know if a form was added to that variable for the page.
{{ has_page_form }}

{{ has_footer_form }}

{{ has_sidebar_form }}
Objects
The following objects have properties that can be accessed and rendered in the template.
Website
A website object has the following properties:
logo
company_name
contact_phone
contact_email
social_link_twitter
social_link_facebook
social_link_instagram
social_link_youtube
copyright
The properties for the website object can be rendered in the following way:
{{ website.logo }}
Webpage
A webpage object has the following properties:
title
path
url
The properties for the webpage object can be rendered in the following way:
{{ webpage.title }}
Menus
There are 3 menus available for you to use:
header_menu
footer_menu
sidebar_menu
Each menu object is an array of link objects. Link objects have the following properties:
name
url
path
target
rel_attr
class_attr
sublinks
In order to access and render data from the link objects, you will need to iterate over the menu array.
{% for link in header_menu %}
  {{ link.name }}
{% endfor %}
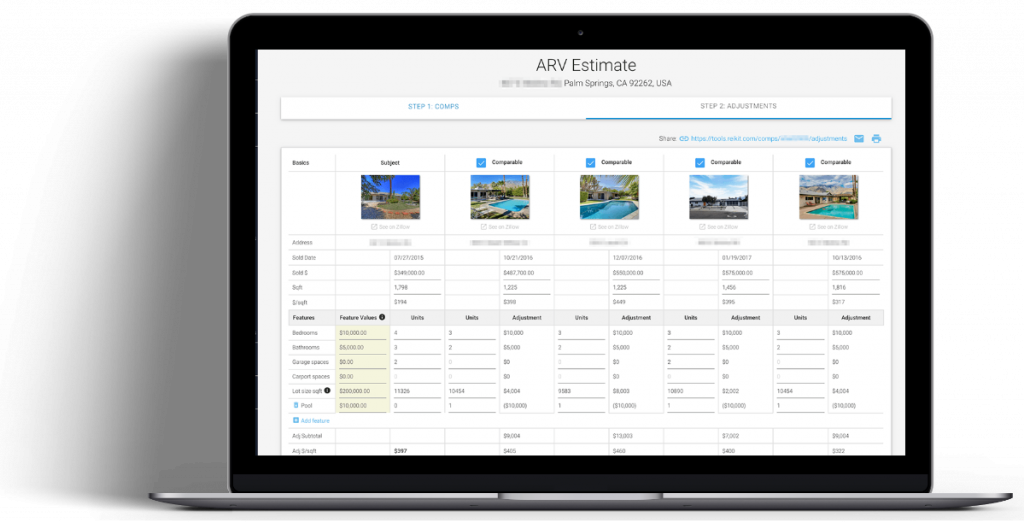
Deal Inventory
A deal_inventory array of deal objects is available. It contains any marketing reports that have been set as searchable. A deal has the following properties:
title
image
address
bedrooms
bathrooms
sqft
purchase_price
arv
rehab_costs
profit
url
is_sold (*)
(*) A deal can be marked as sold by setting the Project to ‘complete’ status.
In order to access and render data from the deal objects, you will need to iterate over the deal_inventory array.
{% for deal in deal_inventory %}
  {{ deal.title }}
{% endfor %}
Variables
You can assign your own variables at the top of the template for reuse.
For example, you could assign a service_area variable at the top of the template
{% assign service_area = "Los Angeles" %}
And you could then reuse that variable in all of your page contents:
{{ service_area }}
Summary
By now, you should ready to let your investor website start working for you!
The best way for your site to do work for you is for you commit to publishing new content on a predictable schedule. With each page, or blog post that you publish, your website rankings will increase over time for the keywords within your articles. As your rankings increase, so will your position, and authority. As your authority builds, so will your organic leads.