According to long established marketing practice, we know that it takes around 8 touches before you can get a prospect to take action.
Given this, it’s not surprising that a potential property seller is likely to leave your website after coming to it for the first time, without filling out your lead form.
When this happens, how can you continue marketing to that seller to get your 8 touches in, if they haven’t yet provided their contact information?
Facebook retargeting to the rescue!
Through retargeting by using a Facebook pixel, you can serve up Facebook ads to those visitors even though you don’t have their contact information.
These ads can be used to remind them of the solution that you offer, engage with them, invite them back to your website, and provide more visibility.
All of this builds trust and increases the number of those touches.
Ultimately, this, in turn, makes them feel comfortable working with your company until they eventually are ready to work with you.
Retargeting is a foreign concept now, but by the time you are done reading this guide for real estate investors, you’ll know:
- What is retargeting
- Why you should retarget visitors
- How to create and install the Facebook retargeting pixel
- How to create a Facebook ad to start retargeting your visitors
Let’s begin by getting a better idea of what retargeting is.
What is retargeting
Think back to the last time you browsed the web or scrolled through Facebook.
Do you remember seeing ads for items or services that you had previously searched for or visited a website to learn more?
You have seen this happen many times before, and were maybe even amazed by these “coincidences.”
It is most definitely not a coincidence.
There is a simple explanation for why this happens – and once you know what it is, you’ll be able unlock the secrets to make this lead generation magic work for you, too.
Next, we will break it down, starting with how these browsers and social media know your preferences and search history, via a “pixel.”
What is a retargeting pixel
A pixel is a small piece of JavaScript code generated by ad servers like Facebook, Google, other social media, and so on.
When you install this hidden code on your website, you create a connection between your website and the ad network.
As a result, when a visitor comes to your website, the pixel then locks on to the visitor’s browser to track them.
This is referred to as the visitor being “cookie’d.”
Because of that connection, whenever a visitor moves around your site, the cookie then delivers the tracked information back to the ad networks.
Since a large number of websites have installed a pixel, the ad networks can see how a person is browsing the internet moving from site to site.
Why you should retarget your visitors
The goal of retargeting is three-fold for real estate investors:
The first is, to remind sellers who left your website without entering in their contact information of the solution that you offer via Facebook ads.
The second is to entice a visitor to come back via a Facebook ad, and enter in their contact information.
The third is to stay top of mind when the seller does decide to sell.
How to retarget potential sellers with Facebook ads
Are you ready to start making magic?
In the next few sections, we will walk you through how to create a Facebook retargeting pixel, and how to create the ad that uses that pixel to get the prospect back to your investor website.
How to create a Facebook retargeting pixel
This article assumes that you have created a Facebook page for your business (suggested), and that you have a Business Manager account (required).
If you need to create a Business Manager account, click this link for information straight from Facebook: Facebook Business Manager Help
From there it’s easy to create your pixel in Facebook.
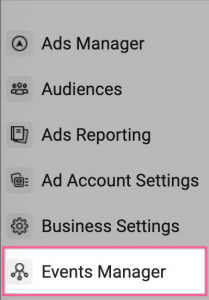
First, navigate to your Business Manager account here:
Access Events Manager
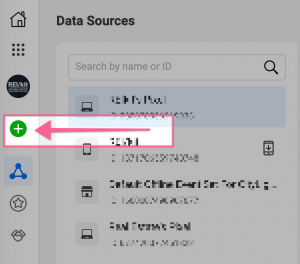
Locate your Events Manager settings:
Connect Data Sources
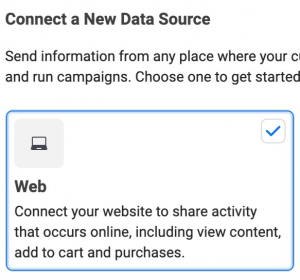
On the next screen, click the plus symbol to Select Data Sources for the pixel.
When prompted to Connect a New Data Source, select Web:
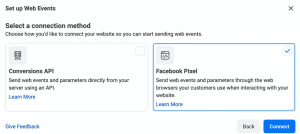
Select Connection Method
On the next screen, select Facebook Pixel as the Connection Method:
Continuing from there, you’ll enter the name of your pixel and check your website for any partner integrations that are available:
![]()
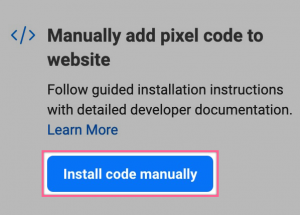
On the next screen, you’ll choose how to want to install the pixel code.
Your options are to manually add it to your website following step by step instructions, or to use the partner integration for websites built with specific website building software such as WordPress.
![]()
For this guide, we’ll use the example real estate investor website with a lead generation form, www.reikit.co, and select the box and button to Install Code Manually:
At this point, you’ll be directed to the Events Manager Onboarding screen, with videos and instructions for installing the base code that runs the pixel id onto your website.
You have a number of options on this screen to install the pixel:
Option 1: Copy and paste the base code that Facebook supplies onto each of the pages of your website yourself.
Option 2: Copy and paste your Facebook Pixel ID into a specific field within the settings of the website builder that you used to build your website.
Option 3: Email instructions to a developer who built your website and can install the code for you.
Finding your Facebook Pixel ID in the Base Code
For the second option of copying and pasting the Pixel ID into the field settings for your website, you need to be able to identify the Pixel ID within the base code that you see on the screen.
To do this, click on the green “Copy Code” button, and then paste the code to a blank document, so that you can view the entire base code.
Then, just identify the numerical value between www.facebook.com/tr?id= and the &, and you have found your Pixel ID.
![]()
Next, copy that Pixel ID and then paste it into your website builder settings for that specific purpose.
As an example, for the reikit.co website, we will be pasting the Facebook Pixel ID into the reikit.co website settings interface.
![]()
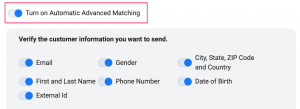
Once this is done, click Continue in the Facebook pixel interface to be directed to the next screen where you’ll toggle on Automatic Advanced Matching.
Automatic Advanced Matching
Once you have installed your new Facebook Pixel to your website using any of those methods, you’ll need to check that the installation was successful.
We’ll show you how to do this with the Facebook Pixel Helper.
This is done before moving on to the next guided step, the Event Setup Tool, that we’ll come back to further down this article.
Note: Keep this Business Manager screen open so that we can come back to it when it’s time to test the pixel.
Check if your Facebook retargeting pixel was installed successfully
The easiest way to check for successful installation is to use the authorized Facebook Pixel Helper.
This helper tool is a Chrome Browser extension, so you’ll need access to the Chrome Browser, and specifically the Chrome Web Store, to use it.
Click this link to access the Chrome Web Store.
Search the store for Facebook Pixel Helper, and click on Add to Chrome.
![]()
Next, locate the Pixel Helper icon in your Chrome browser extensions bar, but do not click on it yet.
![]()
In a new Chrome browser window or tab, navigate to the website that you installed your pixel on, in order to test it using the Pixel extension.
For this article, that would be reikit.co.
Now, on that screen, click on the Pixel extension icon to see the different statuses for the pixel on your page.
![]()
If your pixel has been successfully installed, it’s time to create your events using the Event Setup Tool.
Adding Events with the Event Setup Tool
The Events Setup Tool guides you through identifying the buttons or areas of your website that you want to track visitor actions on.
These actions are called “events.”
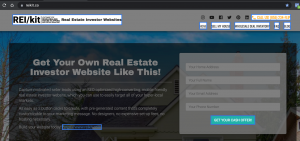
For reikit.co, we want to track that very specific click on the “Get Your Cash Offer!” button.
To start the process for your website, click on the Add Events dropdown in in the Overview tab of the Pixel screen, and then select ‘From the Pixel’:
![]()
Next, click on the blue Open Event Setup Tool button to access the tool, and on the next screen enter in your website URL and click Open Website.
Once opened, on the box hovering on the screen, select the Track New Button:
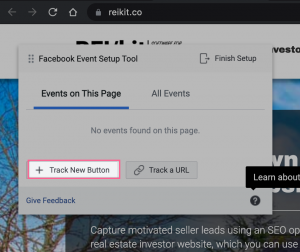
What happens now is that Facebook will give you options on your website by highlighting areas that it has identified as events:
Simply click on the highlighted areas to set those events up.
Here, we click on Get Your Cash Offer and it then brings up the Set Up Event dropdown.
![]()
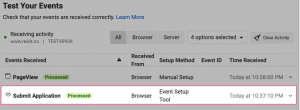
For this, we’ll choose Submit Application, but you can choose any event that makes sense for your website and events.
Click Confirm, and you’ll see the Event show up in the box at this point:
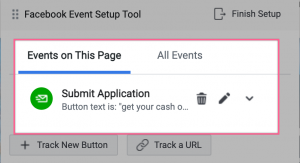
Click on Finish Setup, confirm the events, and click Continue.
Now it’s time to test the events that you just created.
Test your Facebook retargeting pixel using the Event Setup Tool
Testing is a simple process that just requires you to click on the main element that your website visitors would click on.
This will then trigger the pixel to fire, and send that visitor’s information back to your pixel in Facebook.
For our example reikit.co website, that clickable element would be the “Get Your Cash Offer” button, as we’ve just created.
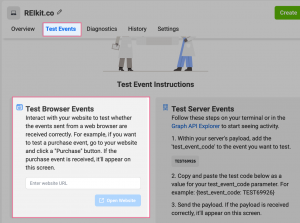
Navigate back to the screen that we left off on in Business Manager and continue guided setup, or click on Test Events tab in the Data Sources interface.
Enter your website’s URL in the space and click on Open Website:
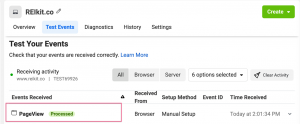
The Events Manager screen may refresh and show you what events it has received.
It has likely already recorded a view of the page, as you can see here:
At this point, on the website that was opened when you clicked on Open Website in Business Manager, now click on an element that you want the pixel to fire on.
For our example website, we’ll click on “Get Your Cash Offer!” to make sure that the pixel is sending that event back to Facebook.
In your own website, do the same thing, then go back to Events Manager.
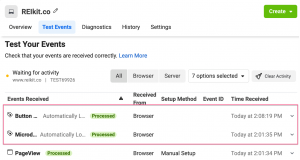
As you can see below, the Facebook pixel recorded that click and added it to the Events section of the Overview screen:
Your pixel is now successfully installed and sending events.
If it’s not, check out these troubleshooting tips direct from Facebook: Facebook Pixel Troubleshooting
Coming up, you’ll be creating your custom audience and then creating your Facebook ad.
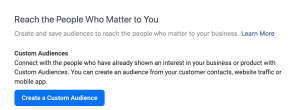
How to create a Facebook Custom Audience
Facebook collects visitor information from the pixel that you just created, to build an audience from that data.
After a small number of visitors are captured, approximately 20 or more, the pixel will be able to start serving ads to those visitors in their Facebook feeds or other placements.
Click on the Audiences selection in your Facebook Business Manager screen:
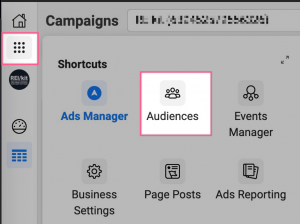
Or click on this link:
https://business.facebook.com/adsmanager/audiences
Then, select the option to create a custom audience.
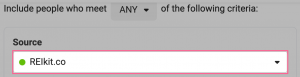
Next, choose the audience source.
Select ‘Website’ from the Your Sources section.
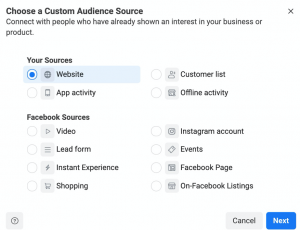
Building on the above walk-through on how to create your Facebook pixel, you will simply select the pixel that you had created earlier, from the Source field dropdown.
Then, you start building out the criteria for your audience.
Criteria for the Custom Audience
In this article, we’ll build out our audience example for our goal of showing ads to visitors who visited your website, but did not click the get cash offer button.
We don’t want to show ads to people who have already submitted the form.
In Facebook terms:
INCLUDE: All website visitors.
EXCLUDE: Submitted the application.
Next, how to create an audience with that criteria using stacking in Facebook.
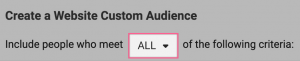
Criteria stacking
First, the default setting for the criteria stacking is ANY.
In this case however we want to choose ALL, because we are combining two separate criteria, and both of these criteria must be true to show ads to the right people.
Then, select the action, or Event, that your visitors have taken that you want to include in this audience.
“All website visitors” is the default setting, so you can leave that as-is:
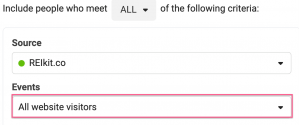
To fulfill the second criteria of excluding people who clicked on the form, click on the Exclude People button, and then specify the Events ‘Submit Application’ (or your Event) from the drop-down:

Next you have to specify the retention period.
Retention
Retention refers to the number of days that you want to keep someone active in your audience.
After the time period that you specify passes, that person is removed from the audience.
Retention time depends on the type of business that is showing an ad and the average length of time before a visitor decides to convert – converting meaning they have made a purchase or requested a proposal, and so on.
For example, a person visiting a website offering a $3,000 exercise bicycle will take a much longer period of time to make a decision, than one offering cozy socks.
This conversion period is considerably longer when it comes to whether a person decides to sell you their house for cash.
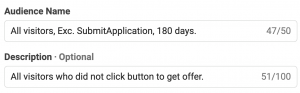
You can keep people in your audiences up to a maximum of 180 days.
For this audience that you are building now, as mentioned, it can be a long time before people choose to proceed with your company’s solution to buy their house.
So, on both the Include AND Exclude criteria above, change the retention period from the default of 30 days, to 180 days.
Finish off by naming your Audience and giving it a description.
Now that you’ve built your audience, you can get to the even more exciting part: how to create your ads for re-targeting.
Let’s then create an ad that will be triggered by your retargeting pixel, enticing your potential lead to come back to your site.
How to create a Facebook ad that uses your retargeting pixel
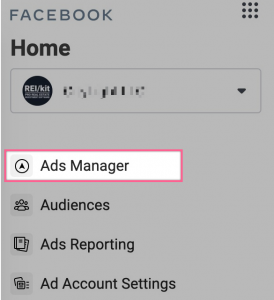
Since you are already in the Facebook Business account, we will walk through creating the ad in Facebook Ads Manager from within the Business account.
First, start by opening Ads Manager:
Now that it’s launched, you can create a new ad Campaign for your business.
This process from beginning to end is five steps, so let’s get to it.
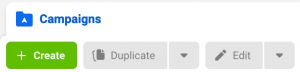
Step 1: Start Creating
Start by clicking on the Campaigns tab in your Ads Manager dashboard, and then click on the green Create button.
Step 2: Choose your Objective
What are Facebook Objectives?
When you select an objective, you are effectively telling Facebook what type of person to show your ad to, based on their behavior.
You also are telling Facebook the optimal action that person should take on your ad, based on your desired outcome.
For example, the Engagement objective will target people in your audience most likely to click, comment, and like your ad.
As you can see in the screenshot below, Facebook offers 11 different campaign objectives, and for this campaign we recommend the Reach objective.
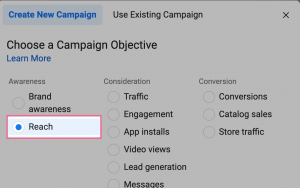
Why use the Reach objective with small audiences?
We recommend the Reach objective because you want Facebook to serve your ad to as many people in that small, highly targeted audience as it possibly can.
In addition, as you’ll see later, with the Reach objective you also have the ability to cap the number of times that your audience sees your ad.
This is important with an ad where people may take a longer amount of time to return to your website or consider your business.
You don’t want to annoy your audience by serving ads once or even more times every day.
Also, your audience may become numb to your ad if it is shown too many times; this is known as ad fatigue.
Select the Reach campaign and click Continue.
Step 3. New Campaign Set Up
Special Ad Categories, A/B Test, and Campaign Budget Optimization
Special Ad Categories
Name your campaign:
We chose “Retarget REIkitco Visitors No SubmitApp” for the Campaign Name, so that it is easily distinguished from other campaigns.
Next, you’ll need to declare if you are offering real estate housing opportunities.
You are not advertising housing for sale or rent, so leave this with No Categories Declared.
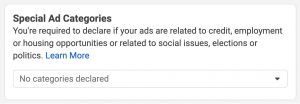
Note: It’s possible that after you’ve created and published your campaign, that Facebook will reject your ad if it thinks you are providing real estate housing opportunities. This might be triggered by just using the word “house” in your ad. You will have the option at that time of asking them to review the ad again and approve it.
Then:
Leave the default setting for Campaign Details, making sure it still reflects the Reach campaign that you selected.
A/B Test: Skip this option.
Campaign Budget Optimization: Skip this option.
Click the Next button.
`
Step 4. New Ad Set Setup
Naming, Page, Dynamic Creative, and Offer
Naming:
Name your Ad Set, such as “We Help Fast – Custom Audience – All Visitors No Click 180 Days” and then select your Facebook page for your business from the drop-down menu.
When you have a business Facebook page, it will allow you to interact as that business, such as when replying to people who comment on your ads, and will display your business name and your business image.
Dynamic Creative: Skip this option.
Budget and Schedule:
For re-targeting, you want to keep a low-budget, continual ad campaign.
A daily budget of $5.00 is a good starting point. Facebook may use slightly more on some days, and less on others. You can always adjust it later as well.
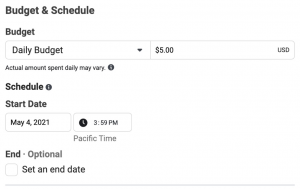
Leave the campaign with no end date, as the pixel continually fires over time.
Audience:
For the ad audience, you want to use the Custom Audience that you created earlier in this guide.
First click into “Search existing audiences” search bar, and then click on Custom Audience.
From the drop-down list that appears, select the audience name that you created.
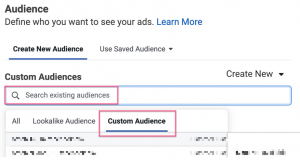
Leave everything else at the default settings, and we’ll move on to Placements.
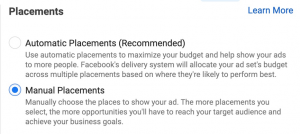
Placements:
Facebook has the default for placements set as Automatic, to be placed in all 14 places where your ad could possibly be displayed.
For this ad we will adjust the placements so that your ad only appears in the Facebook Ad Feed.
Why?
More is not always better. You’ll be paying for placements in areas that don’t make sense for a retargeting ad for this specific audience, such as Facebook Marketplace, or Instagram.
To remove all but Facebook Ad Feed, start by selecting Manual placements.
Platforms:
De-select everything but Facebook.
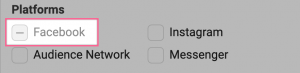
Asset Customization
Placements:
As we mentioned, there is only 1 main placement recommended for your first ad of this kind, although Facebook does offer those many different options.
That recommended placement is to appear directly in your visitor’s Facebook feed.
In this section, uncheck each of the sections except for Facebook News Feed, to remove any checkmarks.
By the time you are done removing options, it should say 1/14 placements in the Asset Customization section.
Optimization & Delivery:
Optimization for Ad Delivery should already be set to Reach for this campaign.
Bid Control: Skip this option.
Click on ‘Show More Options’ link to open up the frequency capping dialog that was mentioned earlier.
Frequency Cap:
Hover over Frequency Cap and click on the Edit link that appears to the right, to change the frequency settings.
By default, Facebook will show your ad to your audience once every seven days. This is fine keeping in mind that you’ll have people in this audience for six months.
However, for this campaign change the Impression count to 2, so that you’re showing your ad twice a week initially.

You’ll be charged for impressions, and the delivery type is Standard.
These cannot be changed with the Reach campaign Objective.
Read more about Facebook impressions and how they are calculated: Facebook Business Help Center Impressions Article.
Step 5: New Ad Setup
In this section, we show you how to set up the text and images for your Facebook ad.
To start your new Ad Setup, once again, name your Ad.
Identity:
This should be the Facebook page for your business that you selected within the Ad Set options.
Advertise on Instagram: Skip this option.
Ad Setup:
Leave Create Ad as default.
Format:
This is up to you; you can choose from a single image, video, or slideshow.
You can also choose to display a Carousel ad, which is two or more images or videos with titles, that the audience can scroll across.
Carousels are ideal for presenting different aspects of your business in a single ad.
For example, if your investing strategy includes burnt-out houses, short-sales, and foreclosures, you could advertise a different image for the three in a carousel.
You can even give each image a website link to different landing pages on your website addressing those types of properties.
In this article, for the sake of simplicity, we’ll focus on a single image.
Ad Creative
Media, Text, and Destination:
See this resource from Facebook as to the social media image specifications for Facebook feeds.
We recommend a 1:1 image ratio for Facebook feed placement, with an image at the highest resolution possible, but at least 1080 x 1080 pixels.
Be sure to add your real estate website URL.
Primary Text:
For Primary Text, the recommended length is 125 characters or less.
Facebook allows you up to 5 different Primary Text options, which is helpful if you are highlighting different aspects of your business.
Make sure the ‘Add a Website URL’ box is checked.
Headline:
Choose a Headline of up to 40 characters.
Here, again you have the opportunity to enter up to 5 different Headlines.
Descriptions:
Descriptions are optional and may not show at all, however you do have the option to enter up to 5.
Facebook Ad Copy and Headlines Creation and Best Practices
If you are struggling to come up with the ad copy and images, our tutorial shows you step-by-step how to come up with your marketing lead ad content specifically for real estate investors: Facebook Ads for Motivated Seller Leads.
Website URL:
Type in your real estate website URL here, if it’s not already populated.
Display Link:
Entering a display link text here will “pretty-fy” a link that is long or otherwise difficult to remember, or simply add a relevant ending.
For example, if your website is www.realestate.com, you could enter in a display link of www.realestate.com/getoffer
Call to Action Button:
What action do you want your audience to perform based on your ad?
The Call to Action button is designed to get a response and be clicked on if you want the visitor to take your desired action.

A click on ‘Learn More’ or ‘Contact Us’ will send them back to your website where they can finish filling out your offer form.
A click on ‘Call Us’ will allow you to enter in your phone number so that they can call you directly.
When they tap on your ad, even in mobile, the call dialogue will pop up.
Select the Call to Action that best suits your business model.
Languages:
If your business speaks more than one language, specifying the languages here will result in Facebook translating your ad for viewers that have selected to view Facebook in that language.
Tracking:
Check the box for Website Events.
It should auto-populate your pixel; select it if it does not.
URL Parameters:
URL parameters, while optional, are incredibly helpful for tracking analytics in software such as Google Analytics.
An URL parameter essentially adds on a string of information to the end of your website’s URL that helps to identify how that visitor landed on your website.
For example, if you have multiple retargeting ads at the same time, the URL parameters field allows you to specify the following parameters:
The Campaign Source, such as “facebook”
Campaign Medium, such as “facebook_feed”
Campaign Name, such as “we_can_help”
Campaign Content, unique to that ad, such as “water_damaged”
This is especially useful when trying to gauge which of your retargeting ads is most effective at getting people to take the action you want them to take.
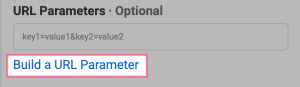
Click on Build a URL Parameter if you want to create one.
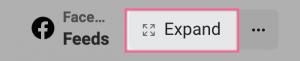
Preview:
Finally, hover over the Preview window and click on Expand to preview your ad in Desktop and Mobile Facebook feeds.
Review
Once your ad is just the way you want it, click on the Review icon to double-check all of your settings.

Publish
The very last step is to click on the green Publish button, which will place your ad under Facebook review.
Then it’s just a matter of waiting for your ad campaign to be approved, which may take from a few hours to a few days.
Be sure to visit Ads Manager each day to resolve any issues that come up and tweak your budget.
Summary
Prospective sellers who come to your real estate investor website and don’t fill out a lead generation form are ripe for a Facebook ad retargeting campaign.
You can entice them to return by creating a Facebook pixel, building a custom audience with that pixel, and then placing Facebook ads in front of those visitors.
This article showed you how to accomplish all three, in easy-to-follow steps, so that you can now have your retargeting ad working for you.