As a real estate wholesaler, your lead pipeline depends on your ability to market your business and get your brand front-and-center of sellers and other investors.
While there are many methods you can use to help with this goal, one highly effective way is with Facebook ads, and specifically Facebook Lead Ads.
Facebook Lead Ads offer a frictionless in-app experience that works especially well for mobile Facebook browsers.
Most typical online ads send the user to an external website when they click on the ad.
However, Lead Ads capture the attention of people browsing Facebook feeds, without interrupting what the user is doing.
If the browser sees your ad and want more information, a form will pop up that they can submit right in the app. After submission they can then continue scrolling.
In this article, you’ll learn how to create Facebook Lead Ads quickly for your real estate wholesaling business. You’ll also get instructions on how to download the information from leads who submitted the form so that you can follow up with them.
The steps to create a Lead Ad from your Facebook Page
Follow these steps to create a Lead Ad from your Facebook Business page:
- Select Ad Type and Goal
- Add Images and Text
- Create the Lead Ad Form
- Shuffle Creatives
- Declare Special Ad Category
- Select Messaging Apps
- Create New Audience
- Determine Duration and Budget
- Select Ad Placement
- Select Meta Pixel
- Add Payment Method
- Review Payment Summary
- Download Your Leads
(Pre-requisite) Set Up Your Facebook Business Page
If you don’t have a Facebook Business Page set up already, I highly recommend that you set one up for your business for several reasons, not the least of which because it is a pre-requisite for the rest of this guide.
Setting up a business page creates a separation between your personal account and the account for your advertising.
Even if you never plan on marketing the business page itself, it’s an essential piece of the mechanics of advertising on Facebook.
If you haven’t set up a business page yet, here is a great guide to get you started:
https://neilpatel.com/blog/create-facebook-business-page/
1. Lead Ad Creation Process: Select Ad Type and Goal
The first thing that you will need to do is to go to your Facebook page to create the new ad.
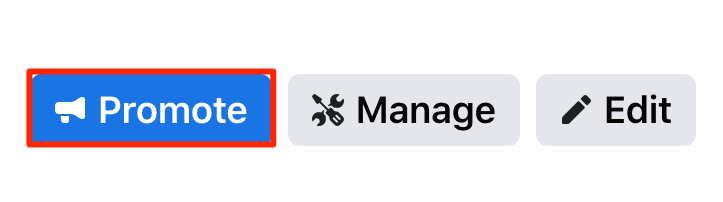
Create New Ad With Promote Button
First, navigate to your Facebook business page.
On your Facebook page, you’ll see a “Promote” button.
Click on the “Promote” button.
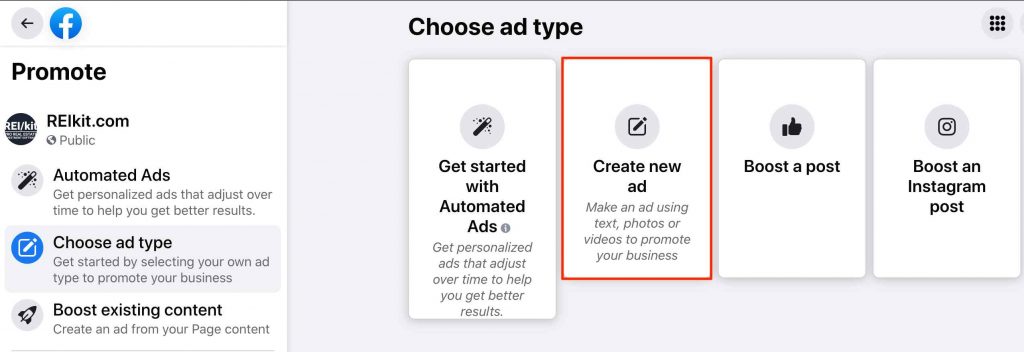
Choose Ad Type
Next, click on “Create new ad.”
Change Goal
Next, if your current goal displayed is not “Get more leads,” you need to change the Goal.

Click on the “Change” button.
Select Goal
When the Goal popup appears, you will need to select the Goal that will create a Lead Ad. In Facebook parlance, that goal is “Get more leads”.
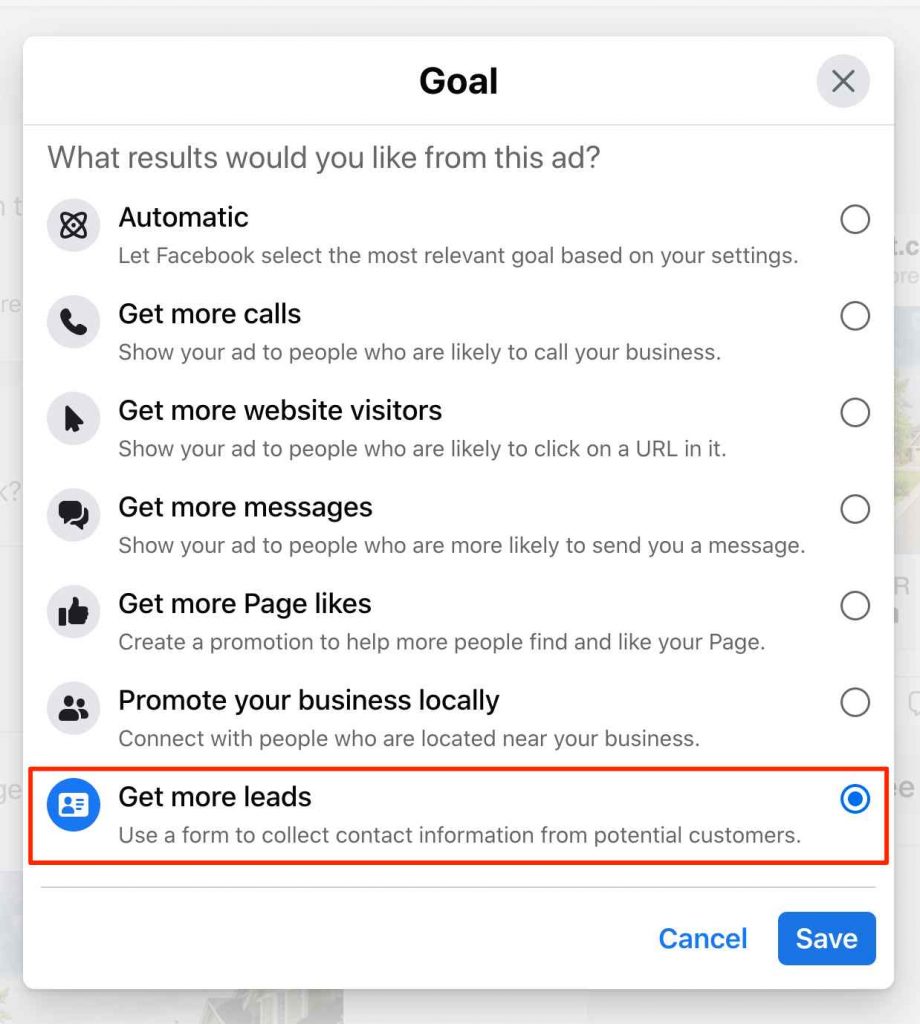
Click on “Get more leads” to select it.
The page will refresh, and you will be advised that a form is required for the ad.
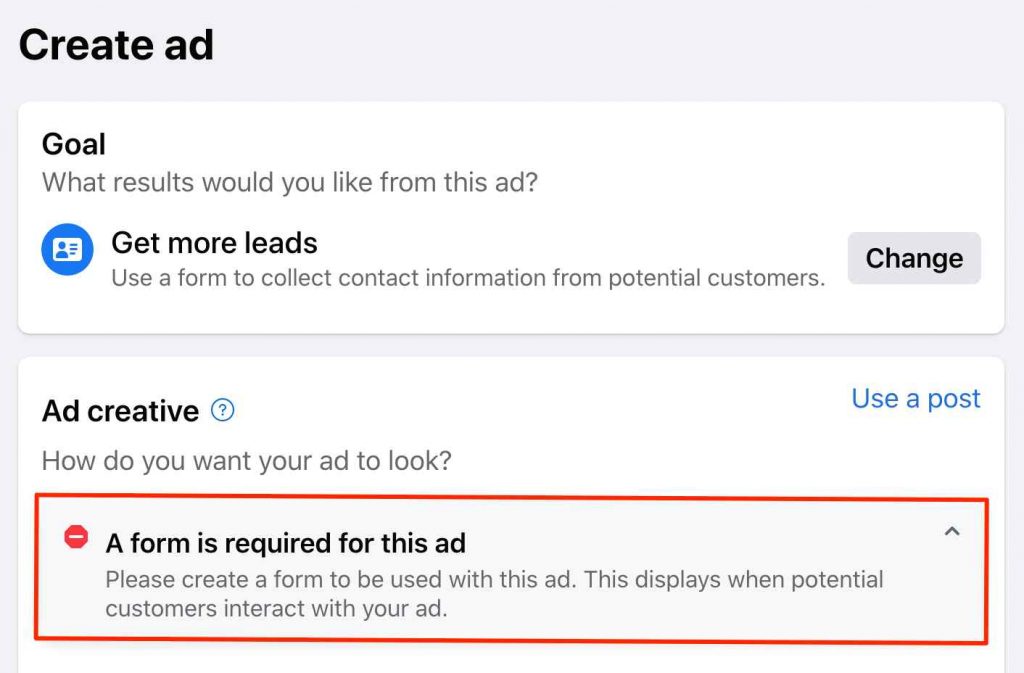
You will create or select that form after you have created your ad. So let’s create the ad first.
Below that message is where you will start adding the creatives for your ad.
2. Creatives: Add Images and Text
Ad creatives are the images and text that will be displayed to your target audience.
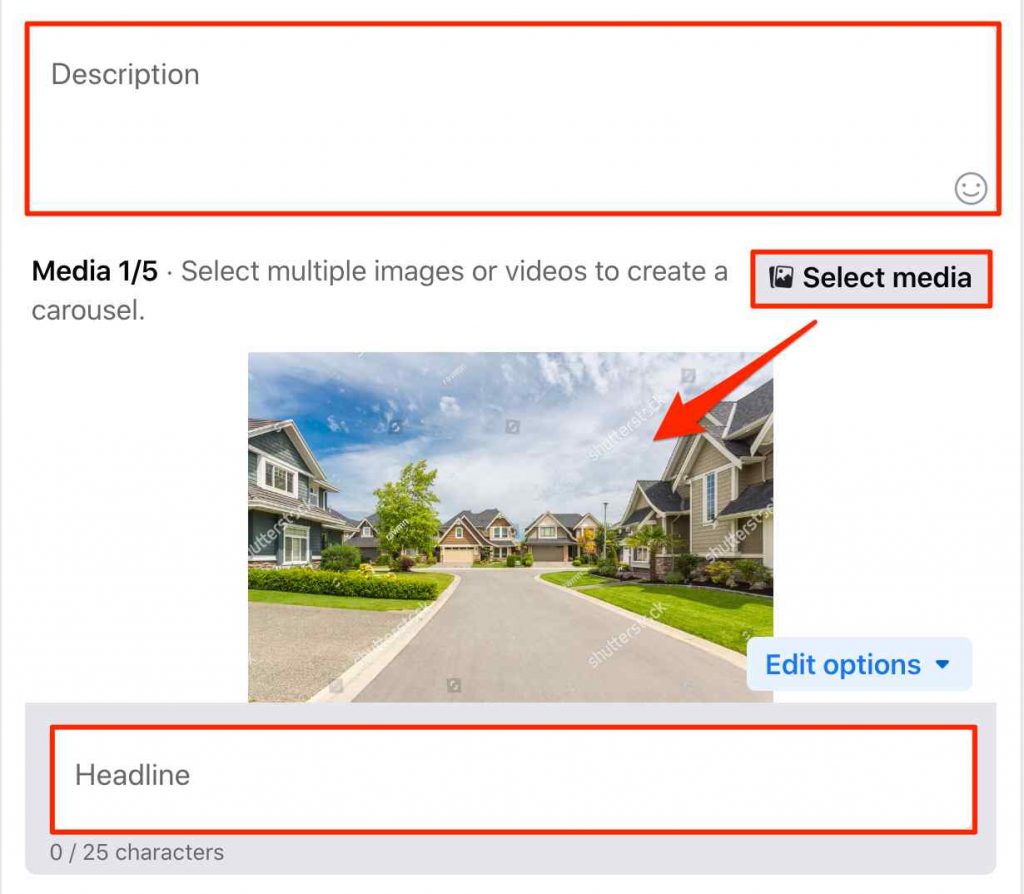
Give Ad a Description
Fill out the Description for the ad. This is what people will see on the ad.
Select Media Images
Select or Upload the media that you want to display. When you click on Select Media, Facebook gives you an ability to pick from their pictures to help make your ad stand out.
Create a Headline
Type in the Headline for the ad.
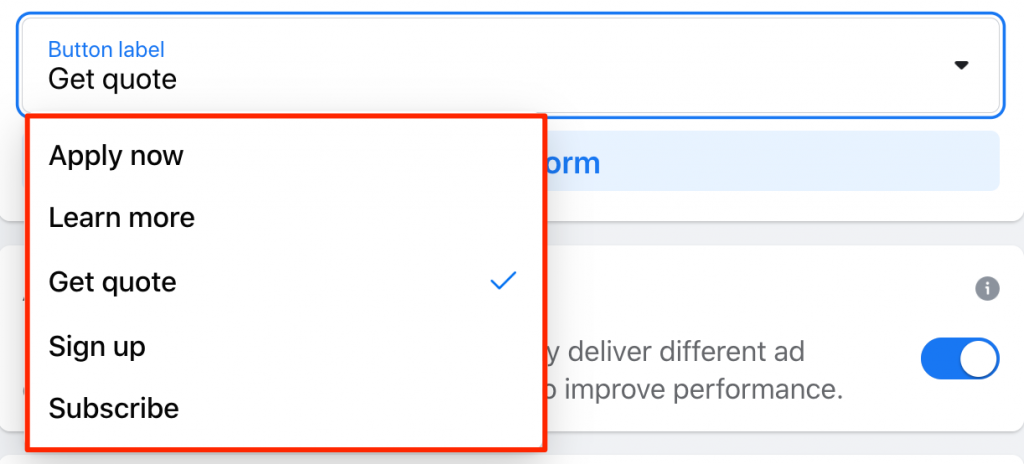
Select Button Text
From the drop-down, select the text that will be displayed on the button.
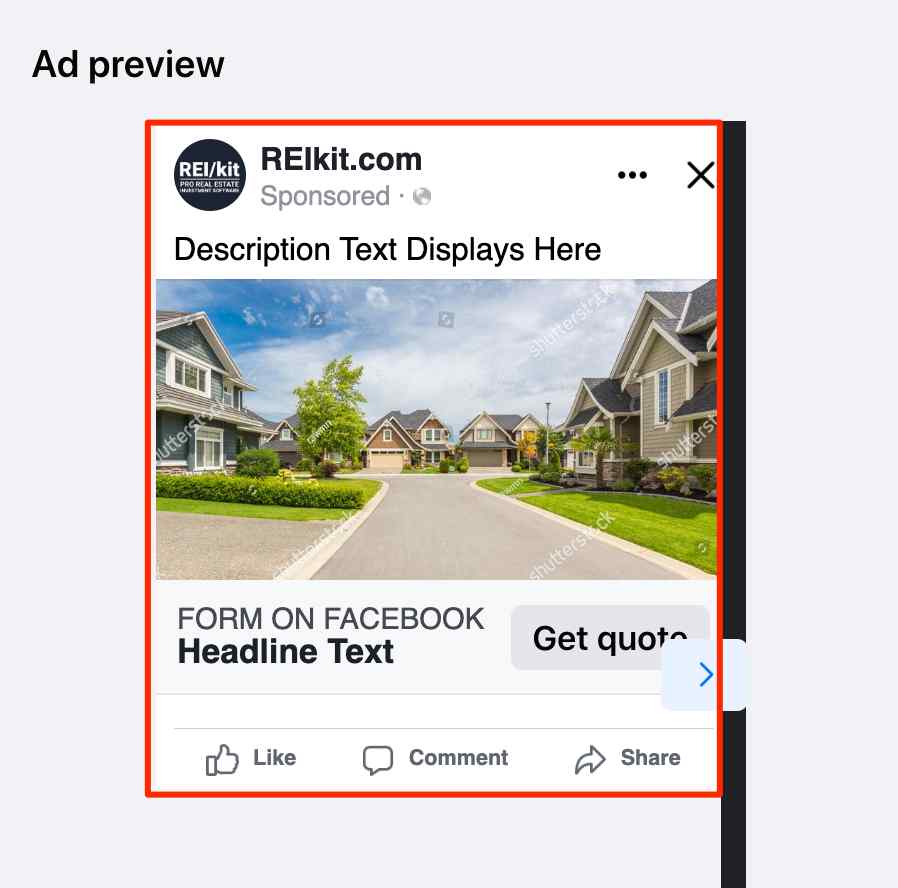
Preview Your Ad
Ensure that the Ad is the way you want it in the Ad Preview window on the right of the screen.
When you are satisfied with your ad, it’s time to create the Form for it.
3. Lead Ad Form: Create the Lead Ad Form
The Lead Ad form is how the lead’s contact information will be captured by Facebook.
You will be given the option to use an existing Form or create a new Form.
Previously Saved Form
If you want to use a previously saved form, select it from the drop-down.

For this tutorial, however, we will be creating a new Lead Ad Form, illustrated in the section below.
Start by clicking “Create Form” to create your Lead Ad Form.

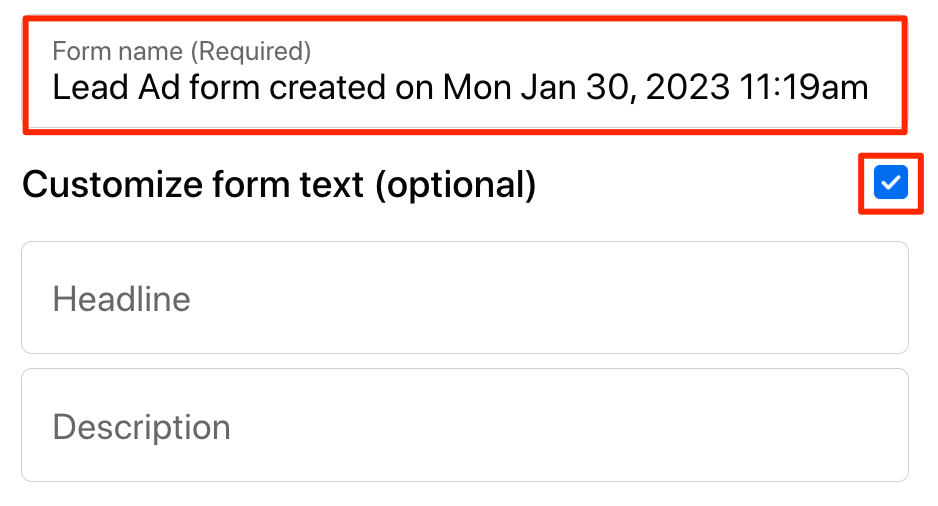
Name your Form
First, if you do not have a form yet, give your form a name by typing the name in the “Form Name” field.
Tip: You can add a headline or description (or both) to your form by checking the “Customize Form text” box.
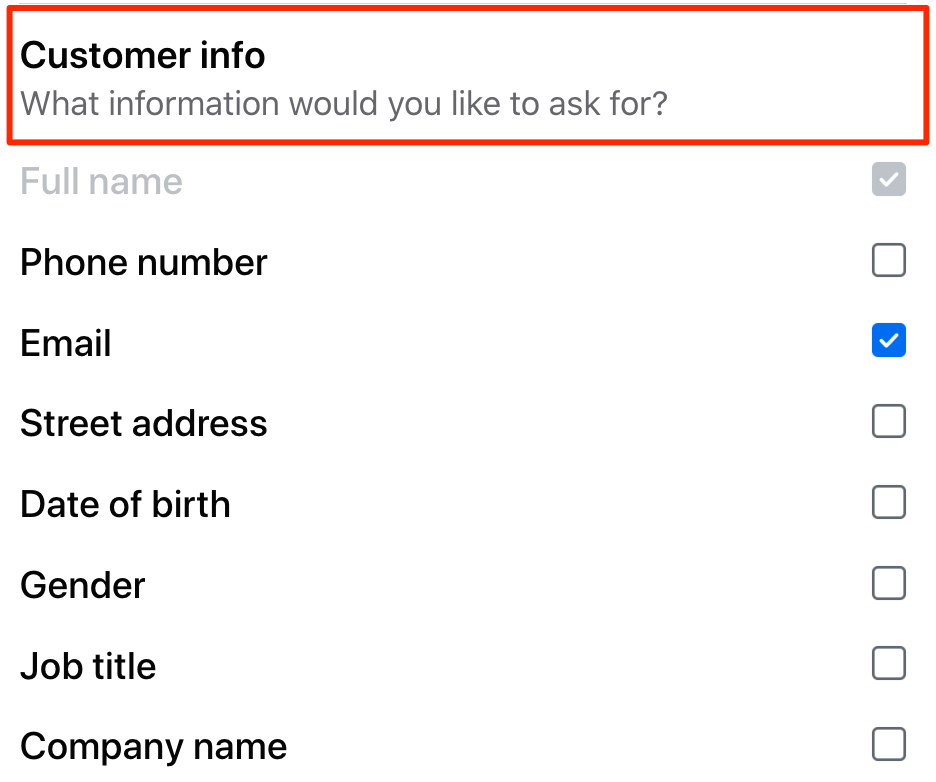
Next, the screen will display a variety of pre-filled customer information options.
Choose Pre-Filled Options
When a Facebook user clicks on your ad, they will be prompted to enter the contact information necessary to receive a response.
Facebook will pre-fill any information that it has already on the user, that they can review or change at that time.
Check the box next to the customer info that you would like to include in your form.
Click “See All” for a full list of all of the available options:
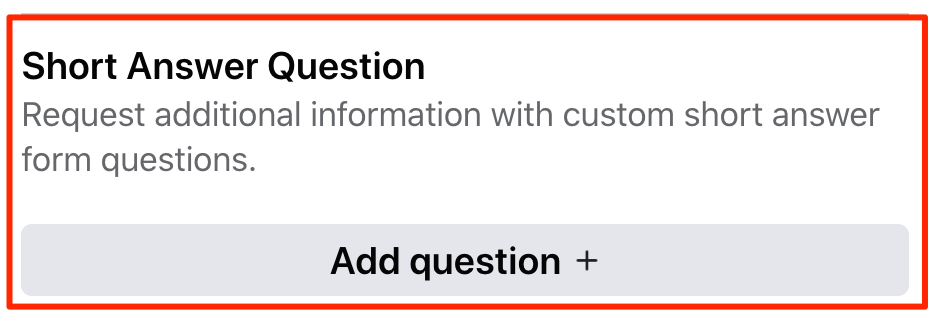
You can also add specific short-answer questions.
Tip: The benefit of selecting these default form fields is that Facebook will auto-fill any contact information that it has already saved for the requester.
The requester will simply look over the auto-filled information and edit it if necessary in the form. If no edits are necessary, the requester will confirm their information and continue through the form screens.
Keep in mind that every additional question you ask beyond the basic contact information – name, phone number, email, and in some cases, property address – reduces the chances that the person will submit the form. This is especially true for short answer questions where they must manually type in their answers on a mobile phone.
Best practice is to ask for only the minimum contact information that will allow you to fulfill their request.
Language
Next, select a language for the ad.
Add Privacy Policy
Finally, if your website includes a Privacy Policy page, check the box and enter the URL of your Privacy Policy to point form submitters to, should they want to see it.

Preview Your Form
Ensure that the Form is the way that you want it in the Form Preview window on the right of the screen. Click through all of the preview windows available.
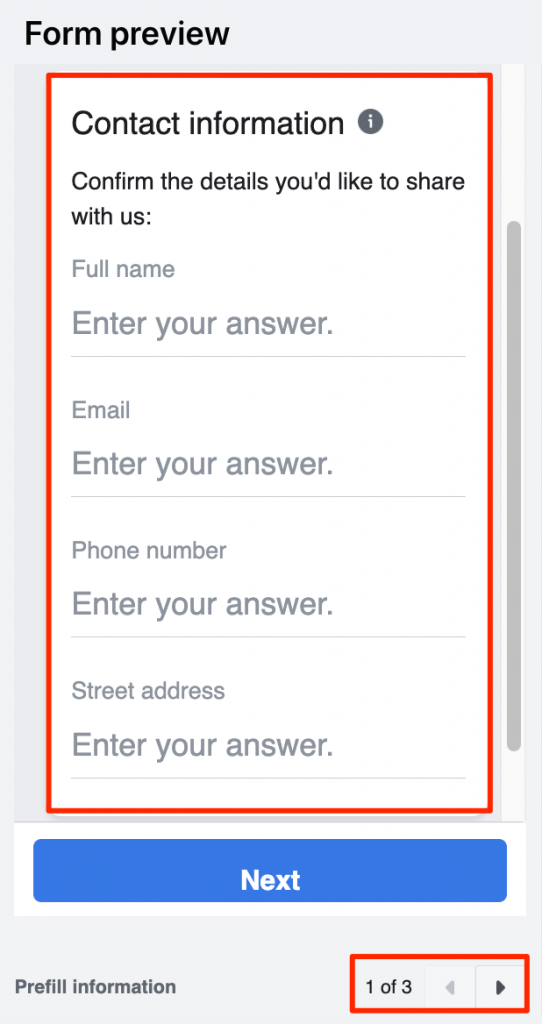
When you are satisfied with your Form, click Save.
4. Shuffle Creative
Now that you have finished creating the Lead Ad Form you can move on to the other items required in the process.
Continuing down the the screen, untoggle the Shuffle Creative or Advantage+ creative button in the box as shown below.

5. Special Ad Category
Next, you’ll need to declare if you are offering real estate housing opportunities.
You are not advertising housing for sale or rent, so leave this untoggled.
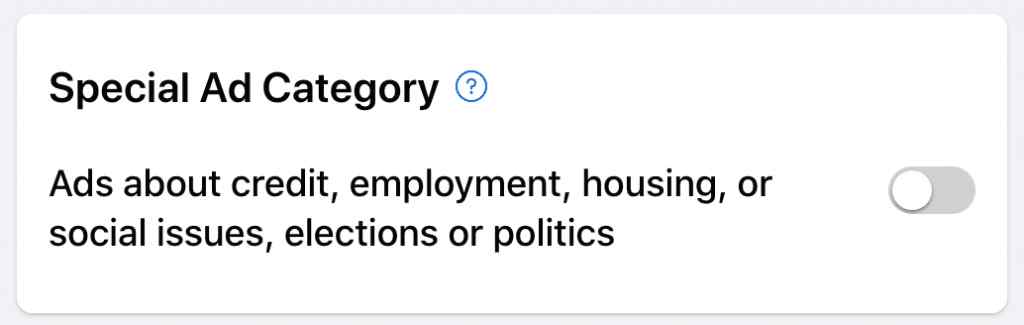
Note: It’s possible that after you’ve created and published your ad, that Facebook will reject your ad if it thinks you are providing real estate housing opportunities. This might be triggered by just using the word “house” in your ad. You will have the option at that time of asking them to review the ad again and approve it.
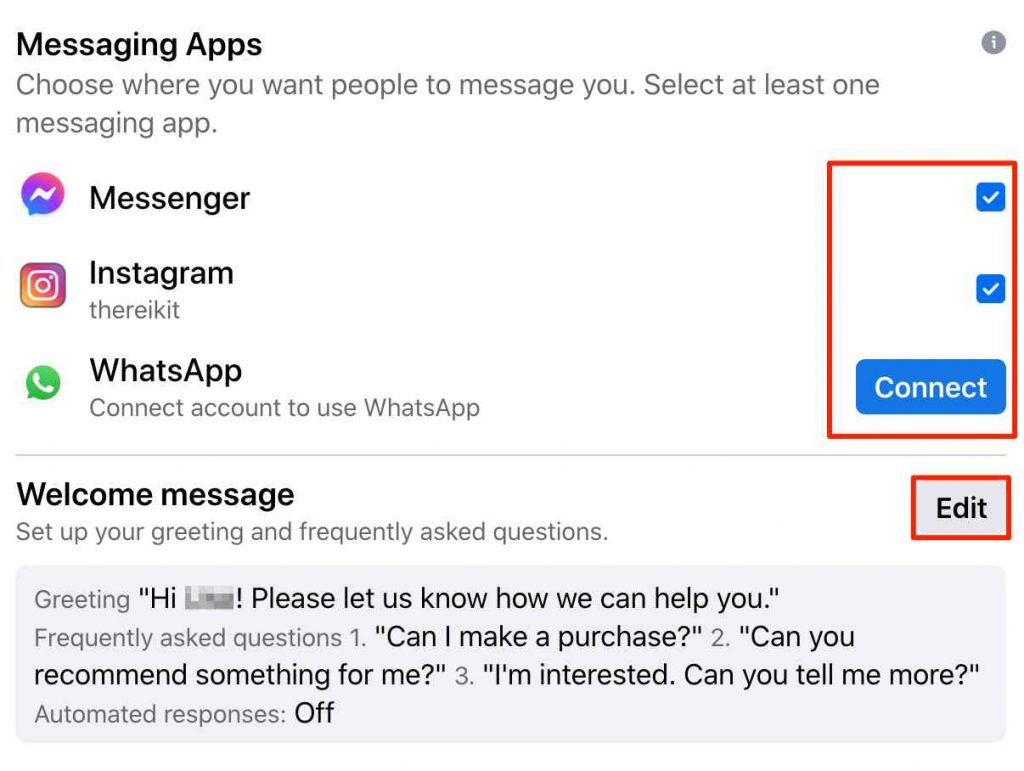
6. Messaging Apps
If you choose to have specific messaging apps connected to the ad, select them here.
Next we walk through one of the most important elements in creating a Facebook Lead Ad: the audience and custom targeting.
Audience Selection through Custom Targeting
An Audience in Facebook is a group of people to show your ad to.
You will need to narrow down your audience, since Facebook will start you off with an Audience of hundreds of millions of people in the United States aged 18 and over.
This is done through targeting within the Audience Builder.
Targeting at a minimum is selecting a geographic area, and can also be additionally narrowed down with Detailed Targeting criteria like demographics, interests, or behaviors.
Now that we have defined exactly what an audience is, below is how Facebook’s audience definition helps you to roughly determine audience size.
Understanding Audience Size
As you will soon see, at the bottom of the create audience builder is a very important bar to take note of as you edit your targeting criteria.
This bar will show you whether your audience is too broad, too specific, or just right.
The sweet spot is in the middle of the green bar, which is considered “Defined.”
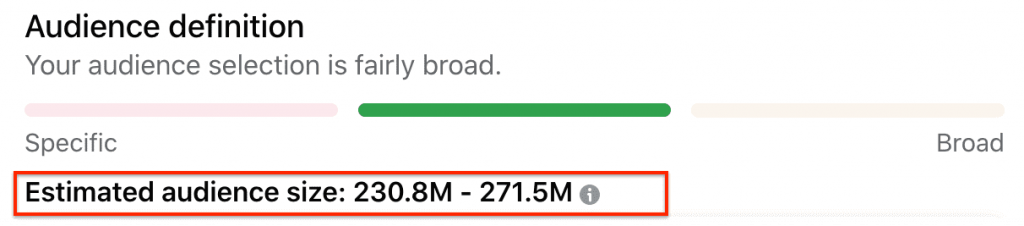
Estimated Audience Size
Another item to keep an eye on as you build your ad, that is visible in the above image, is the “Estimated Audience Size,” the number below the audience definition bar.
The Estimated Audience Size provided gives a general idea of the range of people who your ad can potentially be shown to.
In a nutshell, it estimates the number of people who match your targeting criteria within the geographic area that you choose.
Don’t view it as a hard fact; it’s simply a guideline for how large or small your potential audience is so that you can plan and budget accordingly.
The Estimated Audience Size will change every time you make a change to your targeting.
As you can see in this screenshot below, Facebook gives you a variety of Audiences to choose from initially; “People you choose through targeting” is selected by default.
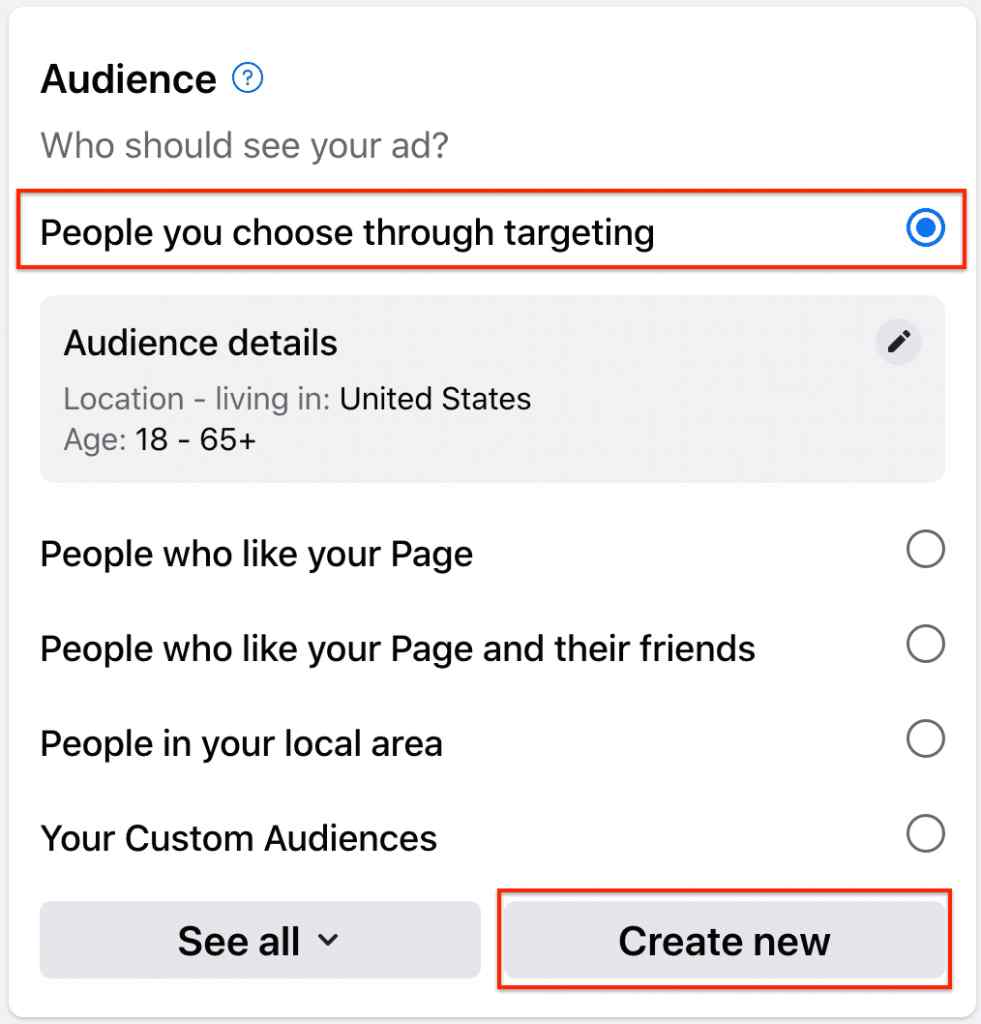
We will continue with this default selection, but also create a new Custom Audience that can be saved and used again in future ads.
Click on the “Create New Audience” button to start the process.
7. Create New Audience
Let’s start creating your custom audience, starting with a name for the audience.
Best Practices for Naming Your Audience
Although the name of your audience is the first field that you will see, I recommend waiting to name your Audience until after you have finished entering in all of the targeting criteria.
This is because you will be using those criteria in the name to distinguish audiences from each other in the future when you have created more audiences.
It is good practice to try to follow a naming system such as: Gender – Age – Geographic Area/Radius – Demographics/Interests/Behaviors.
For example:
M/F – 50-65+ – ATL 50miles – Divorced
Basic Targeting Options
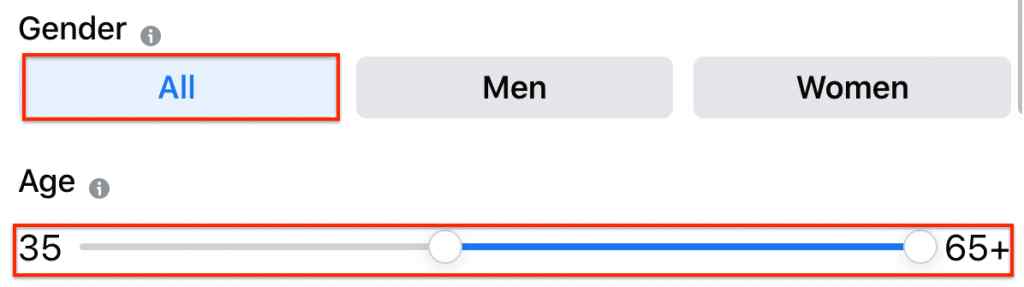
Notice that Facebook starts off the ad builder Audience set with both Men and Women, aged 18-65+, that live within the United States.
Let’s start narrowing down simply with the following settings:
Gender:
All
Age range:
Slide the slider to select the age range of the people that you want your ad to be displayed to.
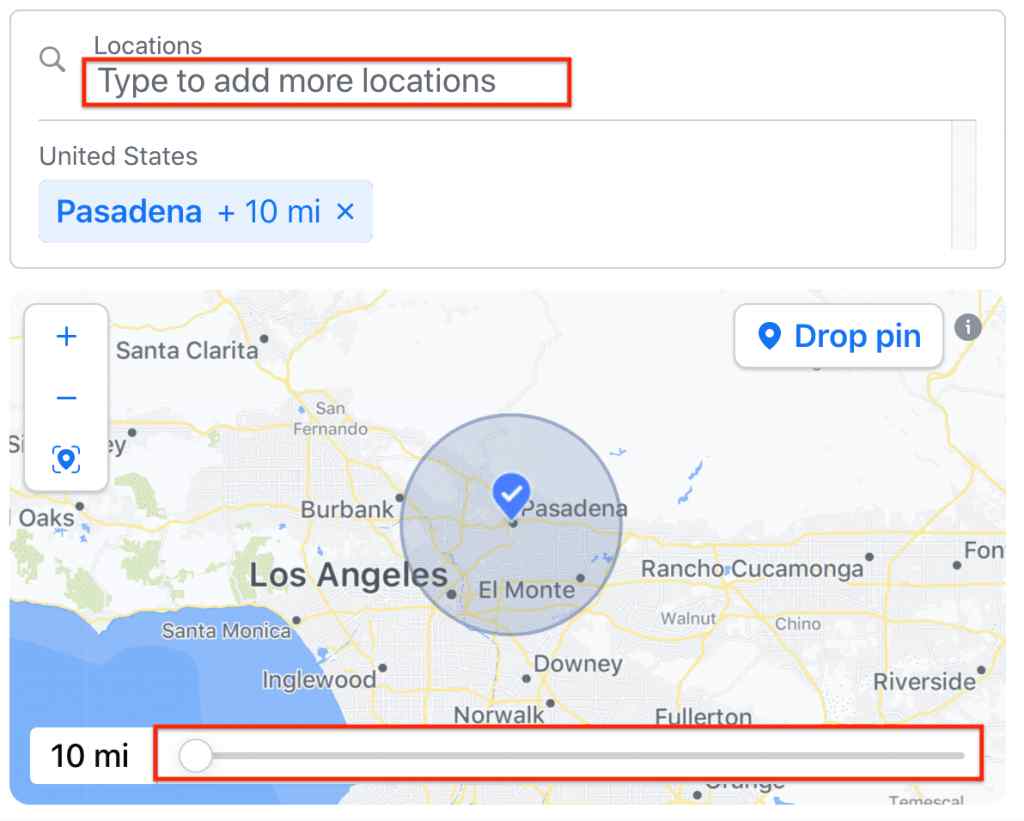
Geographic location(s):
Type in a city and select a radius on the slider,.
Next, select which demographics, interests, or behaviors to target in your ad.
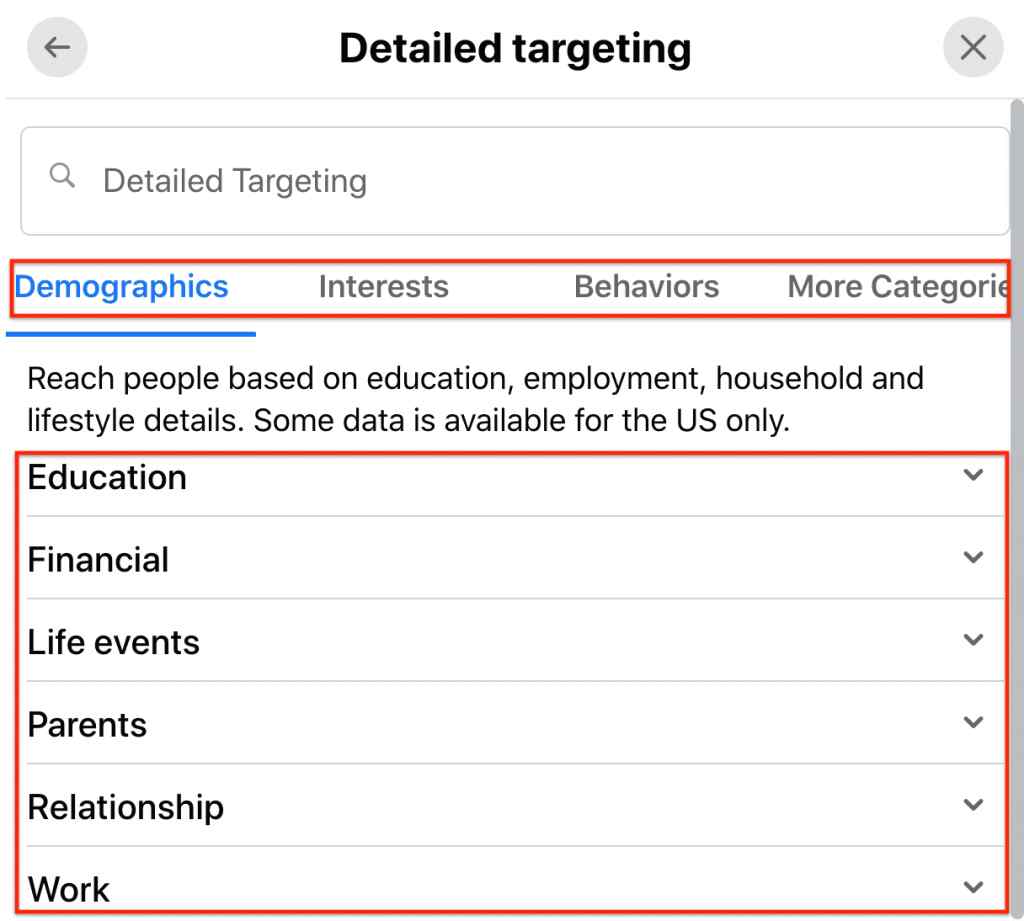
Detailed Targeting Options
Before you can specifically target a particular audience, here is an explanation of the three categories of targeting: Demographics, Interests, and Behaviors.
Demographics
Demographics are the characteristics of a population such as age, income, relationship, education, jobs.
Interests
Interests are those words that a viewer has included in their Facebook profile, or that are included in pages they like or other areas.
Behavior
Facebook can provide Audiences that display a certain type of behavior.
First, try searching for them manually in the Detailed targeting section by typing in your query.
If you’re having trouble coming up with traits appropriate to who you are trying to show your ad to, you can also “Browse” each option by clicking on the word “Browse” and expanding that option into more refined categories:
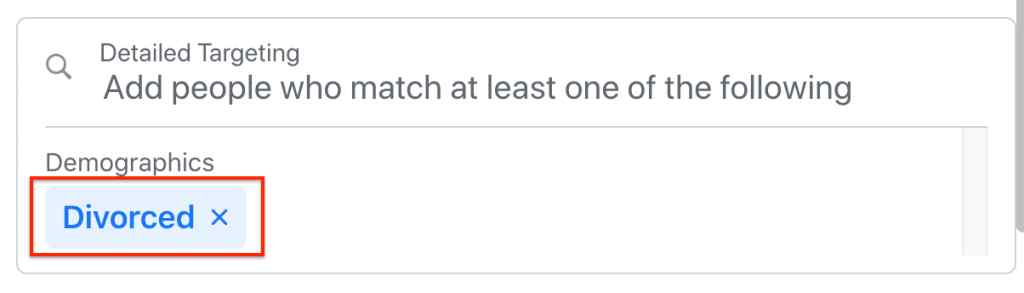
For example, you can select “Divorced” from the Relationship demographic.
This completes the audience selection and targeting section.
Now that you have all of your audience settings defined, you can name your audience.
Name Your Audience
As mentioned previously, waiting until you have finished selecting your audience to name the audience is most useful. Type in the name that you have chosen in the Audience Name field.

Then click “Save audience” to save your brand new Audience.
Once you have saved and closed your audience, next you will choose your budget and the duration of your ad run.
8. Duration and Daily Budget
Duration
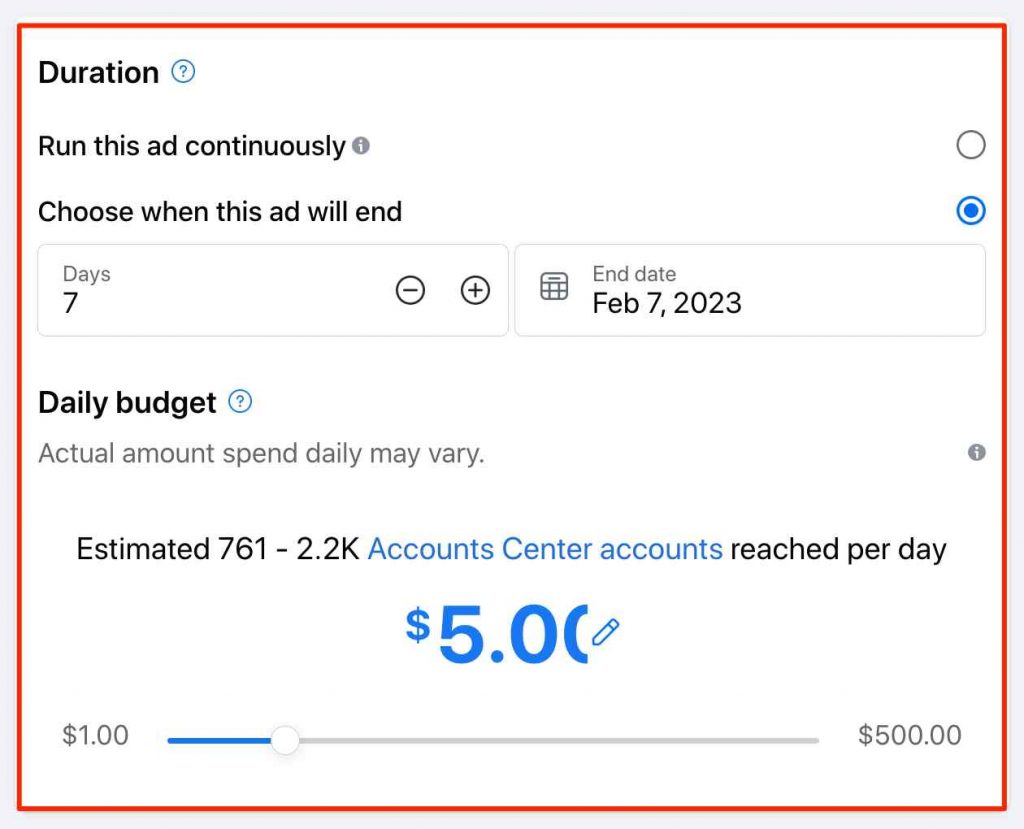
Choose if you want an end date for the Lead Ad to stop running, otherwise it will run continuously.
Daily Budget
The daily budget will vary, but generally fall within the range it displays.
Use the slider or type in the amount you would like to spend daily that aligns with your target.
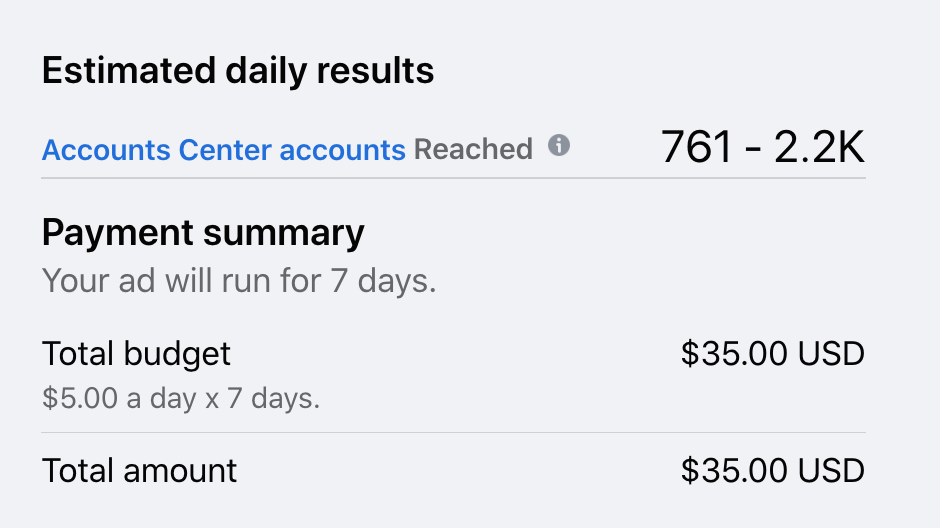
Review Estimated Daily Results
You will see an estimation under the Daily Budget that gives you a rough approximation of how many people (now referred to as “Account Center accounts”) will be reached per day.
Now that your budget and duration are set, next you choose the platforms where you want your ad to be displayed.
9. Ad Placement
Select from Facebook, Instagram, and/or Messenger, with all three selected by default.
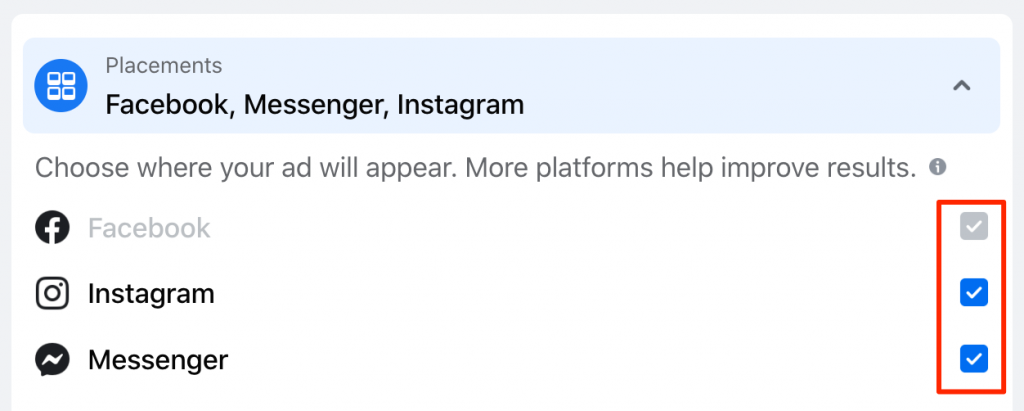
Think about the age of your audience, and what platforms they are more likely to be using.
Uncheck the default checked platforms if necessary.
10. Meta Pixel
Any retargeting pixel that exists may be selected here.
![]()
11. Payment Method
Add your payment method.
12. Payment Summary
Next, review the estimated daily results and payment summary on the right hand side of the screen and ensure that it reflects the total amount you have selected in the Budget section.
That’s it! You have now completed building your Facebook Lead Ad with a Lead Form.
Click “Promote now”, and your ad will start running shortly.
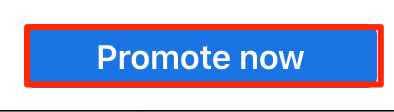
Your ad will be reviewed and will start showing to your audience after approval.
Below is what to do after leads start coming in from your ad.
13. What’s Next? Downloading Your Lead Data
As people start to submit your form from your lead ad, you will be able to download your leads from Facebook to your computer as a CSV file.
There are three different ways to access and download leads that fill out your Instant Form on your Lead Ad. However, this article covers only the two most accessible methods:
-Download the leads manually via Facebook Business Suite (or Ads Manager, depending on where you created the ad).
-Automate lead transferring, such as using Zapier to integrate with a CRM.
A word about following up with your leads
It is crucial to follow up with your leads quickly. This cannot be stressed enough.
While it sounds easy to simply download a file, that is not all that is involved when downloading your leads from your Facebook Page or Ads Manager.
You must download new leads immediately, or at the very least hourly, checking for duplicate leads and any new contact information for existing leads.
Then, you’ll need to import them into your CRM.
As you can imagine, this process involves time and effort, and in the meantime, your leads are going cold. In this industry, a person taking the time to reach out to you to sell their house is not a person you should keep waiting.
Use it or Lose It
In that same vein, Facebook states, “You have 90 days from the time a lead submits their form to download their information. Leads expire after 90 days.”
Even more of a reason why it’s crucial to download regularly.
With that important note out of the way, next is how to download your leads using the first method.
Download Your Leads Manually
To download your leads from your Facebook Page, access these instructions to follow along in the Facebook Business Suite:
https://www.facebook.com/business/help/541000507265711
Facebook recommends that you download your leads data directly from Meta Business Suite if you don’t have a CRM.
If you used Ads Manager to create your ad, see these instructions instead:
https://www.facebook.com/business/help/794345304231812
Don’t want to have to constantly download your leads to a spreadsheet?
Automate the process instead.
Download Leads Automatically
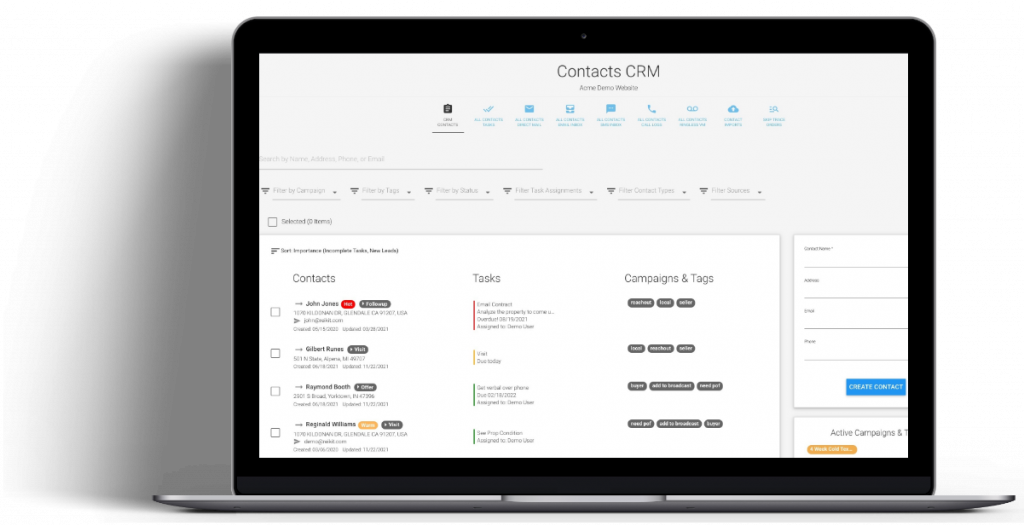
Use REI/kit’s all-in-one wholesaling software to automatically import your leads from Facebook.
REI/kit has a powerful real estate wholesaling CRM that is already integrated with Zapier.
Quickly create a Zap to link REI/kit to Facebook, and you’ll have one less tedious manual task to do — leaving you with more time to close more deals.
Find out more about REI/kit here: www.reikit.com
Key Takeaway
Are Facebook Lead Ads Easy to Create?
Yes! Facebook Lead Ads are easy to create and provide another avenue by which to harvest more motivated seller leads for your real estate wholesaling business. This step-by-step tutorial details how to create the Lead Ad, Lead Ad Form, and how to download or automate the transfer of data for leads who submitted the form in Facebook.