Subject To transactions can be a powerful tool for real estate investors looking to acquire properties without taking on new debt. By taking ownership “subject to” the existing mortgage, you’re effectively stepping into the seller’s shoes, managing the payments, and often helping a distressed homeowner in the process.
However, these deals come with their own complexities, and understanding each step is essential to maximizing profitability while minimizing risks.
In Part 1 of this series on how to transact Subject To deals, I explained exactly what is Subject To investing and how you can both profit from them and help a distressed homeowner as well.
Part 2 outlined the risks and benefits of entering into a subject to transaction that affect not only you, but also the seller, and how to mitigate them.
In this post, I break down the steps necessary to a successful Subject To real estate deal, from verifying seller facts to closing.
In this article I will cover how you can:
- Gather information from the seller
- Determine property value
- Prepare for the property visit
- Verify facts with the lender
- Determine your exit strategy
- Prepare your documents
- Finalize the transaction
- Close the closing
And much more.
Let’s start with the first step, the initial contact.
Perform initial due diligence on the seller and property
When you first get a distressed seller lead, the first step is to perform a through due diligence of that seller’s situation, and determine the condition and value of the property.
In this section I cover: what information to get from the seller, determining a property’s value, what you should take with you when you visit the property, how to get the facts from the lender, and other information you will need to obtain, to evaluate a deal and determine your offer.
First, Get the Facts from the Seller
Before setting foot on the property, make it a priority to dig deep into the seller’s situation.
This initial information isn’t just about assessing the deal—it’s also about finding the right way to help the seller out of their financial hardship.
Real estate transactions are already complex, but when distress is involved, the stakes get even higher.
By understanding the seller’s needs, you position yourself as a genuine ally, ready to create a win-win outcome.
Start the Conversation with Key Questions
Begin by asking specific questions that reveal critical mortgage details, such as:
- – Who holds the mortgage
- – How many payments are behind
- – The most recent payment amount
- – The remaining loan balance
- – Any arrears or property liens, including tax or mechanics liens
Statistics show that about 1 in every 5 homeowners facing foreclosure is behind by at least three payments, according to RealtyTrac.
With so many facing similar challenges, your Subject To offer could be the lifeline they need. A genuine interest in understanding their financial hardship can be the bridge to building trust and positioning your offer as a true solution.
Recognize the Seller’s Urgency
Urgency often plays a huge role here. Sellers on the verge of foreclosure, for example, are more likely to be open to creative financing if it offers them a way out.
That’s why understanding both the seller’s finances and their motivation to sell can shape your approach and increase the chances of reaching a mutually beneficial agreement.
“Building rapport and truly listening to the seller’s story is important,” shares Brian Ammonds, a real estate investor with two decades of experience in distressed properties. “It’s this empathy that makes the difference between just closing a deal and creating a solution.”
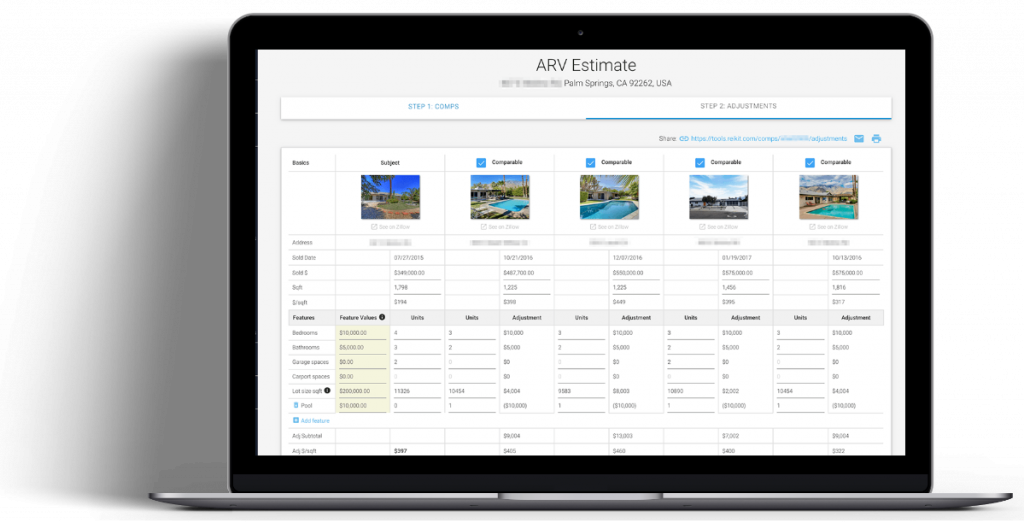
Determine the After Repair Value
Accurately calculating the After Repair Value (ARV) will move a Subject To deal forward.
The ARV acts as your compass, giving you a reliable forecast of what the property could sell for once all necessary repairs and improvements are complete.
This value not only helps you assess potential profitability but also gives you insight into the deal’s overall risk and expected return.
Start with Comparable Properties (Comps)
Determining the ARV begins with selecting comparable properties, or comps, from the same neighborhood.
Look for recently renovated homes with similar characteristics—they’re your best indicators for setting a realistic resale value.
Remember, no two properties are identical, so it’s crucial to adjust for differences.
For example, if your property has one less bedroom than a comparable sale, you’ll need to account for that difference to avoid inflating the ARV.
Avoid Common ARV Mistakes
This isn’t a step to rush. Misjudging ARV can lead to losses or strained profit margins if the market doesn’t align with your projections.
“Overestimating ARV is a common pitfall,” warns Laura Mitchell, a real estate analyst with years of experience evaluating rehab investments. “It can lead to missed profit expectations or even losses if the market doesn’t support the projected sale price.”
This guide explains exactly how to perform an analysis, by finding comps and adjusting them to accurately calculate ARV:
ARV Real Estate Meaning: How to Calculate It Quickly & Accurately
Factor in Your Exit Strategy
Once you’ve selected and adjusted comps, consider your exit strategy.
If you’re planning a fix-and-flip, base your ARV on recently rehabbed properties to match buyer expectations for quality and price.
Alternatively, if your goal is to rent out the property, look at rental comps to get a clearer picture of achievable rental income and demand in the market.
Get Your Initial Documents Signed
Securing initial authorization documents is the first step in your due diligence process.
One of the most important forms is the Third-Party Authorization to Release Information.
Once signed by the seller, this document grants you permission to verify important financial details directly with their lender, ensuring you’re working with up-to-date information.
Access to this information allows you to confirm important details such as the seller’s loan balance, payment history, arrears, and other must-know financial data.
Why This Form is Necessary
Without this form, you’re relying solely on the seller’s word about their financial situation—a risky move in any transaction.
“Having that signed authorization is so important,” explains real estate attorney Jennifer Marks. “It gives you the ability to cut through red tape and get the financial details you need to structure a viable Subject To offer.”
Opt for Electronic Signatures
Whenever possible, opt for electronic signatures using platforms like DocuSign.
This approach simplifies the signing process, allowing you to obtain signatures quickly and avoid delays associated with in-person meetings.
Since lenders typically take 7-10 business days to respond to authorization requests, electronic authorization can save valuable time—especially important when dealing with distressed properties that require swift action.
In-Person Signatures: Double-Check for Accuracy
If you’re meeting the seller in person, bring the authorization form along and ensure it’s signed correctly. Attention to detail here can prevent frustrating delays down the line.
Subject To expert Lisa Graham emphasizes this: “Document authorization can be the make-or-break point in due diligence. Without the lender’s confirmation, you risk basing your offer on bad or incomplete information.”
Visit the Property
With your financial and property information in hand, the next step is a physical property inspection.
Although numbers and ARV projections are valuable, nothing replaces the insights you gain by walking through the property firsthand.
Areas to Inspect
During your inspection, pay close attention to the exterior condition—the roof, foundation, siding, and windows are indicators of a property’s health.
For example, roof damage or foundation cracks could mean substantial repair costs. Inside, evaluate interior systems such as HVAC, plumbing, and electrical wiring.
Data from the National Association of Home Inspectors shows that around 75% of older homes require updates or replacements to major systems, emphasizing the need to identify these requirements upfront.
“Never skip the walkthrough,” advises Jim Parker, a seasoned real estate investor and inspector. “Small issues, like minor foundation cracks, can quickly escalate into costly repairs that eat into your profits. An thorough inspection can save you from unexpected expenses.”
Bring a Checklist to Stay Organized
To ensure a thorough inspection, bring along a checklist.
Use this Rehab Walkthrough Estimation Checklist This simple document helps you capture every detail and prevents you from overlooking areas in the excitement of a potential investment.
Determine the Necessary Repairs
After completing your walkthrough, compiling a detailed list of necessary repairs is highly important for estimating costs and structuring a viable offer.
Document every repair needed—from cosmetic updates like paint and flooring to major structural fixes like roof replacements or foundation repairs—to get a clear view of the property’s potential and any risks involved.
Organize these items by priority, starting with the most urgent repairs and noting any cosmetic improvements that could enhance market appeal.
Categorizing Repairs
Breaking repairs into categories helps you assess the property’s condition:
- – Cosmetic Updates: Fresh paint, new flooring, and landscaping can boost curb appeal with minimal investment, making the property more attractive to potential buyers or tenants.
- – System Repairs: Systems like HVAC, plumbing, and electrical often require more resources but are crucial to the property’s functionality and appeal.
Structural Repairs: Repairs to foundational issues, roof replacements, or framing work can be costly but are unavoidable to the property’s safety and overall value.
Determine the Cost of Repairs
Estimating repair costs must be done to a T if a Subject To transaction will be profitable.
Once you’ve identified what needs fixing, getting precise cost estimates helps you structure a realistic offer and avoid surprises down the line.
Repair costs can vary significantly based on factors like the property’s condition, the scope of work, and local market rates, so a thorough approach to estimating is necessary.
There are several effective ways to gauge repair costs:
- Use Online Estimation Tools: Websites like Homewyse offer estimates for typical repairs, helping you establish a baseline for common upgrades.
- Consult Local Contractors: Reach out to local contractors for quotes to ensure your costs align with current market rates. Contractors can often identify hidden issues that might impact the overall budget.
- Leverage Experience or Partner with a Pro: If you’re newer to real estate investing, consider teaming up with an experienced contractor or investor.
Planning for Contingencies
According to the American Society of Home Inspectors (ASHI), repair costs can often add 10-20% to initial budgets due to unforeseen issues, making a thorough assessment a necessity.
“Accurate repair estimates separate successful deals from costly mistakes,” explains Sarah Langley, a property rehab consultant experienced with distressed properties. “It’s easy to underestimate repair costs, especially with older properties, so always budget a contingency for the unexpected.”
First, if you haven’t already, you should read this post from the Flipping Guide:
Verify the Facts
The Next Step: Verifying the Seller’s Information
Once you’ve collected the information from the seller, it’s time to verify every detail.
This verification stage of due diligence is non-negotiable—it ensures you’re not blindsided by hidden costs or issues after closing, which could put the investment at risk.
Contact the Lender to Confirm Loan Details
With the signed Authorization to Release Information form, contact the lender directly to confirm mortgage details, such as:
- – The loan’s payment history
- – The remaining balance
- – Any arrears or overdue amounts
- – Escrow balances
Be prepared for some back-and-forth, as lenders may require additional documentation for confirmation.
Conduct a Comprehensive Title Search
In addition to verifying mortgage details, perform a title search to identify other potential encumbrances like IRS liens, HOA dues, or unpaid property taxes.
According to ATTOM Data Solutions, approximately 1 in every 10 distressed properties has a title defect, underscoring the importance of this step.
If additional encumbrances, such as tax liens or unpaid utility bills, are discovered, factor these into your offer to ensure the investment remains financially sound.
“As an investor, you need a complete financial picture before making an offer,” says Brian King, a title officer and Subject To expert. “Unexpected liens can drastically impact your costs and profitability. As they say, “Trust, but Verify.”
Verify Utility Balances and Property Taxes
Contact utility companies associated with the property to check on account balances, as unpaid bills can lead to liens or potential service disconnection.
Additionally, confirm property tax payments through the local assessor’s office or online to ensure taxes are current, or identify any outstanding balances.
With the seller’s current liabilities, the property’s ARV, and the estimated repair costs written down, you’ll have a rough estimate of what kind of deal you’re looking at.
Identify Potential Costs in a Subject To Transaction
Subject To deals are often marketed as “no money down” investments, but the reality is that costs can arise both before and after closing.
Knowing these potential expenses upfront allows you to budget effectively and prevent surprises that could impact profitability.
Many investors new to Subject To transactions may not realize that various fees, payments, and other costs can add up quickly, so you must plan ahead.
Common Costs You Might Encounter
Several costs are typical in Subject To transactions, and they may vary depending on the property’s condition, the seller’s equity, and the region. Here’s what you may need to budget for:
- – Mortgage Arrears: If the seller has missed mortgage payments, you may need to pay these arrears upfront to bring the loan current. This step is crucial to prevent foreclosure and ensure the loan stays in good standing.
- – Equity Payment to the Seller: In cases where the seller has equity in the property, they may expect to receive a portion as part of the deal. While you can often negotiate this amount, it’s a potential cost that needs to be factored into your budget.
- – Closing Costs: There are several fees associated with closing a Subject To deal, including:
- – Attorney Fees: Many states require an attorney at closing, and the cost can vary based on the complexity of the transaction.
- – Transfer Fees or Taxes: Transfer taxes can vary by location and may be due at the time of property transfer.
- – Escrow Fees: Escrow services facilitate the closing process and can add to closing expenses.
- – Title Insurance: Title insurance will protect against liens or undiscovered title defects and is an additional cost to budget for.
- – Carrying Costs: After closing, you may need to cover ongoing carrying costs until you complete your exit strategy. These may include monthly mortgage payments, property taxes, insurance, utilities, and routine maintenance to keep the property in good condition.
“Investing in real estate is never completely cost-free, especially with Subject To deals,” notes financial consultant Anna Howard. “Understanding these costs upfront helps prevent unexpected expenses from eroding your profit.”
Creating a Realistic Budget for a Profitable Exit Strategy
Once you’ve identified all potential costs, you can create a more realistic budget that informs your exit strategy.
If you plan to hold the property as a rental, be sure to include carrying costs and set aside funds for repairs or tenant turnover.
If your goal is to flip the property, prioritize spending on repairs and upgrades that will boost resale value.
Determine Your Exit Strategy and Offer
Your exit strategy is the backbone of your Subject To deal, guiding the structure of your offer and ultimately shaping the profitability of the transaction.
Exit strategies range from quick resale to long-term rental or lease options, and your choice will depend on factors such as the seller’s financial situation, the property’s condition, and your own investment goals.
For instance, if the property has significant equity and requires minimal repairs, a quick resale may maximize your profit.
On the other hand, if the property is in a rental-friendly area, a lease-option or rental approach could provide steady cash flow over time.
Aligning Exit Strategy with Seller’s Situation
You must consider the seller’s financial standing when choosing your exit strategy, as this can significantly impact your approach.
In some cases, a seller who’s behind on payments may be eager to transfer the deed without requiring additional compensation, simply to escape their financial obligations.
In other cases, you may find that a seller with equity expects a portion of it, which would need to be factored into your offer.
HUD statistics indicate that distressed properties typically yield annual returns of 8-12% for buy-and-hold investors, offering a benchmark for those considering long-term rental investments.
“Aligning your exit strategy with the seller’s situation is the way to go,” advises real estate strategist Kelly Tran. “Each situation requires a custom approach to create a win-win offer that relieves the seller while ensuring your profitability.”
Examples of Exit Strategies and Offer Structures
As you begin formulating your offer, keep in mind these common scenarios that can help shape a strategy suited to both the seller’s needs and your own investment goals:
- – Taking Title Without Upfront Costs: In some situations, especially when the seller is facing foreclosure or financial hardship, they may be willing to transfer the property without requiring additional funds. They may even agree to bring the loan current before transferring the deed, eliminating immediate costs on your end.
- – Negotiating for a “Problem Property”: If the seller owes more on the property than its current value, you might be able to negotiate for them to cover certain costs or even offer funds to you in exchange for taking the property off their hands. This scenario can be advantageous when there’s negative equity, and the seller is motivated to exit quickly.
Paying the Seller’s Equity: In cases where the seller owes less than the property’s value, you may need to compensate them for part of their equity. This can still result in a profitable deal if the property has the potential for appreciation or is located in a high-demand rental market.
You can review your potential exit strategies in the first post, to see how each of these situations will have an impact on your exit strategy, and your offer.
Prepare Your Purchase Documents
Documentation is the backbone of any Subject To transaction.
Properly structured documents not only protect both you and the seller but also establish clear terms and legal compliance.
One of the most important documents is the purchase agreement, which outlines the exchange of value between you and the seller and includes disclosures to ensure transparency.
The purchase agreement should cover several areas, including:
- – Clear terms and conditions – The purchase agreement should define the transaction terms, such as price, transfer conditions, and any contingencies. Make sure it’s structured to meet legal requirements in your state. Customizing your agreements with the help of a real estate attorney familiar with Subject To transactions is highly recommended, as each state has unique regulations.
- – Disclosures – Full disclosure is non-negotiable in Subject To deals, particularly concerning the due-on-sale clause, which allows the lender to call the loan due if ownership changes. Including this clause ensures that the seller is aware of potential risks, including the possibility that the lender may accelerate the mortgage. Disclosures about profit intent and risks related to the transaction’s structure are also advisable, helping to create a transparent relationship.
Legal guidance is invaluable in this step. According to a survey from the National Association of Realtors (NAR), more than 25% of real estate disputes arise due to poorly structured contracts.
“A comprehensive contract is your safety net,” emphasizes Karen Lee, a real estate attorney with expertise in Subject To transactions. “Documenting every detail minimizes misunderstandings and provides legal recourse if there’s a disagreement.”
Your attorney may also recommend adding clauses that protect you in specific scenarios, such as issues with property condition, undisclosed liens, or seller misrepresentation.
These additional protections ensure that you’re fully covered, even if unexpected problems arise after closing.
Finalize the Transaction
With your documents prepared, you’re ready to move on to closing the transaction.
The closing process is where all the paperwork and due diligence come together, to ensure a smooth closing.
Real estate closing laws vary from state to state, so it’s important to understand the local requirements.
Some states mandate that real estate closings happen at a title company or with a closing attorney, while others permit kitchen table closings.
But if you’re new to Subject To deals, it’s generally wise to avoid informal closings and instead work with experienced professionals.
This PDF from First American Title, shows a good outline of some of the documents and costs that you may need in each state (verify) and whether an attorney is required at closing:
Choosing the Right Title Company or Closing Attorney
For a seamless closing experience, it’s best to work with a title company or closing attorney who knows the ins and outs of Subject To transactions.
Not every title company is familiar with this structure, and some may hesitate to handle these deals due to complexities like the due-on-sale clause.
Reaching out to local real estate investment groups can help you identify companies or attorneys who regularly handle Subject To deals and understand the nuances involved.
An experienced closing team will prepare all the necessary documents, complete title searches, and ensure compliance with state and local laws.
“Closing with an experienced title company eliminates risks and ensures every document is correctly prepared and recorded,” says Robert Fielding, a real estate investor with over a decade in creative financing. “A solid closing team gives you peace of mind.”
Finalizing the Documentation
At closing, you’ll need to ensure that both recorded and non-recorded documents are signed, notarized, or witnessed as required.
In cases where the seller is married, make sure the spouse signs all relevant documents to avoid future legal complications.
Most title companies will take care of recording the documents, but it’s smart to confirm this step to ensure the property transfer is complete.
Once everything is signed, arrange any necessary payments—whether to the seller or to bring the mortgage current.
According to First American Title, well-documented closings reduce the risk of post-closing disputes by 40%, underscoring the importance of a clear paper trail.
Recording the Deed and Finalizing Ownership Transfer
With the closing complete, your title company or attorney will record the deed transfer with the county.
This final step legally completes the transaction, transferring ownership to you.
Take a moment to double-check that all documents include the required signatures, notarizations, and recordings to confirm everything is in order.
After the Closing
Once the transaction is complete you’ll need to do the following:
Keys
You should have exchanged these at closing. You’ll need to make sure that the seller gives you any keys and garage door openers as well as any alarm codes. After closing, you’ll need to get a locksmith to re-key all of your doors.
Cancel seller’s insurance.
Using your Limited Power of Attorney, cancel the seller’s homeowner’s insurance policy, but make sure you change the mailing address to your address before canceling.
This will ensure that you, and not the seller, will get proceeds should the seller make a claim against the property. Alternatively, you can, at closing, have the seller sign a letter of insurance cancellation, requesting that any unearned premiums be sent to your or your company’s address.
Obtain your own insurance.
Once the transaction is complete, a few important post-closing steps remain to ensure the transfer is smooth, secure, and aligned with your investment strategy.
This stage involves securing access, updating insurance, and establishing new accounts—actions that reduce risks and prevent future issues.
Exchange Keys and Access Codes
At closing, confirm that you receive all necessary keys, garage door openers, and any alarm codes from the seller.
Some investors rekey the property immediately to prevent unauthorized access. Hiring a locksmith to rekey the doors usually costs around $100-$200 and adds a layer of security.
Cancel Seller’s Insurance Policy
The seller’s insurance policy should be canceled now that ownership has transferred.
Use the Limited Power of Attorney signed at closing to contact the seller’s insurance provider and cancel the policy on their behalf.
This step prevents any insurance conflicts, as dual policies on a single property can lead to claim denials.
Making sure only one active policy covers the property eliminates complications should an insurance issue arise.
One such insurance provider (NREIG), recommends that you should always have your own policy on the property to avoid a denied claim because the primary insured is no longer the owner.
Obtain Your Own Insurance Policy
Setting up your own insurance policy will protect your investment.
For rental properties, a non-owner-occupied landlord policy provides coverage tailored to rental risks.
Make sure you’re listed as the first named insured, with the existing mortgage company as the mortgagee and the seller as an additional insured.
Data from the National Association of Insurance Commissioners (NAIC) shows that having a landlord-specific policy reduces claim denials by up to 20%, as these policies are designed to cover tenant-related damages.
“Ensuring proper insurance is one of the first priorities after closing,” advises Matthew Rosen, an insurance consultant for real estate investors. “If an unforeseen event occurs, having the right policy in place could save you tens of thousands in repair costs.”
Update the Address and Contact Information
If you’re notifying the lender of the title transfer, have the seller sign a change of address form to update the lender with your mailing address and phone number.
This makes sure that future mortgage statements, notices, and lender communications are directed to you, simplifying account management and ensuring timely payment reminders.
Set Up the Lender’s Online Payment Portal
To prevent missed payments, set up the lender’s online payment portal or other payment method used by the seller.
Many lenders offer online payment, auto-pay, or electronic funds transfer (EFT) options that help keep the mortgage current.
Studies on mortgage servicing show that borrowers who use auto-pay options reduce their chances of missing payments by 25%, which can add stability to your Subject To investment.
Manage Utilities and Establish New Accounts
Finally, contact the utility providers to confirm there are no outstanding balances and set up new accounts in your name.
Keeping water, electricity, gas, and other utilities up to date prevents service interruptions, allowing for a smooth transition.
This step also gives you full control over utility costs, enabling you to monitor expenses if you intend to rent the property.
Summary
In this guide, you learned the critical steps to complete a Subject To deal, from your initial due diligence on the seller and property to the post-closing tasks that solidify your investment.
Along the way, I covered key details like what to ask the seller, setting up the right documentation, where to close, and much more.
Whether you were new to Subject To transactions or looking to refine your approach, this comprehensive overview gave you the tools and insights needed to make informed, strategic decisions.
In the next part, The Essential Documents and Contract Clauses to Purchase a Property Subject To, I talk about the specifics of the Subject To purchase agreement, and some of the most important disclosure items to include, to keep you out of trouble.