Using Facebook ads to advertise for motivated sellers doesn’t have to be scary, expensive, or risky. This guide is meant to help real estate wholesalers, real estate investors, and even real estate agents get started with an easy, low-risk ad, with a tiny budget of only $10.
In this way, you can get your feet wet so that you can begin to understand all of the mechanics and nearly unlimited potential of advertising using this channel, without losing your shirt.
The point of the ad like the one you will see in this article is to drive motivated seller leads to your website to fill out your lead form.
The easiest way to set up your first ad is from your Facebook Business Page, by following the illustrated steps in this guide.
- (Prerequisite) Set up your Facebook business page
- Create an Ad from your business page
- Choose Ad Type
- Choose a Goal
- Create Your Ad
- Write a Description
- Upload or Choose Image
- Write a Headline
- Choose a Button Label
- Enter a Website URL
- Create a Custom Audience
- Determine Detailed Targeting
- Choose a Duration and Daily Budget
- Determine Ad Placement
- Add a Payment Method
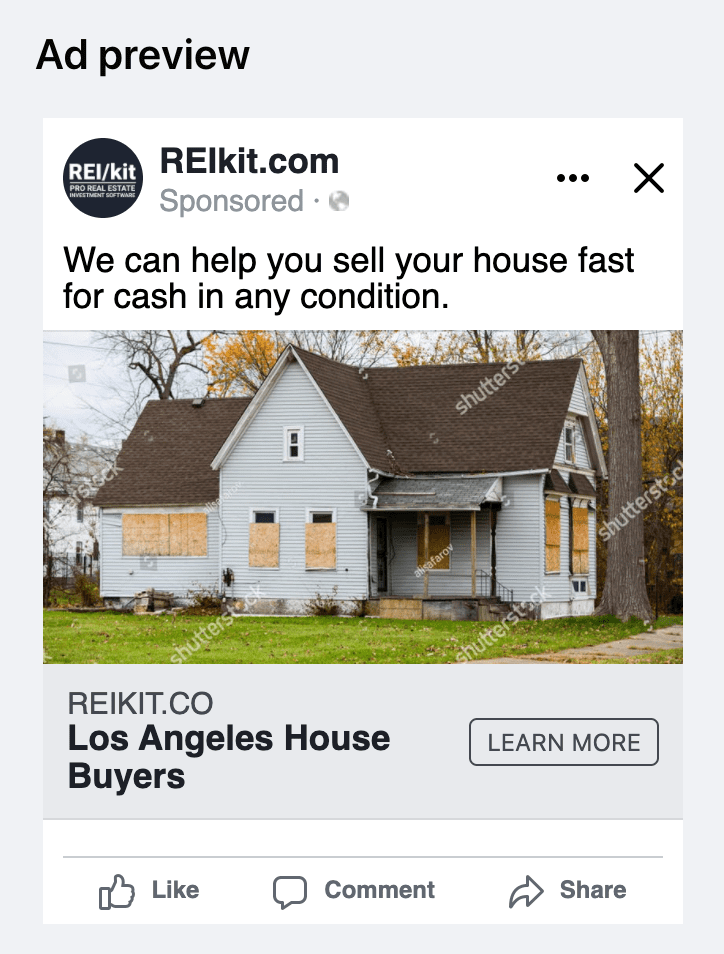
- Preview the Ad
- Send Ad for Approval
(Pre-requisite) Set Up Your Facebook Business Page
If you don’t have a Facebook Business Page set up already, I highly recommend that you set one up for your business for several reasons, not the least of which because it is a pre-requisite for the rest of this guide.
Setting up a business page creates a separation between your personal account and the account for your advertising.
Even if you never plan on marketing the business page itself, it’s an essential piece of the mechanics of advertising on Facebook.
If you haven’t set up a business page yet, here is a great guide to get you started:
https://buffer.com/library/how-to-create-manage-facebook-business-page
Set Up Your Website
This article assumes you have already set up a website, but you can follow the process to familiarize yourself with it even with no website.
Don’t have a website yet? REI/kit optimized real estate investor websites can be set up in two-clicks, completely built out and ready to start capturing motivated seller leads.
Here is the link for the example website being used in this tutorial: https://www.reikit.co
Now let’s get advertising.
Creating Your Ad From Your Facebook Business Page
In this tutorial, I want to get you up and running as quickly and painlessly as possible.
For that reason, I’m not going to talk about every feature of the Facebook advertising interface.
Instead, I’ll walk you through your options and then show you how to create an advertisement that will start sending traffic to your page right away.
There are at least four ways to start an ad on Facebook:
- “Boost” a post that you created and posted on your business page – fastest, but most limited in targeting, functionality, and goal set
- Create an ad via your business page – second fastest, limited in goal set
- Create an ad campaign with the Facebook Ads Manager – used to create robust campaigns with multiple goal sets, split-testing
- Create an ad campaign with the Facebook Power Editor – everything Ads Manager, plus agency use, allows for quick campaign duplication
For simplicity, your first ad will be an ad created from your business page (option 2).
Don’t worry if you have no likes on your page, or that nobody knows about your page yet.
Although the ad will be posted on your business page, it will be shown to anyone on Facebook that meets your targeting criteria that I’ll break down later.
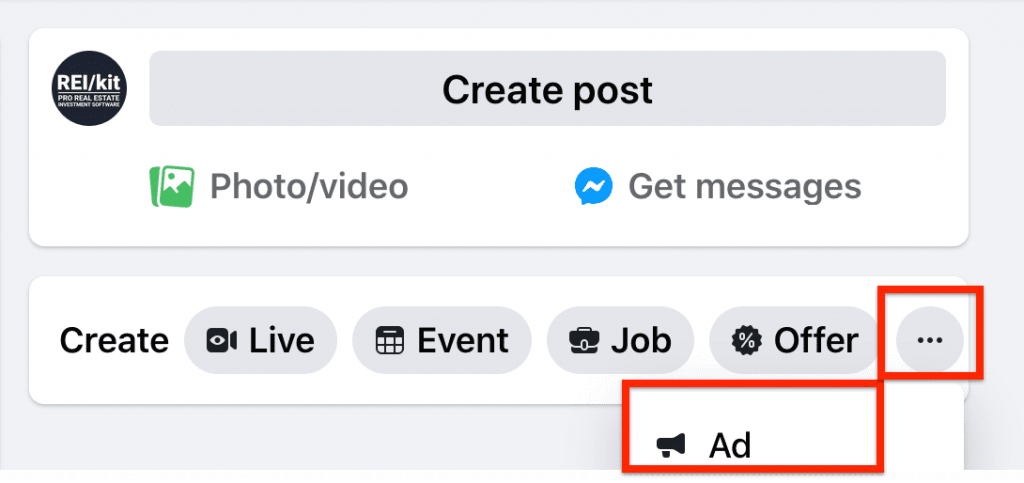
To get started, go to your business page, then in the post section click into the ellipsis button (three dots) to bring up the post options and select “Ad”:
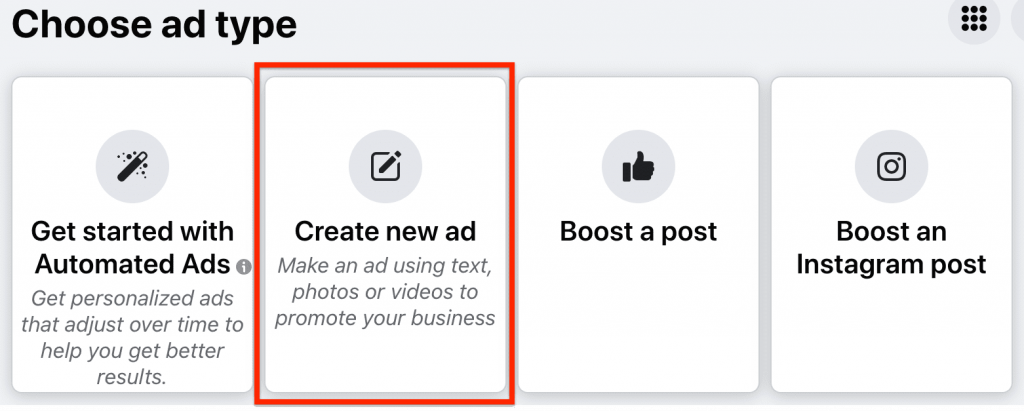
This will bring up your ad type selection screen.
Choose Ad Type
You will be presented with several options for how you want to create your ad.
Note if you have more than one Facebook business Ad Account: After clicking on create new ad, you will be presented with the ad interface; you may need to toggle to the correct one now before you start creating this new ad.
Next, select a goal.
Choose a Goal
Goal selection helps Facebook determine the kind of audience to show your ad to, and also the metric that they will use to charge your account.
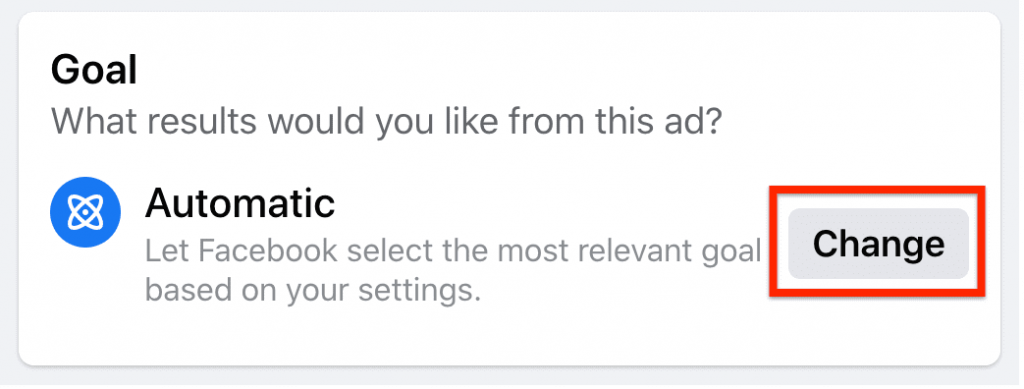
Facebook has “Automatic” set as the goal by default, however there is always a chance that the Facebook algorithm will choose the incorrect one.
For this article’s ad, click on the “Change” button to select the goal manually.
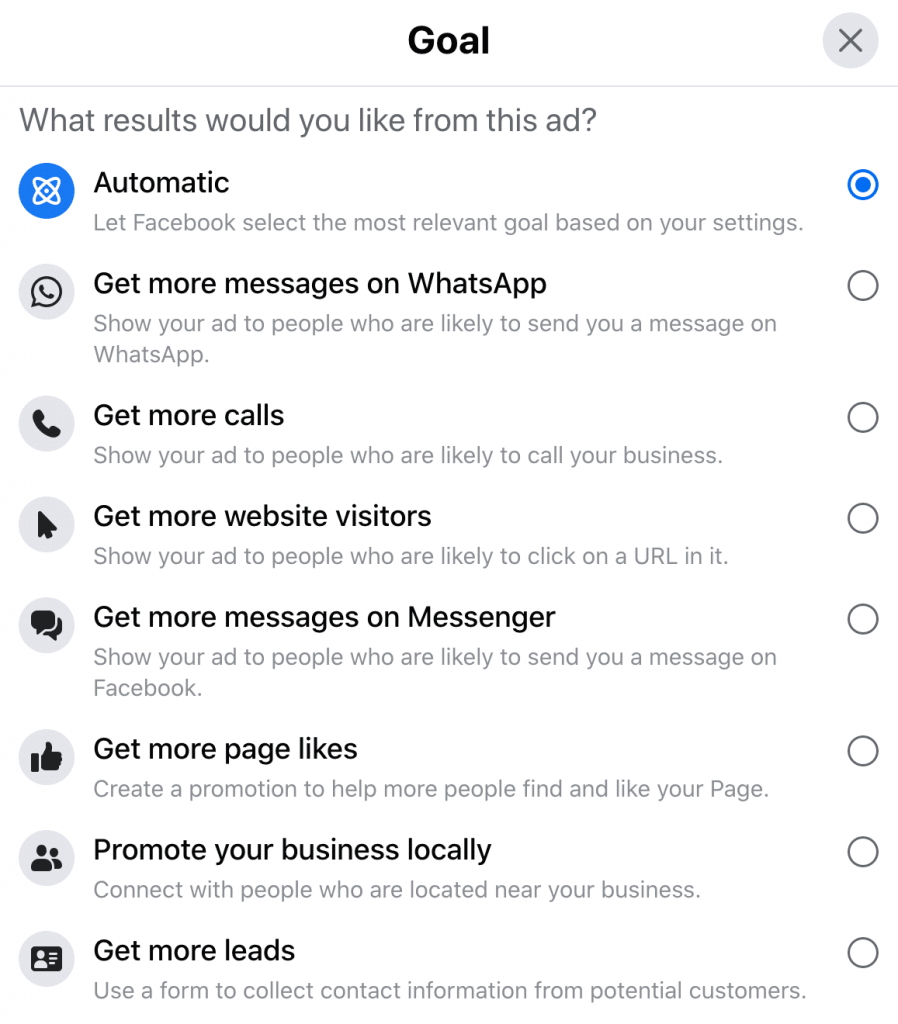
Here you will select what outcome you would like as a result of your ad:
About Goal selection, Impressions, Clicks, and Leads and how Facebook charges for those.
Facebook will charge for different goals either based on impressions, clicks, or leads, so depending on the goal that you choose you will be charged correspondingly.
For example, a “Get More Website Visitors” goal is charged based on impressions, whereas engagement with a post is charged based on clicks, and lead goals are based on whether a lead filled out and submitted a form.
The further down the funnel that you go, the more expensive the conversion event is in Facebook.
For example, consider your ability to convert a lead acquired using a Facebook lead ad that has much less information about what you do when they submit their info, vs a lead acquired via a Facebook website visitor who submitted their information on your website that explains what you do.
However, if this is your first ad, Facebook only gives you one option: get charged for impressions for your first $10 in spend.
This means that the website visit is the only goal that matters, since the more eyeballs you get on your ad (impressions), the more people will click on it.
So for this ad, select the “Get More Website Visitors” goal.

Create Your Ad
Now you can begin to create your ad.
Note that Facebook will have already imported some of the information from your Facebook business page into the ad, such as your page description, cover photo, or page url into the Ad Preview section.
You will overwrite or completely remove this information and image in the following steps.
Changes made are automatically saved and reflect in the Ad Preview, so be sure to check the Ad Preview after each change to make sure it is accurate and clear.
Ad Creative
Description
Your description text describes the product or service that you are offering.
Generally speaking, for any types of advertisements involved with housing or financial situations you need to be very careful in how you approach prospective sellers or buyers, or risk getting your ad rejected by Facebook.
For example, using phrases like these:
“Facing foreclosure? I can help!”
Or
“I’ve helped others like you, and I can help you, too!”
“Sell Your House Fast”
Or
“Sell Your House for Cash”
is not acceptable, because you are attempting to single out the viewer rather than appealing to a broad audience that the viewer MAY be (not IS) a part of.
In general, if you are asking a specific question, are using a question mark, or are including the words “like you” or “your” in your ad, it’s probably too specific.
So, for example, “We offer services to help with many financial situations” is more acceptable.
Here are some variations of the same theme:
- No commissions. No fix-up. No fees. Get help with a house no longer wanted today.
- We buy houses that are not wanted. Click Learn More to find out how we can help today.
- The fastest way to get cash for unwanted properties.
For more information on prohibited content that is related to personal attributes, you can go straight to the source:
https://www.facebook.com/policies/ads/prohibited_content/personal_attributes
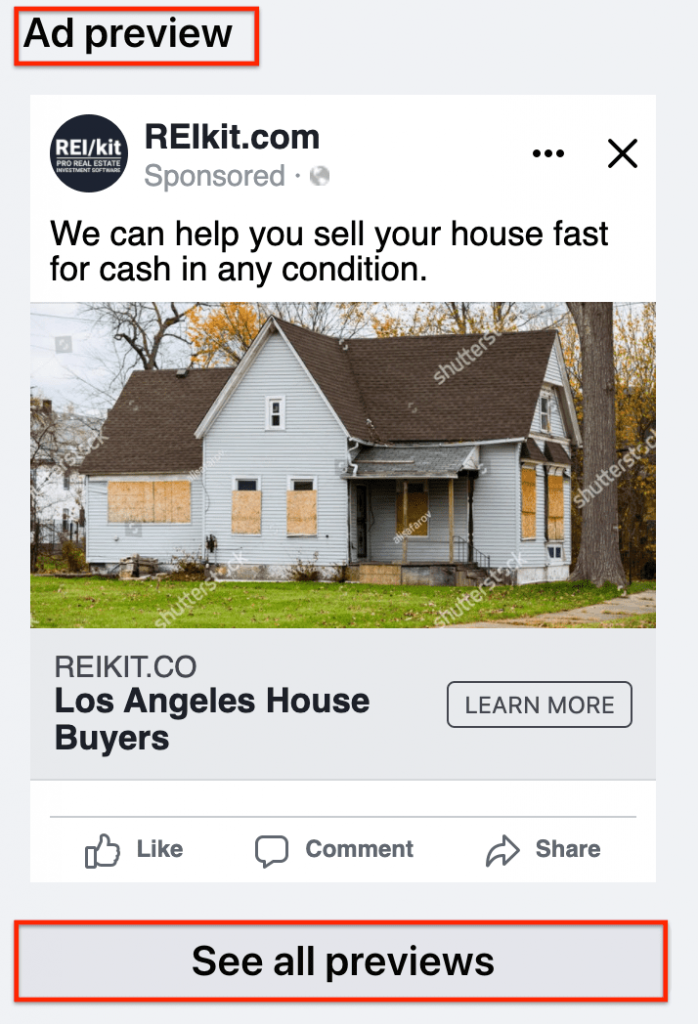
For this ad, I will use “We can help you sell your house fast for cash in any condition.”
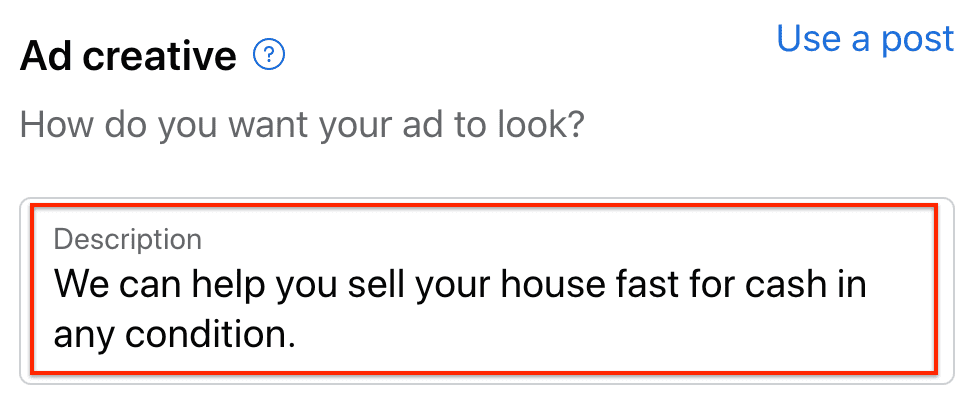
Again, the Ad preview box will automatically update with your selected description, although the imported image, headline, and CTA still appears and will be replaced.
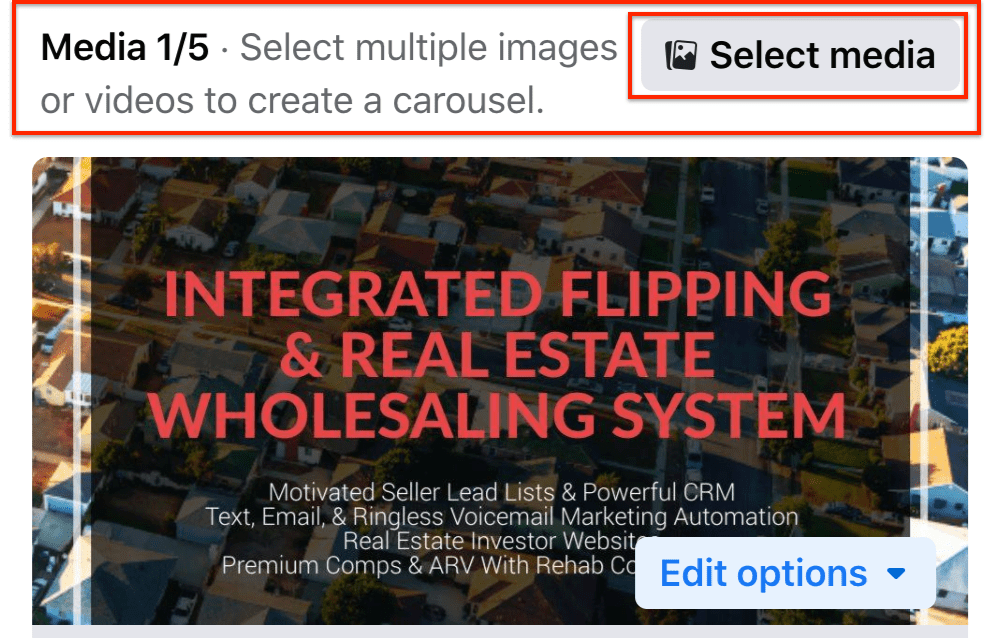
Next, you will choose the images or videos you want displayed in your ad.
Facebook allows you quite a bit of creativity and flexibility in creating your ad.
Select Media
First, click the Select Media button:
Browse Media
From the Browse Media box, you can:
- -Choose from a single image or video from your Ad account
- -Select a single image or video from your Instagram account
- -Choose a single image or video from your business page
- -Stock images: select from a variety of royalty-free images provided by Facebook
- -For any of these, you can choose to create a Carousel of multiple images or videos, where viewers can scroll through up to 5 images by sliding through them left to right on the ad
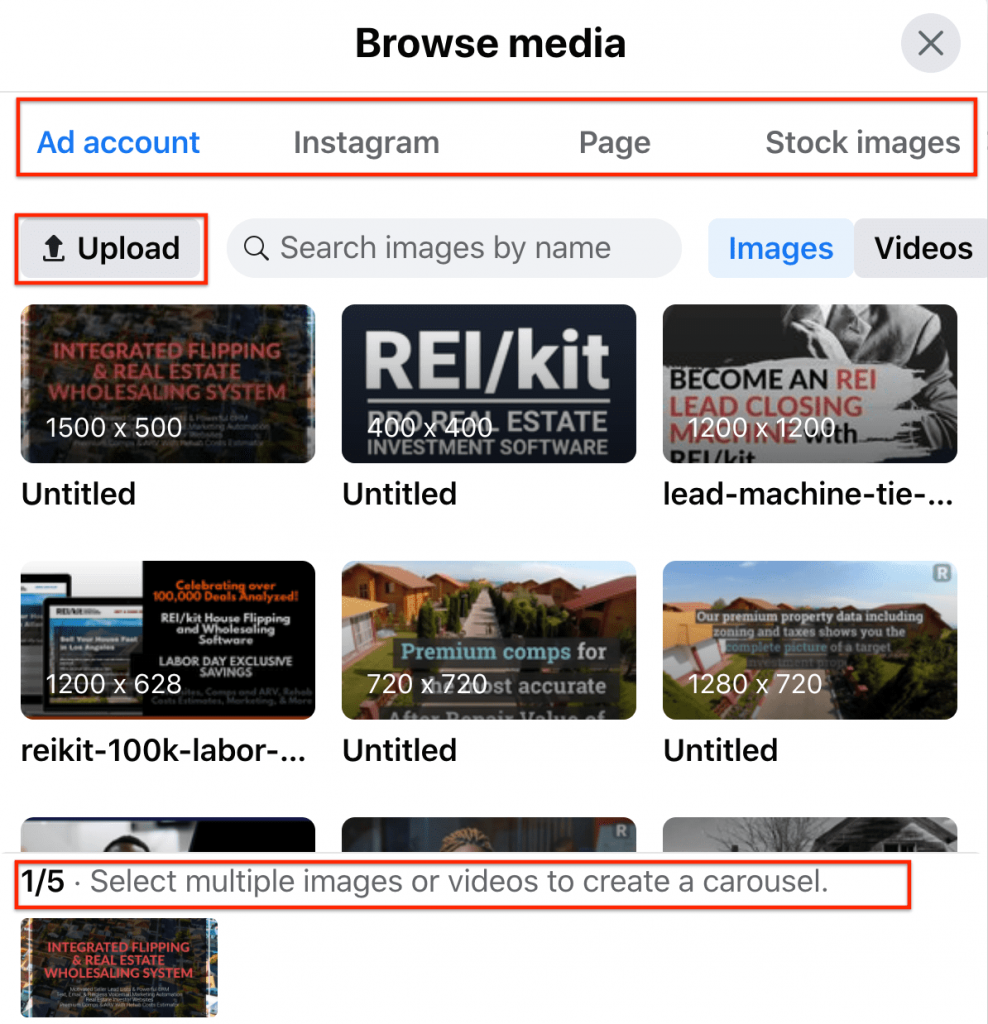
You can also simply upload a new image or video.
For uploaded photos, the photo specifications are: minimum size: 600 pixels width, 600 pixels height; recommended size of 1080 x 1080 pixels for a 1:1 image, and 1200 x 628 for all others. No maximum size restrictions.
Try not to use text in your photo, and if you must, make sure it is not more than 20% of the image.
While Facebook no longer penalizes ads with photos that have more than this percentage, it’s still good practice to minimize text.
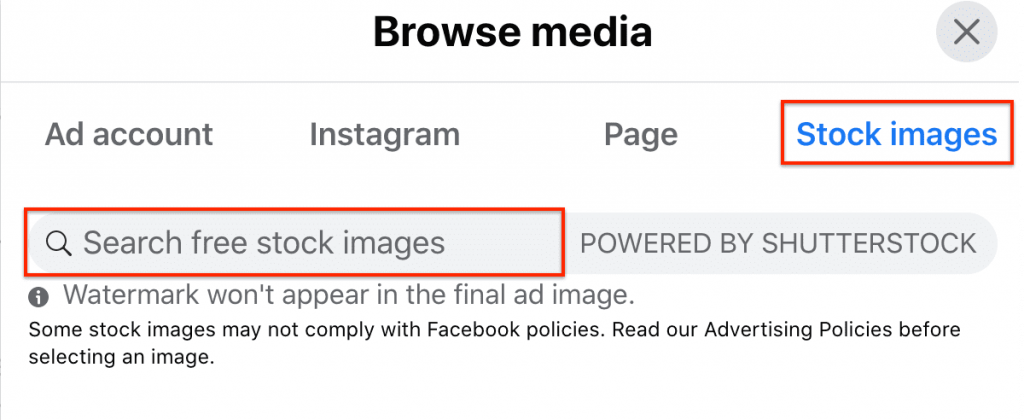
Choose an Image
For this tutorial, you will start with a single stock image.
Select ‘Stock images’ from the Browse Media box and then type in a word into the ‘Search free stock images’ search bar.
For this guide, I have typed in the word “foreclosure” in the search bar and then selected one from the images that appear.
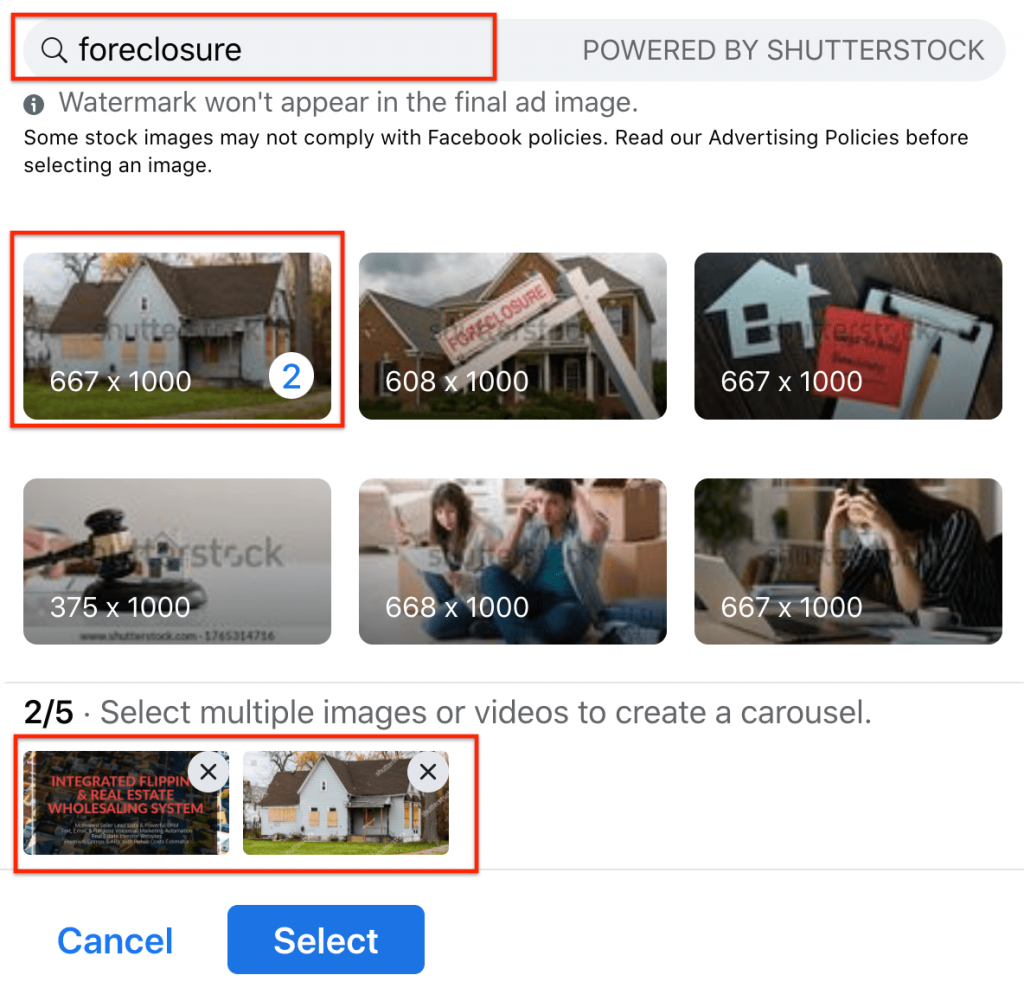
Note that the cover photo or other image from your business page may appear as a default selection, as shown above, and you will need to deselect that by clicking on the X if necessary.
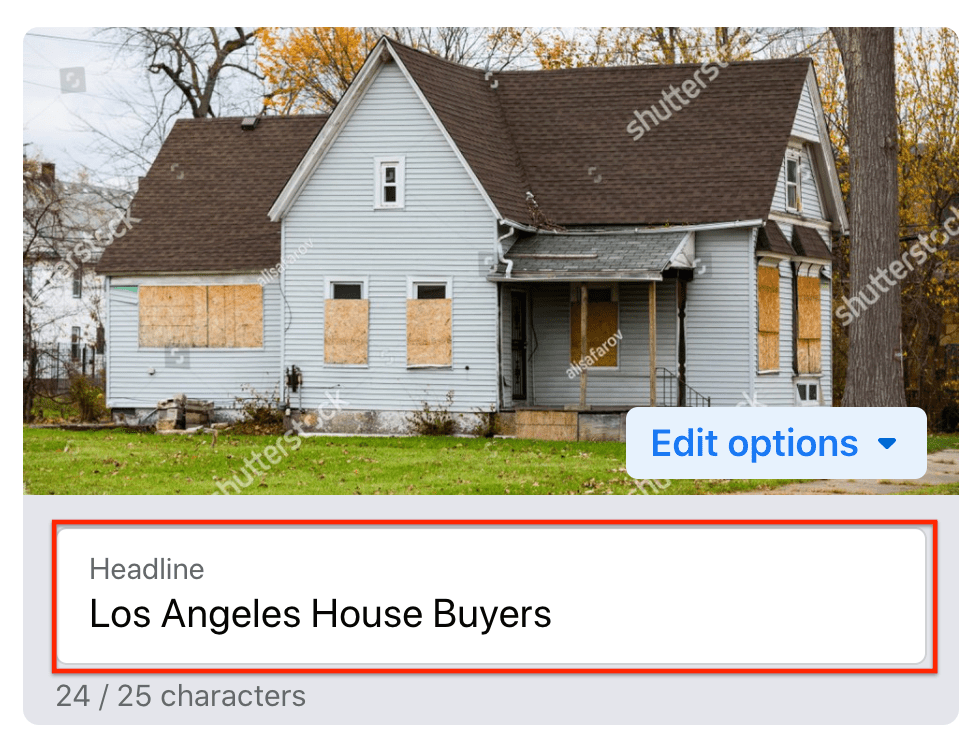
Write a Headline
Depending on what your real estate expertise is, you can choose a headline that suits your offering.
When marketing, it’s always helpful to put yourself in the customer’s shoes and imagine a solution that will resonate with them.
In other words, while “We Buy Houses” is the ad that I am creating now, there’s a possibility that the customer is not looking to get rid of their house, or they are not interested in how much you want their house for cash.
They are looking for solutions that will help them lift a burden from their shoulders.
If you can find a way to translate that into your photo and copy, it will go far in separating you from your competitors.
For the purposes of this ad, if you cannot think of a headline that is more tailored to the solutions you can offer, select from one of these:
[Your City] House Buyers
[Your City] Cash House Buyers
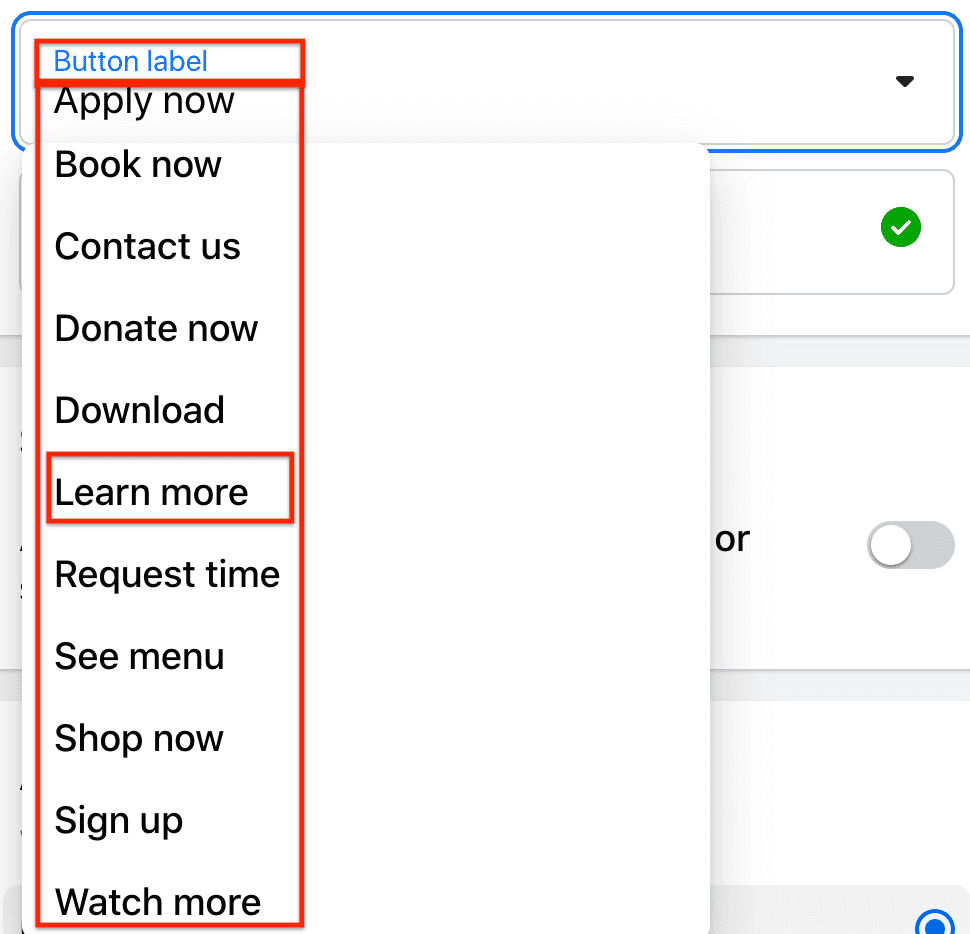
Choose a Button Label
Most ads have a Call-to-Action button that helps the viewer take action.
In the case of a Facebook ad, the CTA is the button that you want the viewer to click on that will get them to your website.
Facebook calls this a button label.
There are a number of button labels available to choose from.
In this case, “Learn More” is the most appropriate choice, since your leads are going to your website for more information about the solution you are offering.
Why do I not recommend any of the other button labels for these ads?
Think about how you would respond emotionally to your own ad, especially one that involves one of your most precious and expensive assets: your house.
The least aggressive Call-to-Action is the smallest investment you can expect them to make at this point, which is to learn more, not to hand over their information.
If they want to do that, they can fill out the contact form on your website after seeing what your business can help them with.
You may recognize this as a small funnel, where you ease the seller into micro-commitments at different stages.
Ultimately, this helps guide them in the process and show their interest and willingness to negotiate.
Enter a Website URL
When creating your Website Visitor ad, you need to tell Facebook where you want it to send visitors to — that is, the people who clicked on your button label CTA.
This is called a destination URL, or landing page, and for this ad you want the URL of your website, not the url of the business page.
As mentioned, Facebook will have imported an URL from your business page already, so you need to change the URL.
First copy your website’s link URL in the browser search bar.
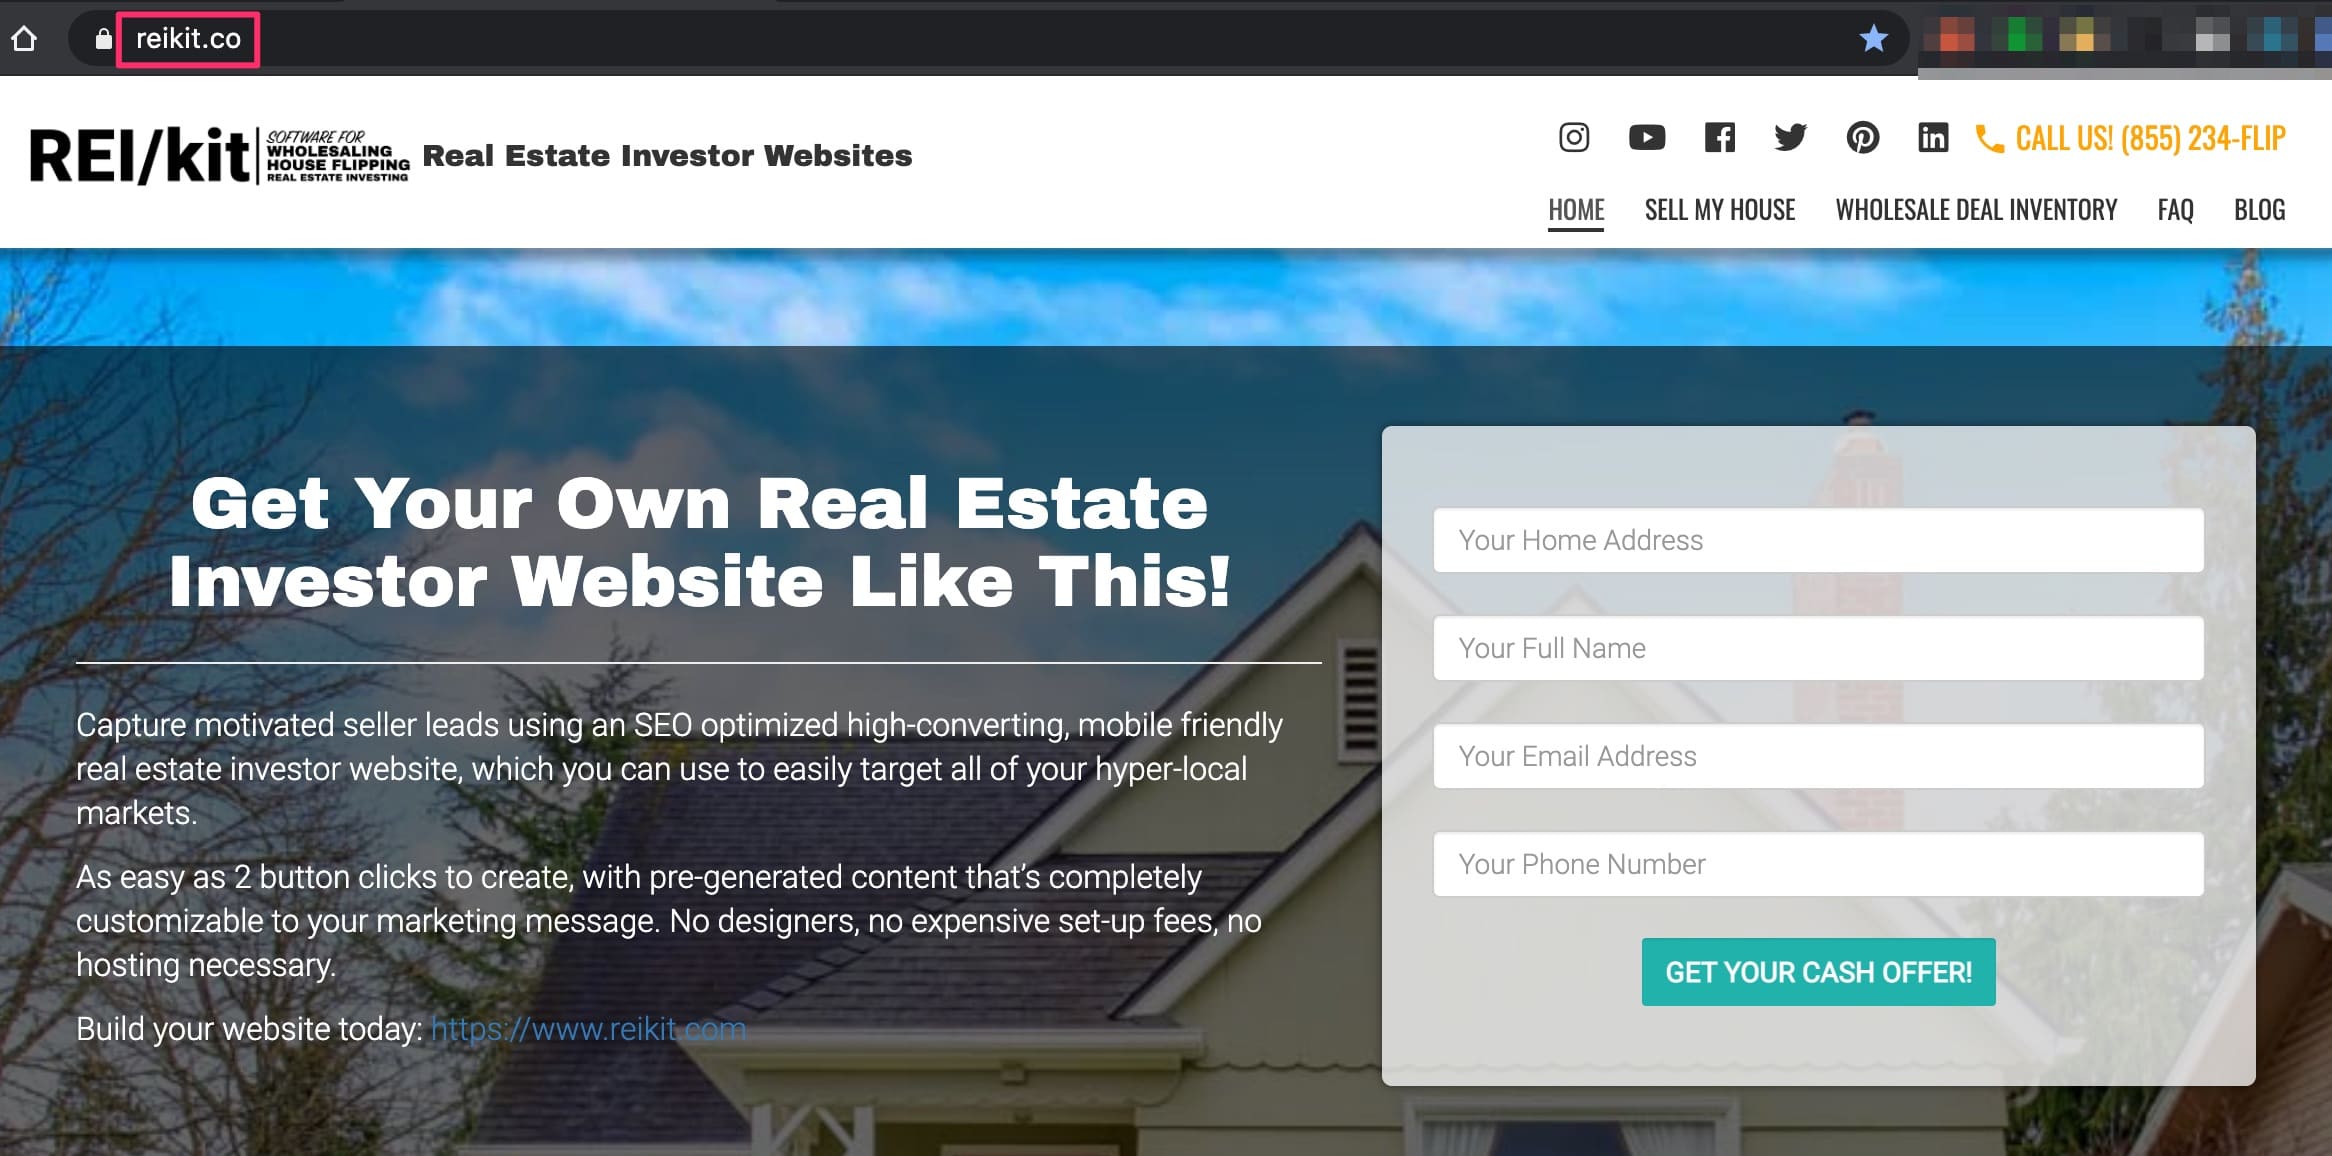
Going back to your Facebook ad creation screen, paste the URL that you copied from your website into the Website URL field on the screen.

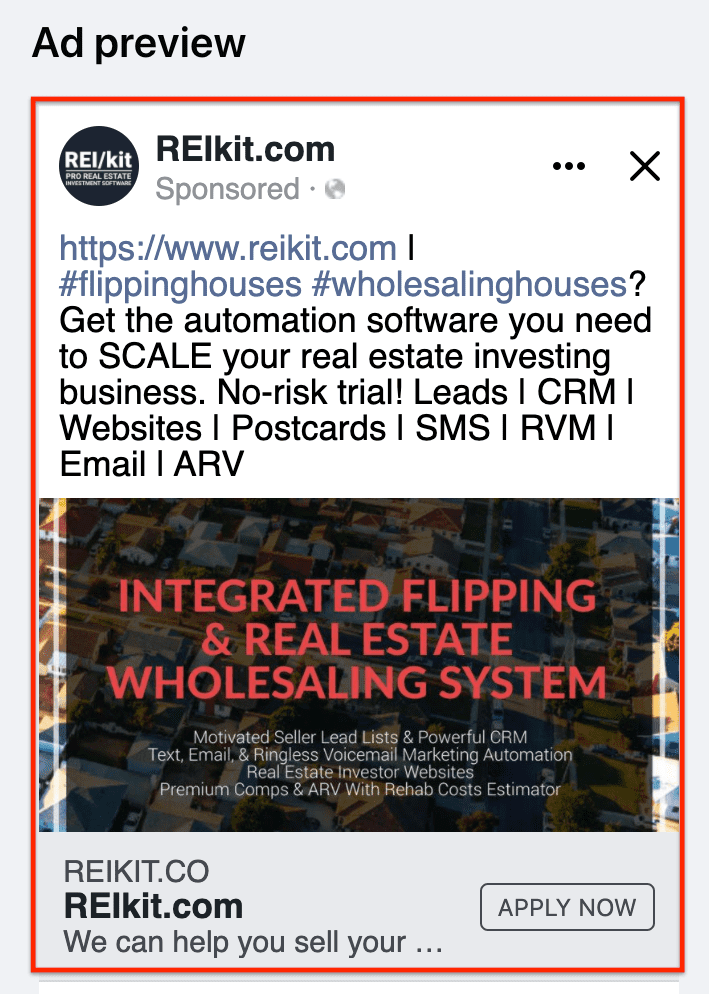
This is the end of the Ad Creative section, and your Ad Preview window should reflect all of the changes you have made:
Special Ad Category
Next, you’ll need to declare if you are offering real estate housing opportunities.
You are not advertising housing for sale or rent, so leave this untoggled.
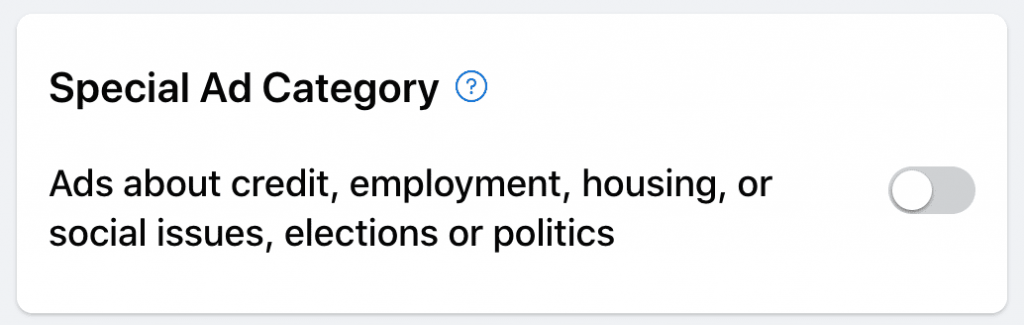
Note: It’s possible that after you’ve created and published your ad, that Facebook will reject your ad if it thinks you are providing real estate housing opportunities. This might be triggered by just using the word “house” in your ad. You will have the option at that time of asking them to review the ad again and approve it.
Create a Facebook Custom Audience
An Audience in Facebook is a group of people to show your ad to.
Facebook will start you off with an Audience of hundreds of millions of people in the United States aged 18 and over, so you have to narrow down your audience through “targeting.”
Targeting can be both geographic, as well as based on other Detailed Targeting criteria like demographics, interests, or behaviors.
As you can see in this screenshot below, Facebook gives you a variety of Audiences to choose from.
The initial audience of “People you choose through targeting” is selected by default.
![]()
Once this targeting selection process is complete, you will be able to save your audience and reuse it for future ads, so let’s create your audience.
Click on the “Create New Audience” button to start the process.
You will be presented with detailed targeting options that I describe next.
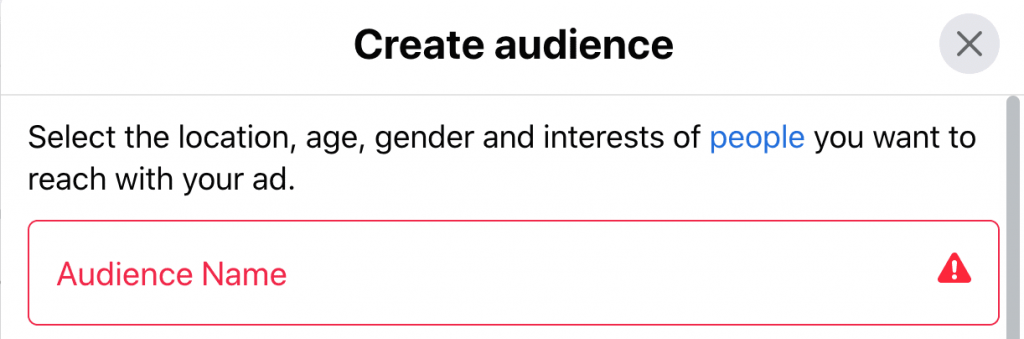
Create New Audience
Naming Your Audience
Although the name of your audience is the first field that you will see, I recommend waiting to name your Audience until after you have finished entering in all of the targeting criteria.
This is because you will be using those criteria in the name to distinguish audiences from each other in the future when you have created more audiences.
It is good practice to try to follow a naming system such as: Gender – Age – Geographic Area/Radius – Demographics/Interests/Behaviors.
For example:
M/F – 50-65+ – ATL 50miles – Divorced – NOT Brokers
Audience Definition
At the bottom of the create audience builder is a very important bar to take note of as you edit your targeting criteria.
This bar will show you whether your audience is too broad, too specific, or just right.
The sweet spot is in the middle of the green bar, which is considered “Defined.”
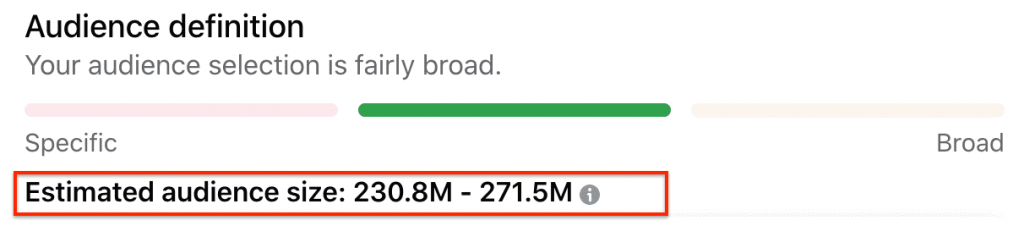
Another item to keep an eye on as you build your ad, that is visible in the above image, is the “Estimated Audience Size,” the number below the audience definition bar.
The Estimated Audience Size provided gives a general idea of the range of people who your ad can potentially be shown to.
In a nutshell, it estimates the number of people who match your targeting criteria within the geographic area that you choose.
Don’t view it as a hard fact; it’s simply a guideline for how large or small your potential audience is so that you can plan and budget accordingly.
The Estimated Audience Size will change every time you make a change to your targeting.
Detailed Targeting
Narrowing the Audience
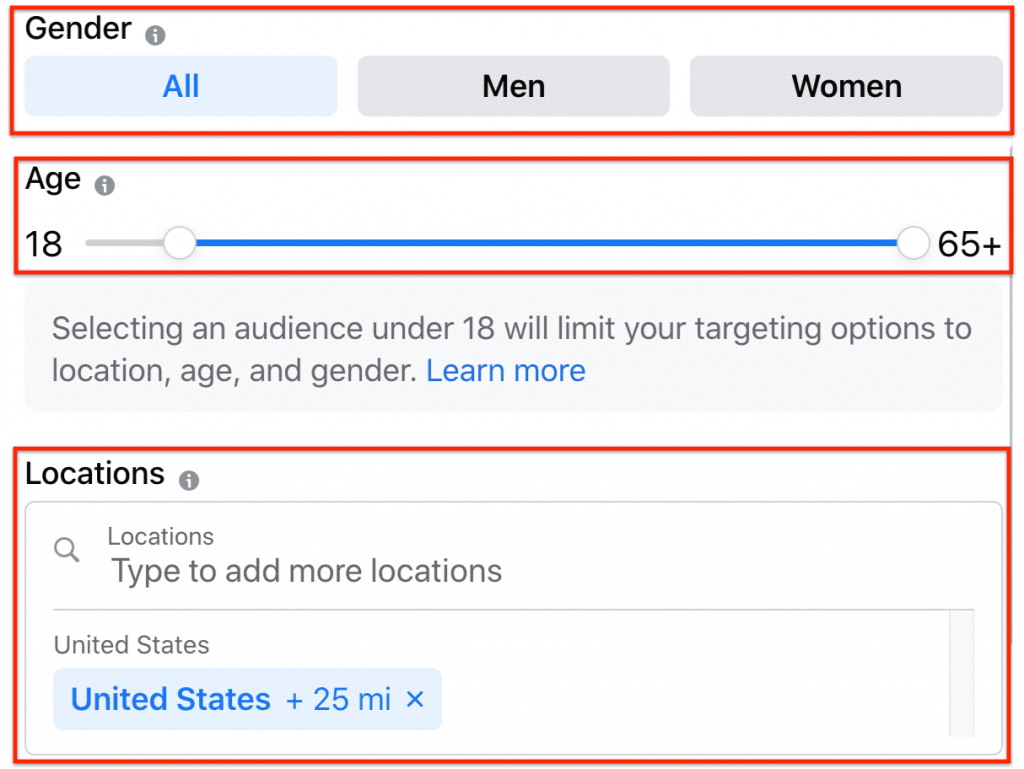
Notice that Facebook starts off the ad builder Audience set with both Men and Women, aged 18-65+, that live within the United States.
Now, I don’t know a lot of 18 year olds that own houses that they no longer want (unless inherited), nor do I want sellers outside of my city contacting me, and you might not either.
Narrowing down our Audience based on the criteria of people we don’t want the ad shown to, is just as important as defining the criteria of the people we do.
Note: The location does not have to be in your specific area. If you are doing virtual wholesaling or looking for potentially motivated sellers in a different geographic area, specify that area in the targeting.
Facebook Audience Settings for Your “We Buy Houses” Ad
Let’s start simple with the following settings for a We Buy Houses ad.
Gender:
All
Age range:
Slide the slider to select 35 to 65+

Geographic location(s):
Type in a city and select a 10 mile radius on the slider, or whatever is appropriate for that area.
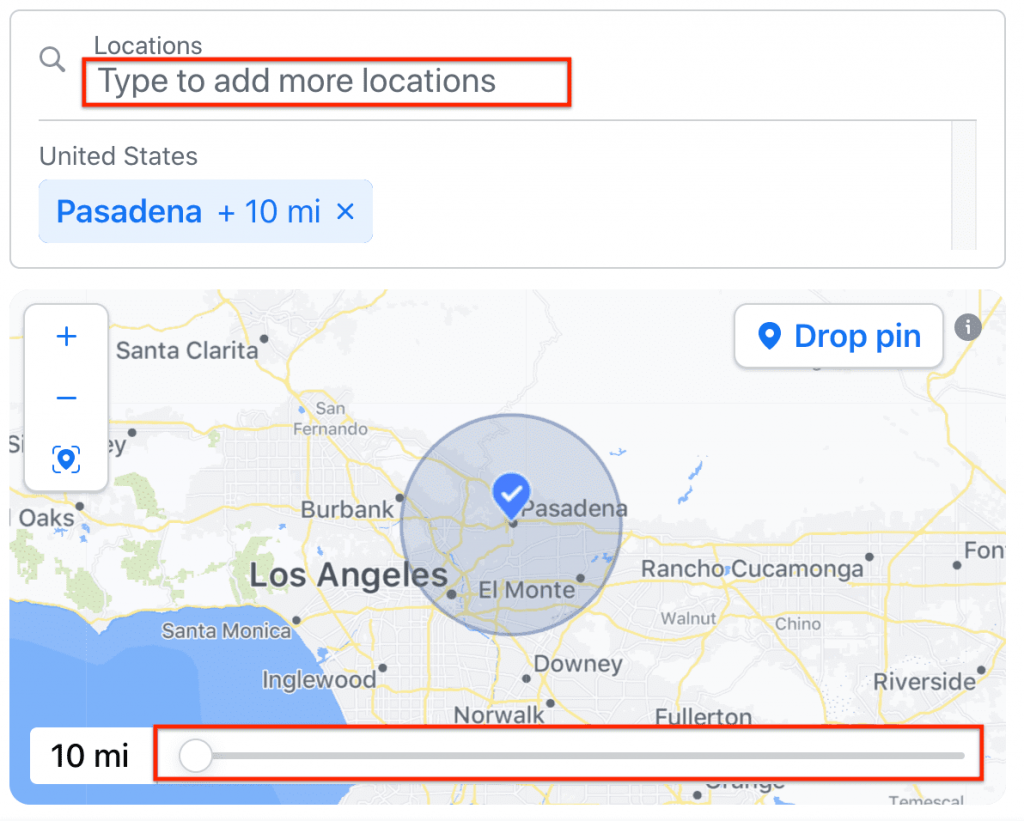
The Estimated Audience Size is now 1.1 million to 1.3 million people.
Now let’s get into the nitty gritty: Facebook’s Detailed Targeting options.
Detailed Targeting Options
Demographics, Interests, and Behaviors
Before you can specifically target a particular audience, here is an explanation of the three categories of targeting: Demographics, Interests, and Behaviors.
Demographics
Demographics are the characteristics of a population such as age, income, education, jobs.
Interests
Interests are those words that a viewer has included in their Facebook profile, or that are included in pages they like or other areas.
Behavior
Facebook can provide Audiences that display a certain type of behavior. For example, you could include people who fit into certain multi-cultural affinities: African-Americans, Asian-Americans, Hispanics, and so on.
Note: do not advertise housing opportunities (if you are advertising a property for sale, for example) that are specifically aimed at populations of a certain multi-cultural affinity; this is against federal law.
Inclusive Targeting
You will first want to select which demographics, interests, or behaviors to target in your ad by either searching for them, or browsing through the different categories.

Because Facebook doesn’t allow you to target specific audiences, you have to get creative as to how to target the people that you think are most likely to be your leads.
You can simply search for any keywords you can think of and Facebook will start auto-populating related interests, demographics and behaviors in the drop-down that appears:
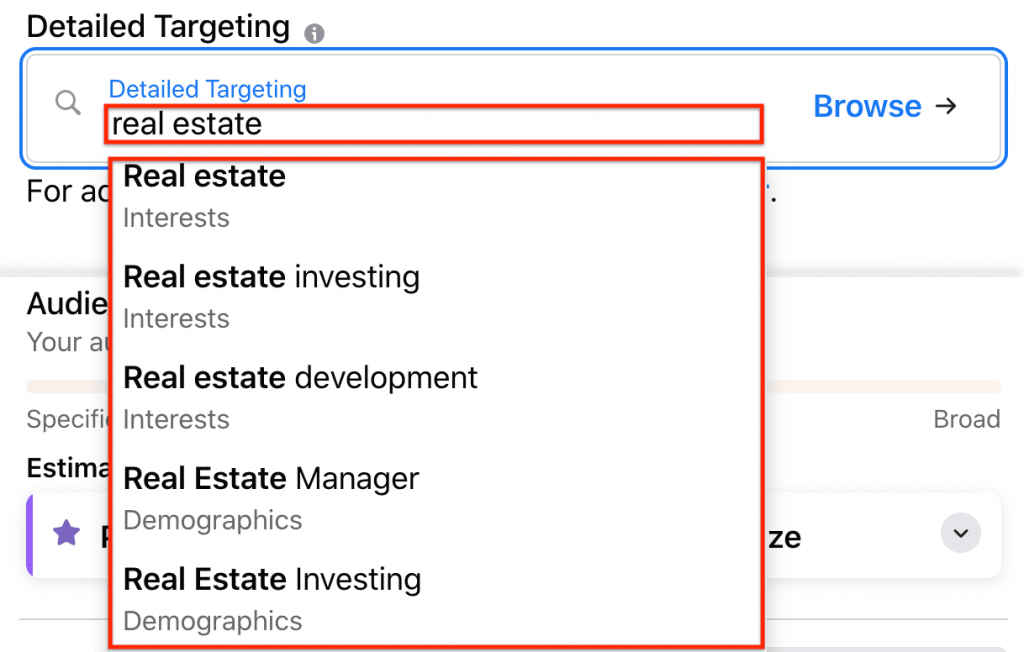
Trick of the trade: Think of and search for an interest or demographic or behavior that you believe the people in your target audience exhibit.
Here are some questions to ask yourself to help you with the keywords in your search:
Do they frequent a particular restaurant or establishment?
Do they like a particular activity or sport?
What are their dreams and aspirations?
Do they have celebrities or political figures that they follow?
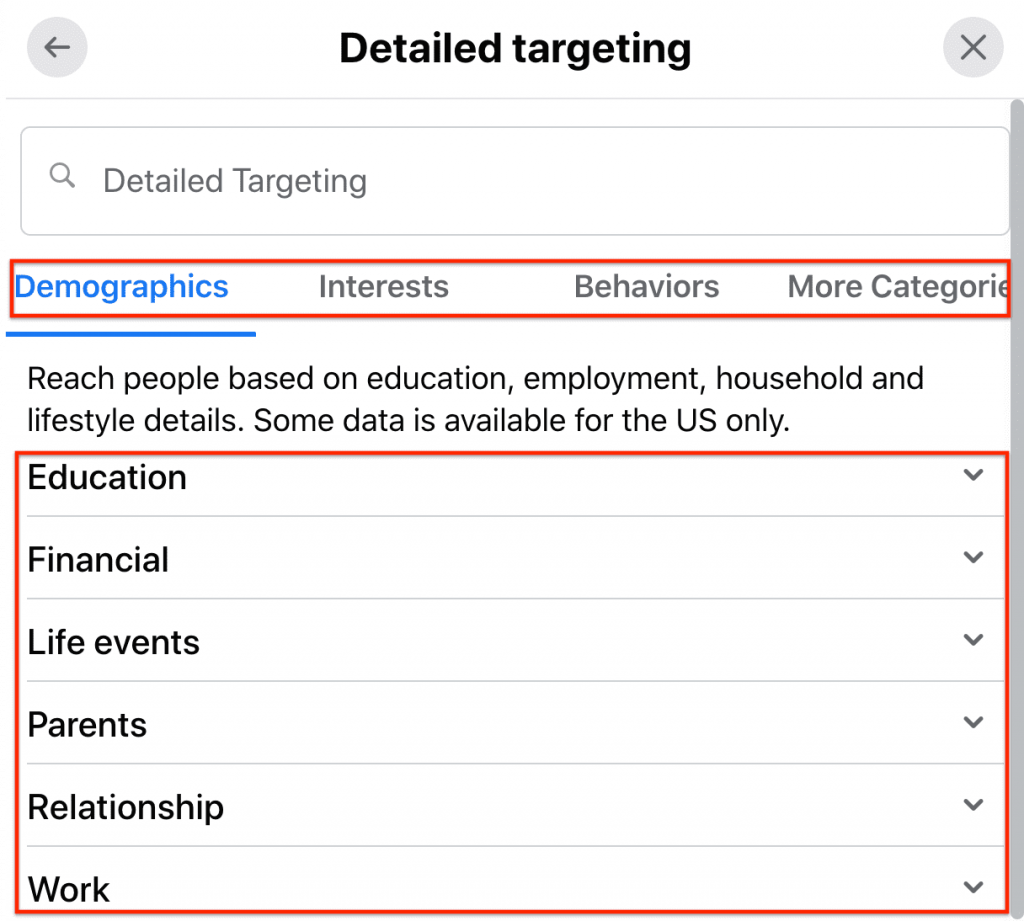
If you’re having trouble coming up with anything, you can also “Browse” each option by clicking on the word “Browse” and expanding that option into more refined categories:
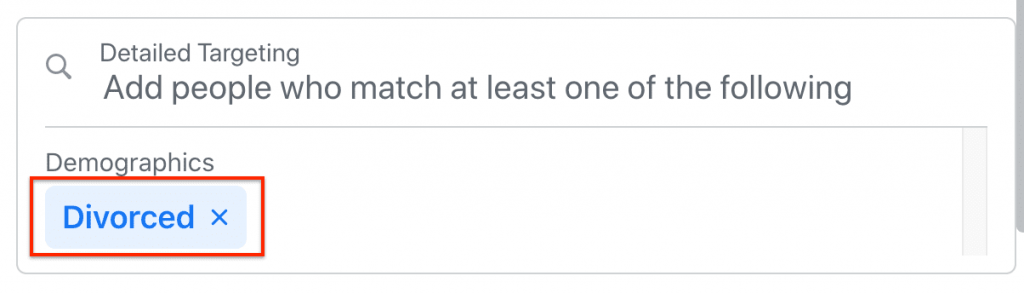
For example, for this ad I selected “Divorced” from the Relationship demographic.
Excluding Detailed Targets
On the other hand, you will also need to exclude Job Titles and Interests related to real estate.
For example: brokers and agents; these folks do not need your help selling their property, and you don’t want them clicking on your ad.
Keep in mind again that the criteria is simply referring to the Job Title and Interests that your audience has listed in their Facebook profile.
Facebook does not have this option available for ads created via the Facebook Business page.
You may, however, exclude in Ads Manager as you get more familiar with the platform.
This completes your audience selection and targeting.
Save Your Audience
Now that you have all of your audience settings defined, you can go back and name your audience using your selections:

Then click “Save audience” to save your brand new Audience.
Once you have saved and closed your audience, next you will choose your budget and the duration of your ad run.
Duration and Daily Budget
Since this is your first or a test ad, you should set the budget low, at $2 per day.
Important: In order to make sure that your ad stops running, make sure to select that the ad will end, otherwise it will run continuously.
This is set by default, but if not, select “Choose when this ad will end.”
When you start with a daily budget of $2 you can either set the duration for 5 days, or use the calendar to set the ad end date at least 5 days from the day that you start it.
Facebook will then tell you how much your ad will cost.
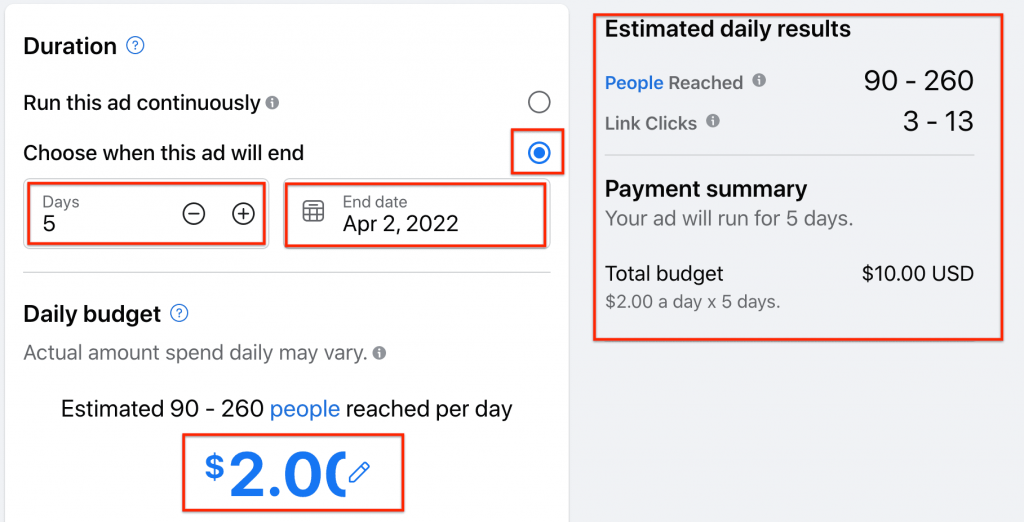
Estimated Daily Results
You will see an estimation under the Daily Budget that gives you a rough approximation of how people will be reached per day.
In addition, also displayed is how many Link clicks (clicks on your ad or your Learn More button) you can expect for a given budget.
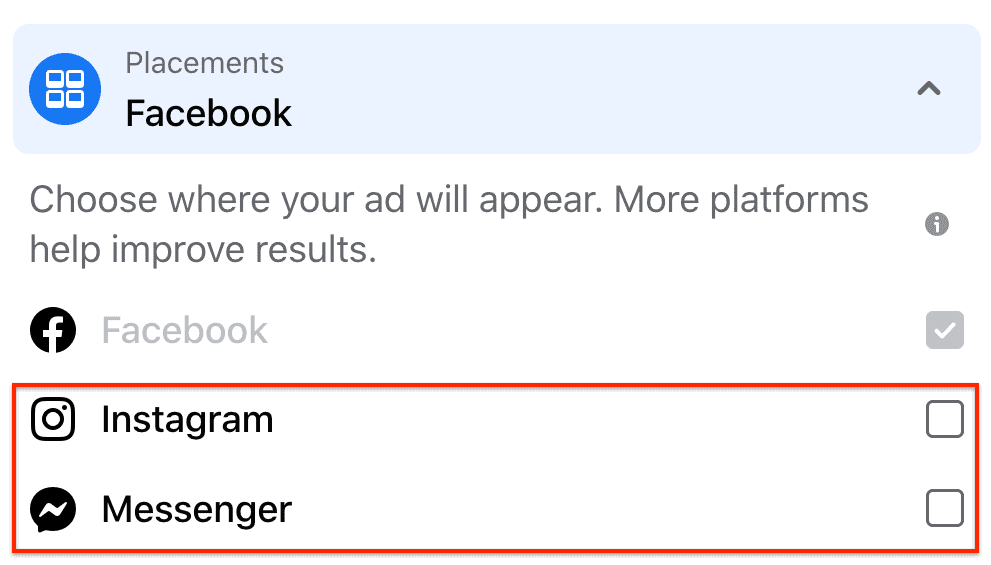
Now that your budget and duration are set, next you choose where you want your ad to show up.
These are Facebook, Instagram, and/or Messenger, with all three selected by default.
Ad Placement
You should uncheck the checkboxes next to Instagram and Messenger placements to ensure that your ad only shows up in the Facebook feeds.
Why? These are just recommendations, but in general think about the age of your audience, and what platforms they are more likely to be using.
Meta Pixel
Any retargeting pixel that exists may be selected here.
![]()
Payment Method
Add your payment method.
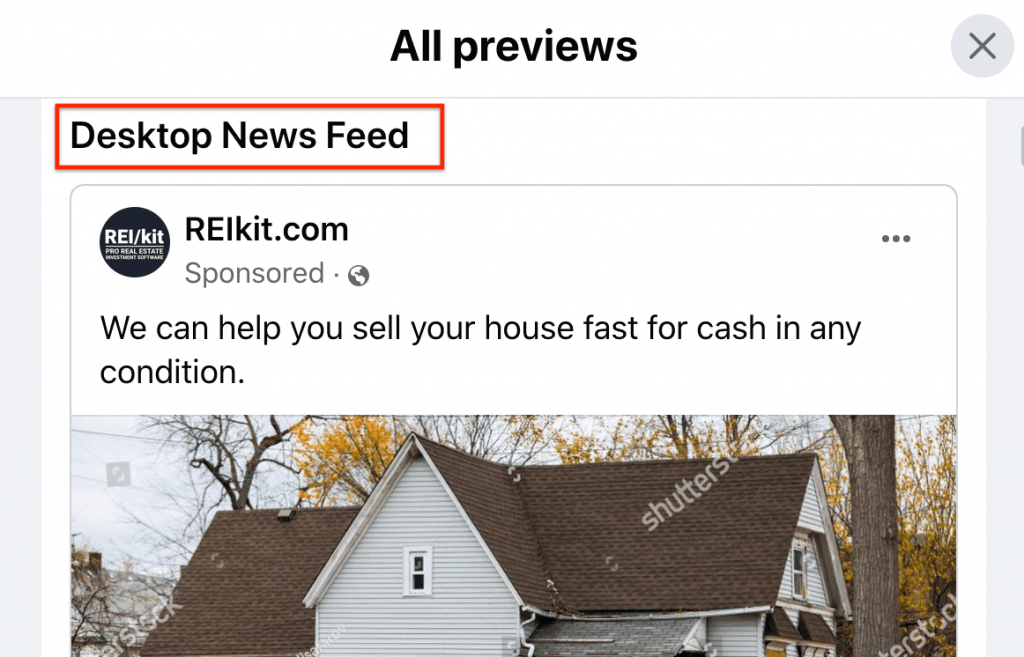
Ad Preview Options
Facebook gives you a number of digital places on which it advertises your ad, and you can switch the views for each of these as you work on your ad.
You would want to do this to see how your ad will appear on Desktop, Mobile, Desktop Right Column, Marketplace, Search, and so on:
Facebook-only placements are:
-Desktop right column
-Desktop News Feed
-Mobile News Feed
-Instant Articles
and more:
Send Ad for Approval
Double-check that your advertisement looks good in all placements, and that any errors have been resolved.
If all is the way you want it to display, click on the blue Promote now button at the bottom.
What happens next?
Your ad will then be reviewed by Facebook and you will be notified when your ad is has been approved.
This can take anywhere from a few minutes, up to a day.
Once your ad is approved it will start delivering the ad to the target custom audience that you selected, until the end date that you set in the budgeting and duration section.
The estimated link clicks will be just that, an estimate.
The key to remember is that while your website is optimized for conversions, this is still a numbers game.
Your ad’s targeting will determine your baseline for future improvement.
For example, if for every 100 clicks to your website you get 1 lead, then for your next ad, you will try to improve your targeting, to get 2 leads for every 100 clicks.
Now that you see how it all fits together, you can tackle more advanced techniques such as funnels, advanced custom audiences, and the Facebook retargeting pixel.
Interested in creating a Facebook Lead Ad that contains a Lead Form? Click this link for a tutorial on creating a Lead Ad directly from your Facebook page.
Wrapping Up
In this guide I walked you through the entire process of creating an ad through your Facebook Business Page, using just $10, by following easy steps.
You should now understand the basic mechanics of creating these ads and can start seeing how you might be able to use different audience targeting options to attract leads to your website.
About REI/kit
Looking for an all-in-one integrated real estate wholesaling and house flipping software?
REI/kit offers everything you need to:
-Generate skip-traced seller leads with the Lead Lists stacking tool and capture them with a website
-Import and/or skip trace your own contacts
-Automate reach out and follow up with direct mail postcards, text, ringless voicemail and email automation campaigns
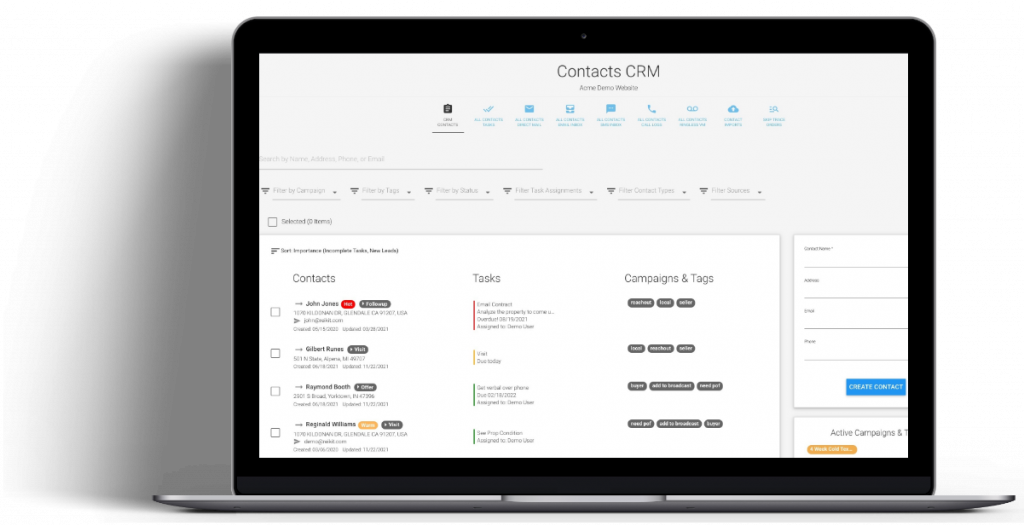
-Track your calls and campaign communications with a lead in one central place with a robust CRM
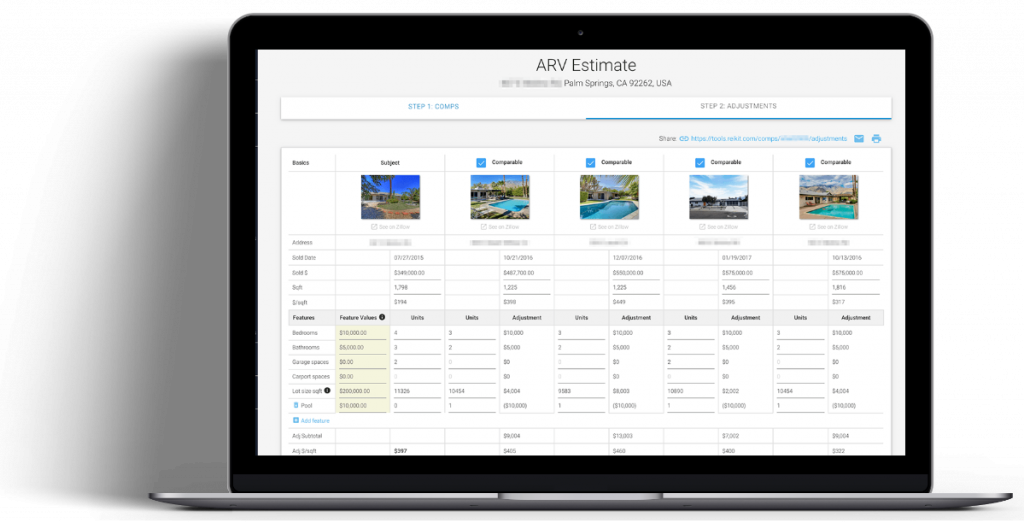
-Calculate accurate ARV with premium comps and deed data
-Market your deals to cash buyers, lenders, and other investors
Click here to find out more: REIkit Real Estate Wholesaling Software