Introduction #
This guide is intended to help you add contacts to a previously activated Campaign, so that the contacts will be sent the campaign sequence.
You can learn about creating an example campaign from beginning to end in the Guide: How to send an Absentee Owner Email Campaign.
When a contact is added to a campaign sequence, this is called subscribing them to a campaign.
There are five ways to subscribe contacts to a campaign sequence:
- Adding one Contact to a Campaign at a time
- Adding many Contacts to a Campaign at a time/in bulk
- Adding contacts to a campaign automatically from a form on your website
- Automatically moving contacts from one campaign to another when they reply to you
- Automatically moving contacts from one campaign to another when the first campaign ends
This guide covers the first 3. You can read about #4 and #5 in the Campaign Setup Guide.
Although most of the time you will add contacts to a campaign in bulk, I’ll first show you how to add contacts one at a time, so that you can get an understanding of the mechanics of a contact’s campaign subscription.
Adding a Contact to a Campaign One at a Time #
There are three main steps to adding a contact to a campaign individually.
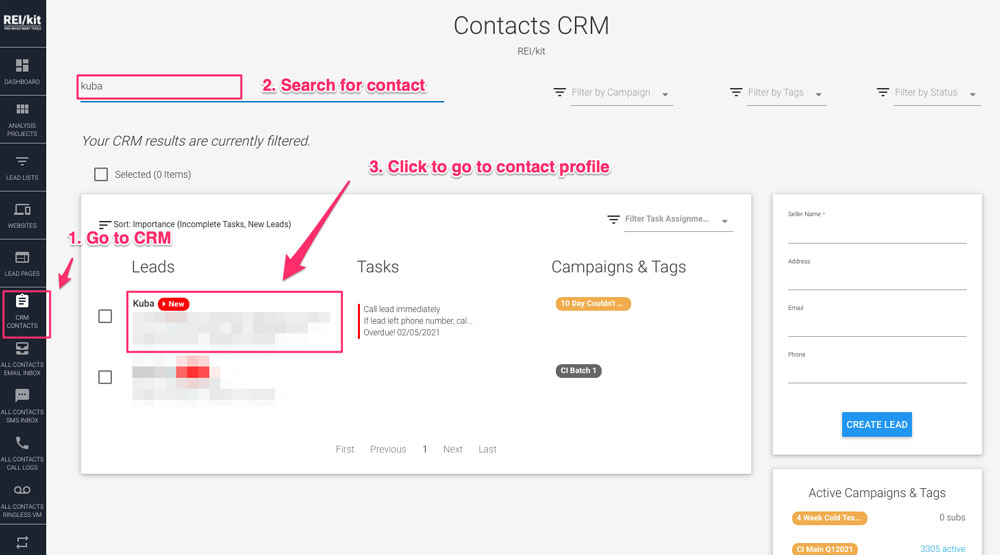
1) Search for the Contact in the CRM and go to Contact’s profile
2) Go to the Contact’s Campaign Subscriptions
3) Subscribe the Contact to the Campaign
Step 1: Search for the Contact in the CRM #
To go to the CRM, first click in the left-hand navigation on the CRM icon.
Once in the CRM, you can search for your contact by name, property address, email address or phone number.
When you find the contact, click on their name to open their individual profile.
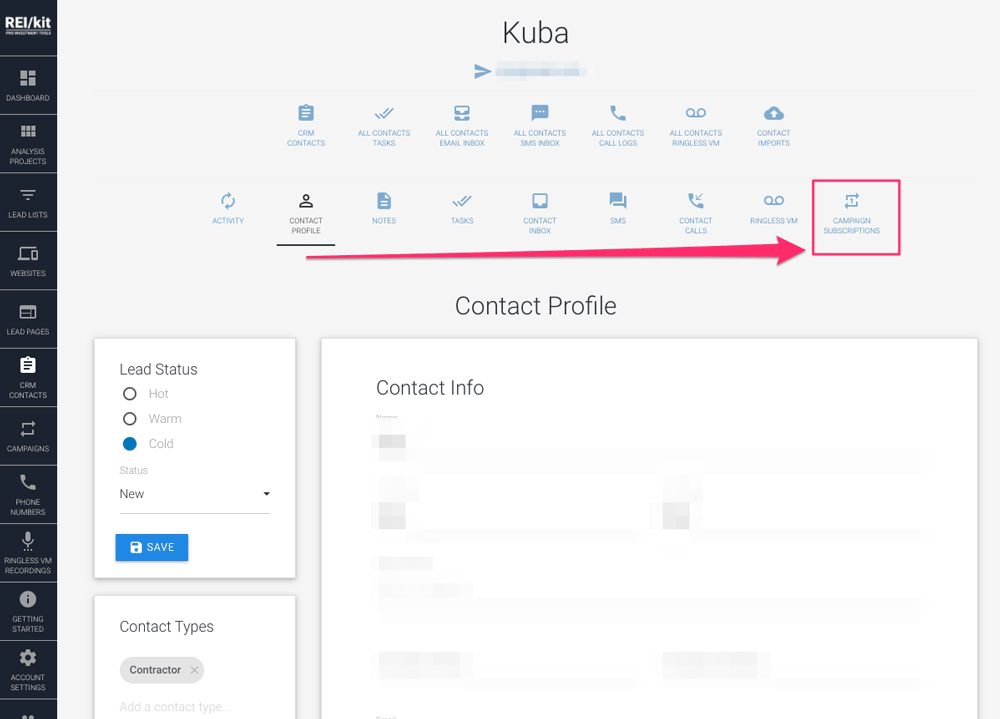
Step 2: Go to the Contact’s Campaign Subscriptions #
When you open the contact’s profile, look across the page so that you can click on the Campaign Subscriptions navigation item:
Step 3: Subscribe the Contact to the Campaign #
The Contact’s Campaign Subscriptions screen shows all of the Campaigns that a Contact is or has been subscribed to.
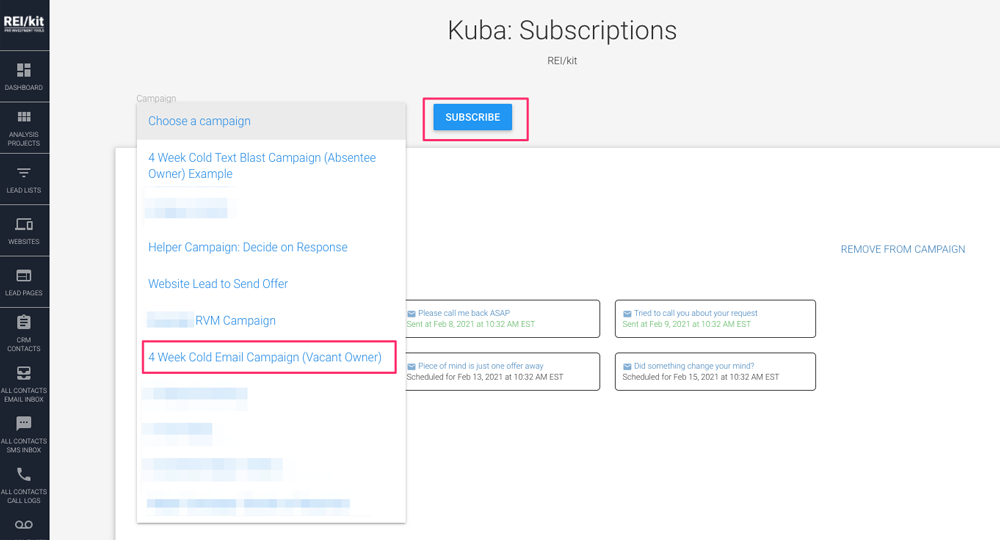
In order to add the contact to a Campaign, first choose a Campaign from the dropdown at the top of the Contact’s Campaign Subscriptions page.
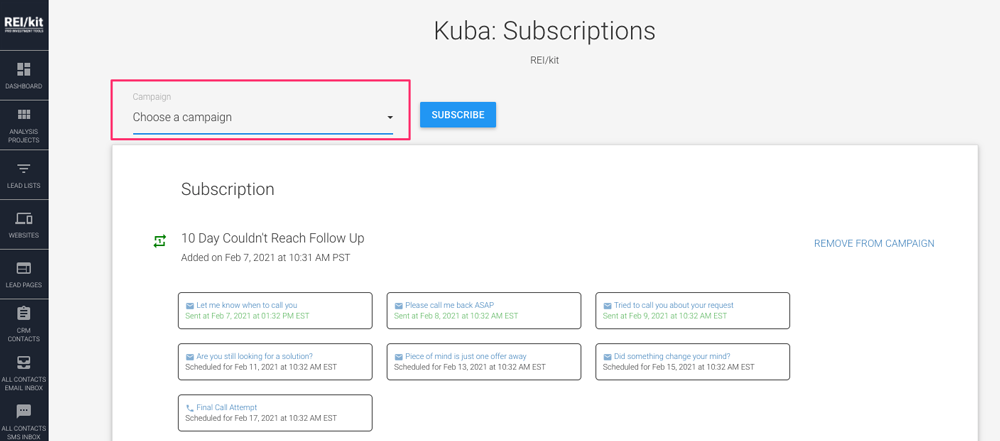
The dropdown will have all of the currently active campaign sequences that you have created.
If there is no dropdown, that means that you have not yet created and activated any Campaigns yet, and will need to complete that step first, by going to the Campaigns section in the left-hand navigation.
Assuming that you have created and activated at least one Campaign, you can select it from this dropdown.
When you click the SUBSCRIBE button, the contact will be subscribed to the campaign sequence.
This will schedule all of the sequence items from within that campaign based on their defined send order and configured delay of days between them. The items are added to this screen as bubbles indicating what kind of sequence item it is, and when it is scheduled to send.
The first item will be sent to the contact according to the Campaign’s send settings.
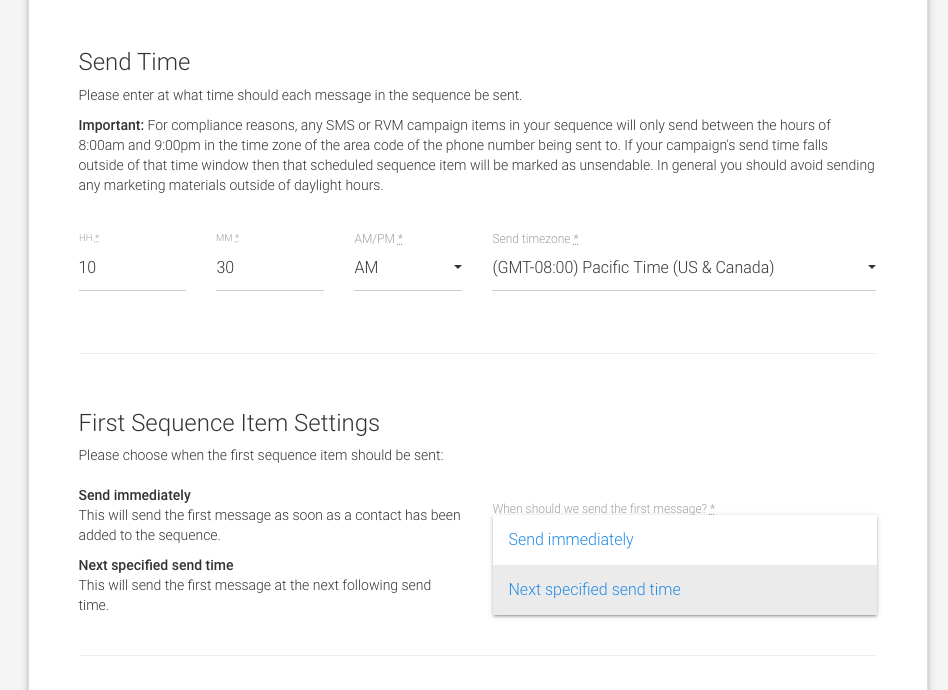
If the Campaign settings are set up to send the first sequence item immediately, then the contact will be sent that first sequence item as soon as they are subscribed to the Campaign.
On the other hand, if the Campaign is set up to send at the “Next specified send time” then the first sequence item won’t send until the next time that the Campaign send time occurs.
This means that if it is currently 12pm, and the send time is 10:30am, then the first sequence item won’t send until the following day at 10:30am.
Once all of the campaign sequence items have been sent to the subscriber, then the Campaign subscription will be marked as completed.
Removing a Contact’s Campaign Subscription #
If you made a mistake, or the contact has requested to be removed from the campaign, then on the Contact’s Campaign Subscriptions screen you can click on the “REMOVE FROM CAMPAIGN” link for the campaign that you would like to remove them from.
This will un-schedule any scheduled & unsent campaign items from being sent to the Contact.
Important Things to Consider #
There is no functionality currently available to pause and restart a campaign. If you were to try to do this by removing the subscription for a Contact and then adding it back, it would be considered a new subscription and the Contact would receive all of the campaign sequence items again.
A Contact cannot be subscribed to the same active campaign more than once, at the same time. If you try to add the Contact to a campaign that they’re already active on, the attempt will be ignored. However, if the Contact was subscribed to a specific campaign that you removed them from, or that has completed, you may subscribe them to that campaign again.
A Campaign Sequence can have Sequence Items of different types including Emails, SMS messages, Ringless Voicemails, and even Task assignments. Sequence items will only be sent to Contacts via the method that is available for the contact. As such, if your Contact has an Email address but does not have a phone number, but your sequence includes sequence items for both Email and SMS, then only the Email sequence items will be deliverable and therefore sent.
Metered usage only counts for sequence items that are sent.
If a sequence item was sent but not delivered, that does count against your metered usage.
Adding Contacts in Bulk #
Adding contacts in bulk allows you to send a blast to everyone on your list, or to contacts meeting a specific filtering criteria.
This is the primary method that you will use to add/subscribe Contacts to Campaigns.
The steps for subscribing contacts to a campaign in bulk are:
1) Filter your contacts in the CRM to identify the contact to send to
2) Use bulk tools to select and add the contacts to your campaign
Step 1: Filter your contacts in the CRM #
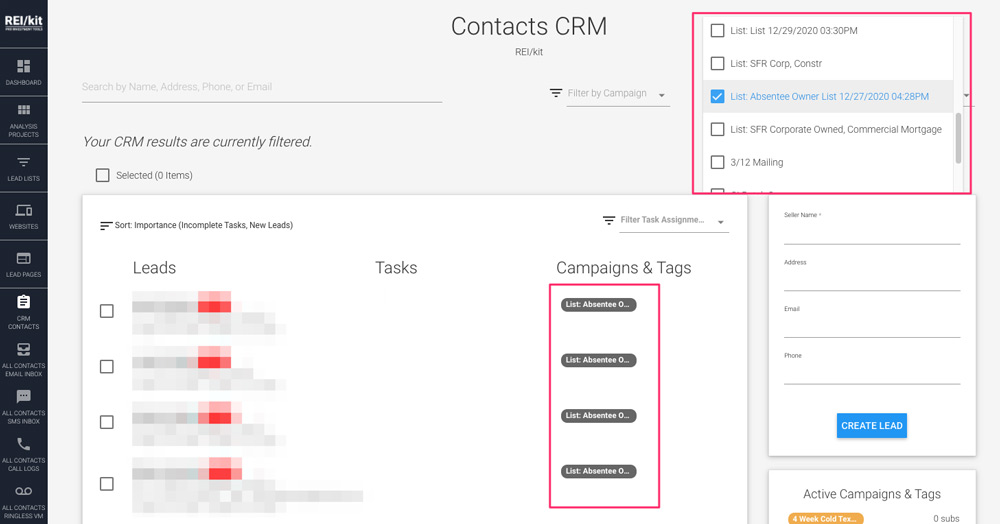
First, go to the CRM and filter your contacts to meet your send criteria.
The primary filtering mechanism in the CRM is Filtering by Tags as well as by Status.
For example, any lead lists that you have previously created are tagged with the name of the lead list.
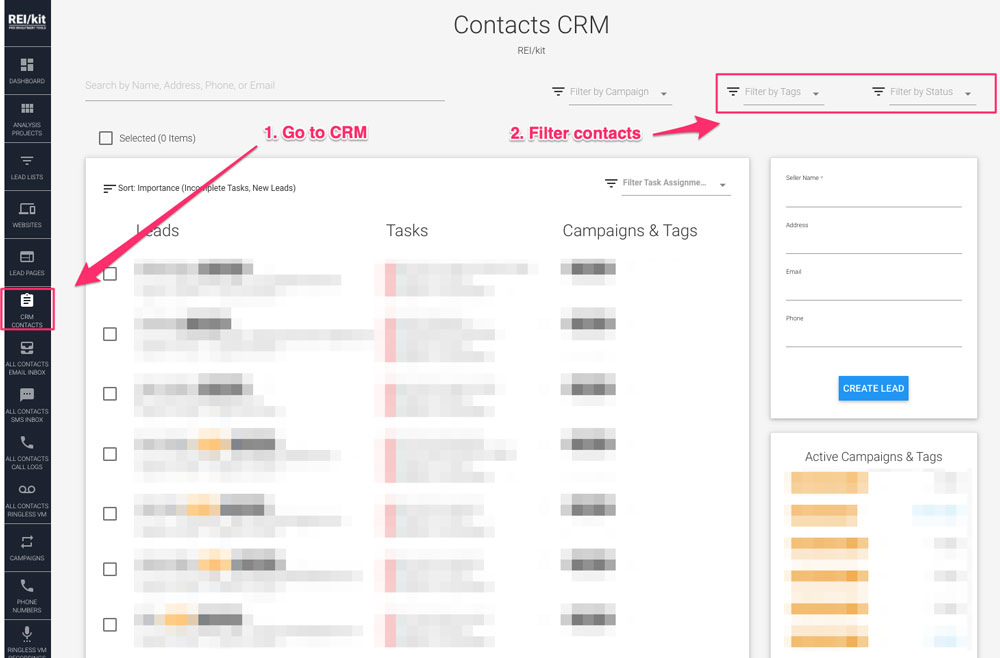
In this example we’ll select the filter for an Absentee Owner List. When you select the tag from the tag filter, the results of the CRM will only show Contacts that have that tag applied.
Step 2: Use Bulk tools to Select and Add Contacts to a Campaign #
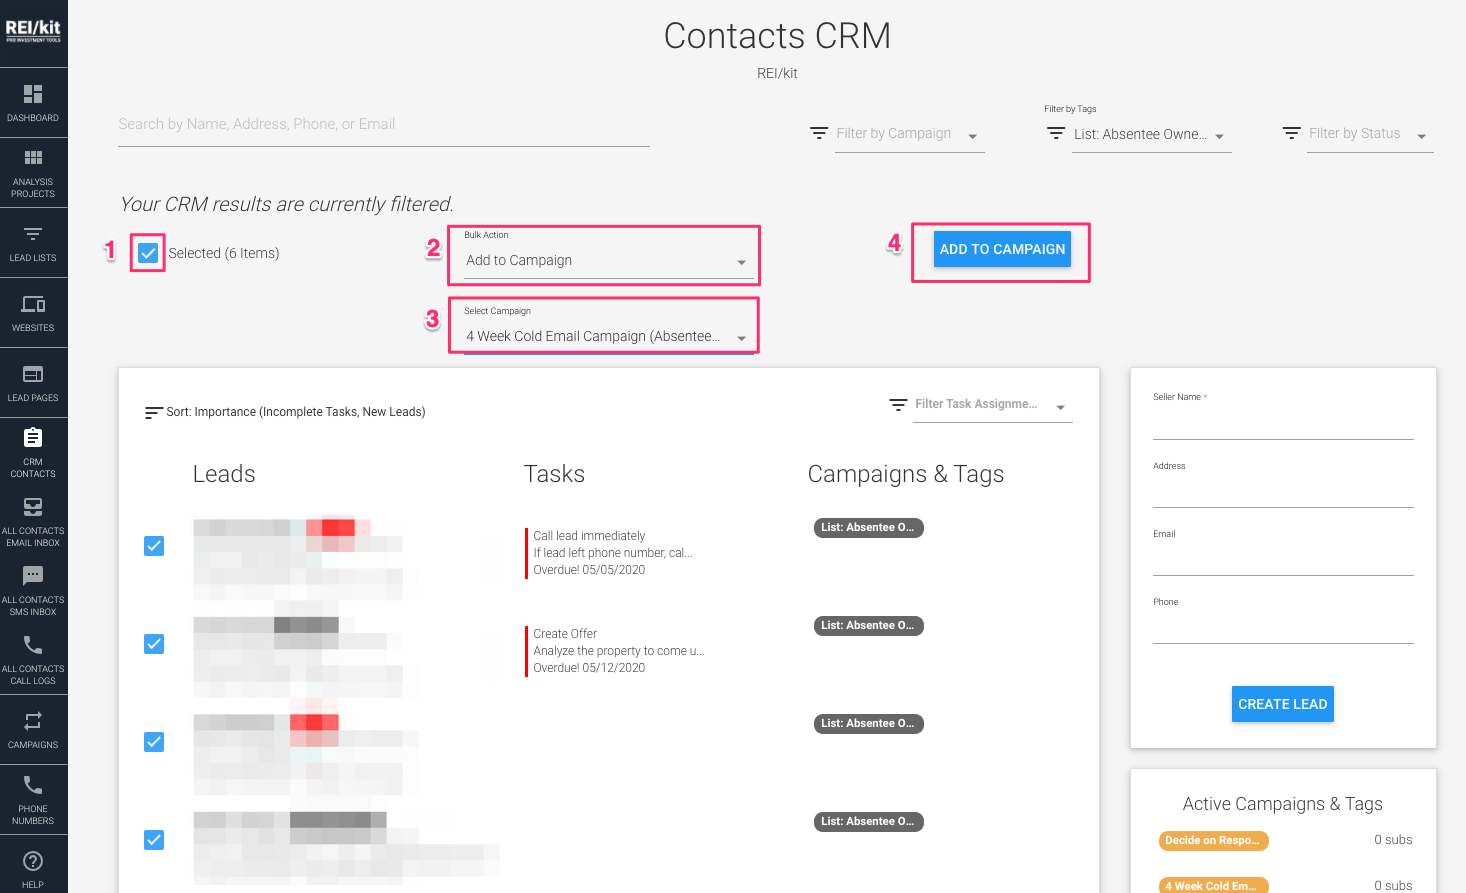
Now that all of your contacts are filtered, you can add them all to a campaign.
1) Click the Select all checkbox
2) Select “Add to Campaign” from the Bulk Action select
3) Select a Campaign that you created earlier. In our example the “4 Week Cold Email Campaign”
4) Click the “ADD TO CAMPAIGN” button to add your selected contacts to the campaign.
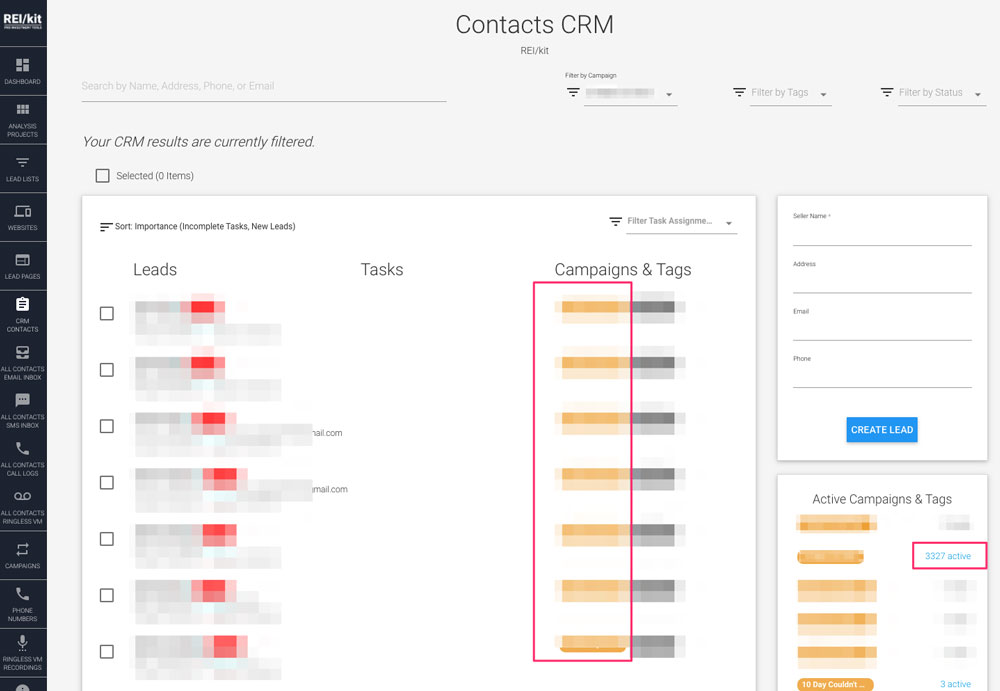
For bulk Campaign subscriptions, it may take a few minutes to process adding all of the selected Contacts to a campaign, so you may not see anything change on the screen immediately.
Once they are added and you refresh your screen, you will see each Contact with the appropriate yellow campaign tag. Furthermore, you will see the total number of active subscribers to that campaign update.
The Campaign Sequence items will be scheduled to send according to the Campaign’s send time settings, as described earlier.
That’s it. You have now scheduled the sending of your automated Campaign to your Contacts.
Bulk Removing Contacts From a Campaign #
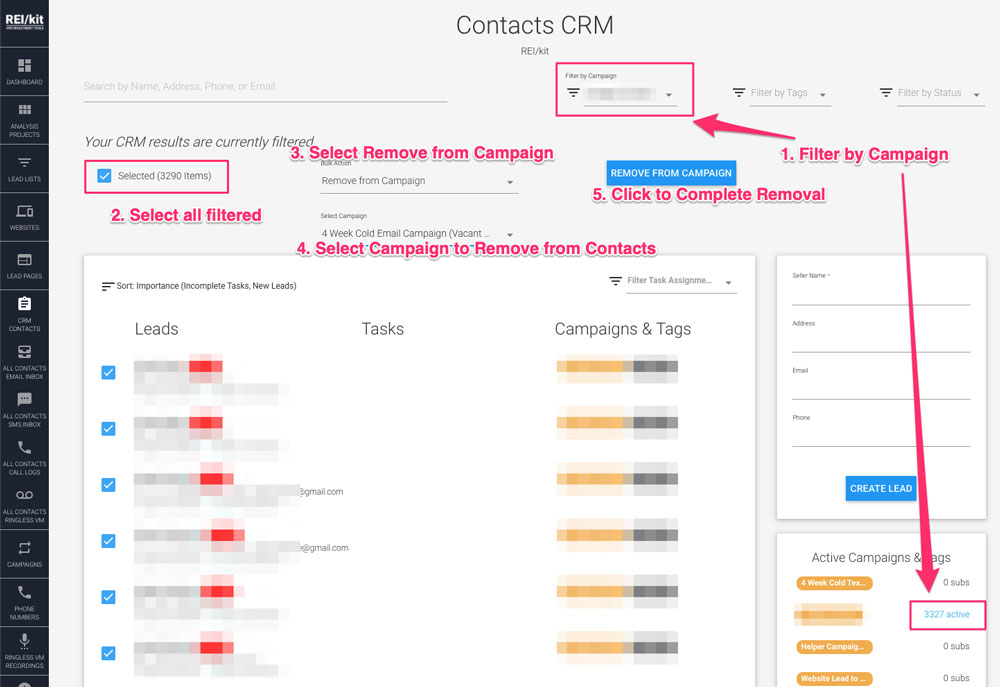
Similar to bulk subscribing Contacts to a Campaign, you can follow the same steps to remove the Contacts from the Campaign:
1) Filter your contacts, based on the Campaign
2) Click the Select All checkbox
3) Select the Remove from Campaign bulk action
4) Select the Campaign to remove
5) Click on “REMOVE FROM CAMPAIGN” to finish the bulk removal
Important Things to Consider #
Because, as described earlier, metered usage items are only counted for sequence items that are sent, you do not have to filter your list by “only people who have email addresses” for an Email campaign for example. For a Contact that does not have an email address, but who is subscribed to an Email campaign, no emails will be sent, and those scheduled items will not count against your metered usage.
Subscribing a Webform Lead to a Campaign #
The final way that Contacts can be automatically subscribed to a Campaign is if you have set up a form on your REI/kit website to automatically subscribe Contacts when they submit a lead form on your website.
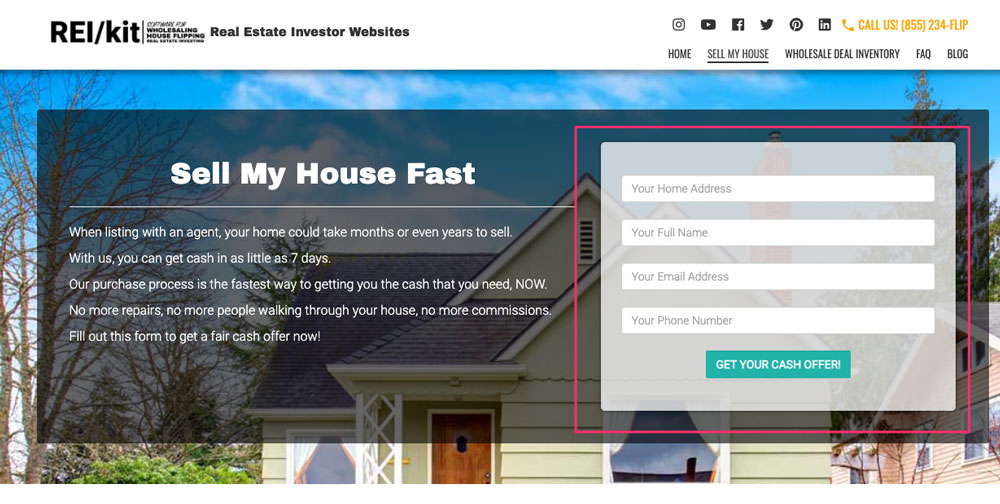
To accomplish this you will need to update your Seller Lead Form.
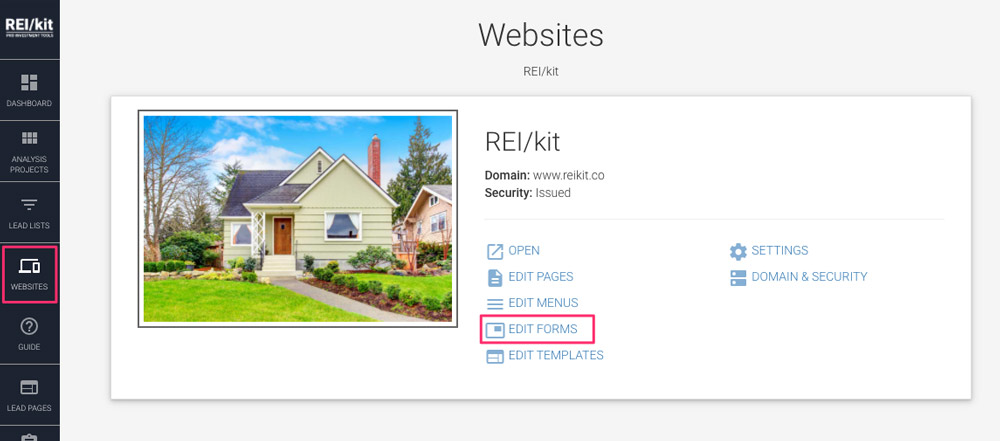
In the left hand navigation of REI/kit, go to your Websites section, then click “EDIT FORMS” for the specific website that you would like to configure.
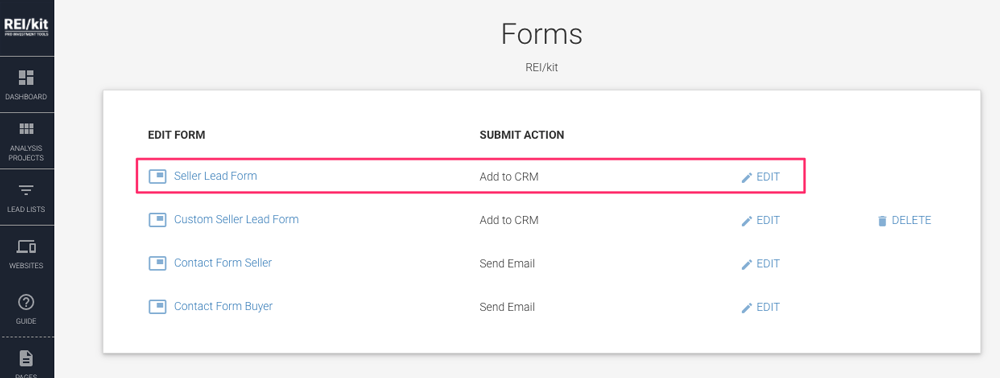
On the forms listing page, select the form that you would like to edit. By default, the Seller Lead Form is the one that your website is configured to display.
On the form edit screen, change the “Automatically subscribe to campaign” selection from “Do not subscribe to a campaign”
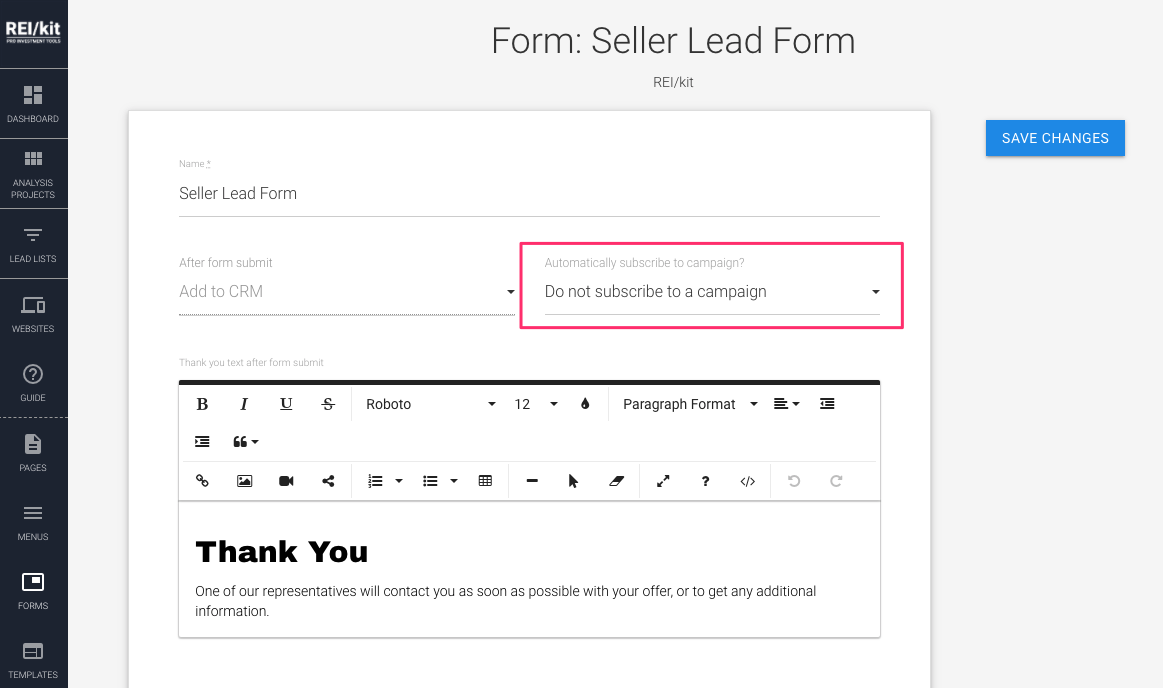
To an appropriate Campaign:

The best Campaign template for this use case is the “Website Lead to Send Offer” campaign template.
The blog post and video How to Automate Your Offer Emails to Motivated Sellers show this use case in action.